Sony HTSS360 Operating Instructions - Page 21
: Connecting the antennas, 6: Preparing the receiver and the remote - active standby
 |
UPC - 027242753938
View all Sony HTSS360 manuals
Add to My Manuals
Save this manual to your list of manuals |
Page 21 highlights
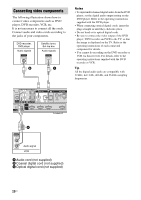
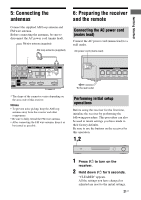
Getting Started 5: Connecting the antennas Connect the supplied AM loop antenna and FM wire antenna. Before connecting the antennas, be sure to disconnect the AC power cord (mains lead). FM wire antenna (supplied) AM loop antenna (supplied) 6: Preparing the receiver and the remote Connecting the AC power cord (mains lead) Connect the AC power cord (mains lead) to a wall outlet. AC power cord (mains lead) L L DIGITAL TV ANTENNA R R AUDIO IN AUDIO IN AUDIO IN COAX IN VIDEO 1 TV SA-CD/CD VIDEO 2 mA MAX HDMI BD IN DVD IN RT OPT IN SAT OPT IN SAT IN AM OUT * The shape of the connector varies depending on the area code of this receiver. Notes • To prevent noise pickup, keep the AM loop antenna away from the receiver and other components. • Be sure to fully extend the FM wire antenna. • After connecting the FM wire antenna, keep it as horizontal as possible. SPEAKERS FRONT R FRONT L SUR R SUR L CENTER To the wall outlet Performing initial setup operations Before using the receiver for the first time, initialize the receiver by performing the following procedure. This procedure can also be used to return settings you have made to their factory defaults. Be sure to use the buttons on the receiver for this operation. 1,2 ?/1 ACTIVE STANDBY INPUT SELECTOR MASTER VOLUME 1 Press ?/1 to turn on the receiver. 2 Hold down ?/1 for 5 seconds. "CLEARED" appears. All the settings you have changed or adjusted are reset to the initial settings. 21US
-
 1
1 -
2
-
3
-
4
-
5
-
6
-
7
-
8
-
9
-
10
-
11
-
12
-
13
-
14
-
15
-
 16
16 -
 17
17 -
 18
18 -
 19
19 -
 20
20 -
 21
21 -
 22
22 -
 23
23 -
 24
24 -
 25
25 -
 26
26 -
27
-
28
-
29
-
30
-
31
-
32
-
33
-
34
-
35
-
36
-
37
-
38
-
39
-
40
-
41
-
42
-
43
-
44
-
45
-
46
-
47
-
48
-
49
-
50
-
51
-
52
-
53
-
54
-
55
-
56
-
57
-
58
-
59
-
60
 |
 |
