Sony HVRMRC1K Operating Instructions - Page 10
Cache recording mode, To set cache recording, Interval recording mode, Setting the interval time - memory recorder
 |
UPC - 027242746770
View all Sony HVRMRC1K manuals
Add to My Manuals
Save this manual to your list of manuals |
Page 10 highlights
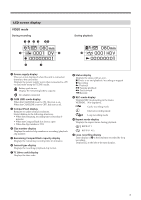
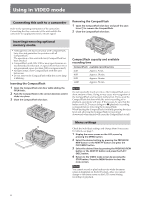
x Recording on this unit during camcorder tape replacement When connected to a camcorder that has an external REC control function, you can record video on this unit only while changing the tape of the camcorder. Camcorder 5 minutes before end of tape REC Changing the tape REC STANDBY REC STOP This unit STANDBY REC STANDBY 1 Press the CAM LINK button of this unit and set it to ON. 2 Set the [CAM LINK SEL] setting of this unit to [SYNCHRO]. 3 Set the [EXT REC CTRL] setting of the camcorder to [RELAY]. 4 Connect the camcorder to this unit via an i.LINK cable. 5 Press the REC START/STOP button of the camcorder to start recording. • When the remaining time of the tape is less than 5 minutes, the camcorder sends a command to this unit to start recording. • The recording by this unit can be stopped from the camcorder after changing the tape or by pressing the STOP button of this unit. • The noise of the tape change is recorded. • The above Step 3 is for the HVR-Z7/S270 series. For details on another camcorder you want to connect to this unit, refer to the operating instructions supplied with that camcorder. • For details on camcorders that have an "external REC control" function and on motion detection, refer to the "Guide to supported models and their functions" supplied with this unit. Notes • During RELAY recording, the cache recording cannot be operated. x Recording video from this unit You can use this unit to start or stop recording a video input signal from an i.LINK without linked operation to a device connected via i.LINK. Cache recording mode The most recent approximately maximum 14 seconds of video and audio captured by the camcorder are held in a buffer memory and automatically recorded when the recording button is pressed. To set cache recording Select [CACHE] from [REC MODE] on the menu screen. Notes • After cache recording, it may take about 30 seconds to write data of the cache part. Interval recording mode Records a series of videos at regular intervals. This function is useful to observe things like cloud movements or daylight changes. Only DVCAM/DV format is valid. Selecting an interval recording time Select [SETTING] t [INTERVAL] t [REC TIME] on the menu screen to set the time. You can select [0.5sec], [1sec], [1.5sec] or [2sec]. Setting the interval time Select [SETTING] t [INTERVAL] t [INT TIME] on the menu screen to set the time. You can select [30sec], [1min], [5min] or [10min]. Setting interval recording Select [INTERVAL] from [REC MODE] on the menu screen. LCD screen display in interval recording mode Remains on during recording and blinks during standby Camcorder STANDBY REC STANDBY This unit REC STANDBY REC STANDBY REC STANDBY 1 Press the CAM LINK button of this unit and set it to OFF. 2 Slide the REC button to start recording. 10
-
 1
1 -
2
-
3
-
4
-
 5
5 -
 6
6 -
 7
7 -
 8
8 -
 9
9 -
 10
10 -
 11
11 -
 12
12 -
 13
13 -
 14
14 -
 15
15 -
16
-
17
-
18
-
19
-
20
-
21
-
22
-
23
-
24
-
25
-
26
-
27
-
28
-
29
-
30
-
31
 |
 |
