Sony HVRMRC1K Operating Instructions - Page 4
Names of parts, Memory Recording Unit / i.LINK Cradle
 |
UPC - 027242746770
View all Sony HVRMRC1K manuals
Add to My Manuals
Save this manual to your list of manuals |
Page 4 highlights
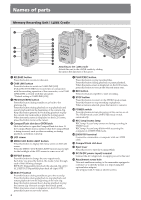
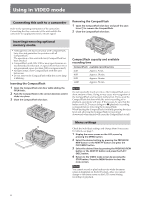
Names of parts Memory Recording Unit / i.LINK Cradle 1 qg 5 6 7 qf 2 qh 8 3 9 q; 4 qa qj qk qs qd Attaching to the i.LINK cradle Attach this unit to the i.LINK cradle by sliding the unit in the direction of the arrow. 1 RELEASE button Press this button to remove this unit. 2 CAM LINK button Press this button to switch to CAM LINK [ON] (FOLLOW/SYNCHRO) to record video in conjunction with the recording operation of the camcorder, or to CAM LINK [OFF] to record with this unit alone. * Default setting is CAM LINK [ON]. 3 PREVIOUS/REW button Press this button during standby to go back to the previous clip. Press this button during playback to stop playback and restart playback from the beginning of the current clip. Keep this button pressed down during playback to play the current clip backwards at triple the normal speed. When the menu screen is displayed on the LCD screen, press this button to move the cursor. 4 CompactFlash slot door OPEN latch Slide the button to open the CompactFlash slot door. If the CompactFlash door is opened while the CompactFlash is being accessed, such as when recording or during playback, operations will stop. 5 LCD screen 6 MENU/LCD BACK LIGHT button Press this button to display the menu screen on the LCD screen. Press the MENU/LCD BACK LIGHT button long enough for the backlight of the LCD screen to come on or off. 7 REPEAT button Press this button to change the auto repeat mode. Each time you press the button, the mode cycles through each of the following changes. REPEAT1 (Repeatedly plays back the selected clip only)/ ALL REPEAT (Repeatedly plays back all clips)/OFF 8 NEXT/FF button Press this button during standby to go to the next clip. Press this button during playback to stop playback and restart playback from the beginning of the next clip. Keep this button pressed down during playback to play the current clip forwards at triple the normal speed. When the menu screen is displayed on the LCD screen, press this button to move the cursor. 4 9 PLAY/EXEC button Press this button to play recorded files. Press this button during playback to pause playback. When the menu screen is displayed on the LCD screen, press this button to execute the selected menu item. q; REC button Press two buttons together to start recording. qa STOP button Press this button to return to the VIDEO mode screen. Press this button to stop recording or playback. When a menu is selected, press this button to cancel it. qs POWER switch Press this button to turn the power of this unit on or off. The VIDEO mode and COMPUTER mode switch automatically. qd REC lamp/Access lamp REC lamp/Access lamp comes on during recording in VIDEO mode. REC lamp/Access lamp blinks while accessing the computer in COMPUTER mode. qf HDV/DV terminal Connect to a camcorder or computer with an i.LINK cable. qg CompactFlash slot door qh Eject lever Press this lever to eject the CompactFlash. qj DC IN (DC power input) terminal Connect the AC adaptor etc. to supply power to this unit. qk Attachment screw hole This unit enables mounting to the camcorder equipped a cold shoe or to directly mount to a tripod using the optional shoe adaptor. Use a tripod with 5.5 mm or shorter screws.
-
 1
1 -
 2
2 -
 3
3 -
 4
4 -
 5
5 -
 6
6 -
 7
7 -
 8
8 -
 9
9 -
 10
10 -
11
-
12
-
13
-
14
-
15
-
16
-
17
-
18
-
19
-
20
-
21
-
22
-
23
-
24
-
25
-
26
-
27
-
28
-
29
-
30
-
31
 |
 |
