Sony KDE-61XBR950 Instructions - Page 29
KE-37XS910, KE-42XS910, KE-50XS910, KE-42M1, PDM-4210, PDM-5010
 |
View all Sony KDE-61XBR950 manuals
Add to My Manuals
Save this manual to your list of manuals |
Page 29 highlights
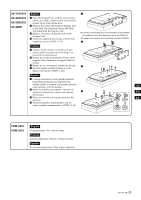
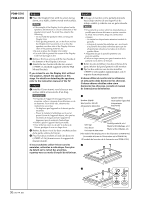
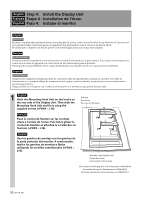
KE-37XS910 KE-42XS910 KE-50XS910 KE-42M1 English 1 Place the Display Unit, with its screen facing down, on a stable, cloth-covered work surface, at least 20 cm (8 in) off the floor. 2 Remove the screws that hold the Display Unit to the Table Top Stand and detach the Table Top Stand from the Display Unit. 3 Remove six screws on the rear side of the Display Unit. 4 Attach the supplied four hooks with the four supplied screws (+PSW5 × L16). 1 (The model of the Display Unit in the illustration is KE-37XS910.) (Le modèle d'écran de l'illustration est le KE-37XS910.) (El modelo del monitor de la ilustración es el KE-37XS910.) 2 Français 1 Installez l'écran tourné vers le bas sur une surface stable et recouverte d'un drap, à au moins 20 cm (8 po) du sol. 2 Retirez les vis qui maintiennent l'écran sur le support table et détachez le support table de l'écran. 3 Retirez les six vis situées à l'arrière de l'écran. 3 4 Fixez les quatre crochets fournis avec les quatre vis fournies (+PSW5 × L16). Español 1 Coloque el monitor con la pantalla mirando hacia abajo encima de una superficie de trabajo estable y cubierta con un paño situada, como mínimo, a 20 cm del piso. US 2 Retire los tornillos que sujetan el monitor al soporte de sobremesa y separe este soporte 4 FR del monitor. 3 Retire seis tornillos de la parte posterior del ES monitor. 4 Monte los ganchos suministrados con los cuatro tornillos suministrados (+PSW5 × L16). PDM-4210 PDM-5010 English No preparations. Go to the next step. Français Aucune préparation. Passez à l'étape suivante. Español No necesita preparación. Vaya al paso siguiente. (US, FR, ES) 29
-
 1
1 -
2
-
3
-
4
-
5
-
6
-
7
-
8
-
9
-
10
-
11
-
12
-
13
-
14
-
15
-
16
-
17
-
18
-
19
-
20
-
21
-
22
-
23
-
 24
24 -
 25
25 -
 26
26 -
 27
27 -
 28
28 -
 29
29 -
 30
30 -
 31
31 -
 32
32 -
 33
33 -
 34
34 -
35
-
36
-
37
-
38
-
39
-
40
-
41
-
42
-
43
-
44
 |
 |
