Sony KDL-40V2500 Operating Instructions - Page 33
Continued, Off, Low, High - power cord
 |
View all Sony KDL-40V2500 manuals
Add to My Manuals
Save this manual to your list of manuals |
Page 33 highlights
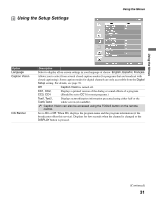
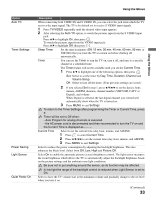
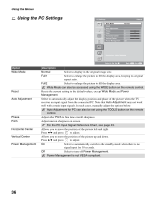
Using the Menus Using the Menus Option Auto YC Timer Settings Power Saving Light Sensor Quiet Power On Description When connecting both VIDEO IN and S VIDEO IN, you can select the jack from which the TV receives the input signal. The TV is by default set to receive S VIDEO input signals. 1 Press TV/VIDEO repeatedly until the desired video input appears. 2 After selecting the Auto YC option, to watch the pictures input from the S VIDEO input jack: Press V/v to highlight On, then press . To watch the pictures input from the VIDEO input jack: Press V/v to highlight Off, then press . Sleep Timer Set the time in minutes (Off, 15 min, 30 min, 45 min, 60 min, 90 min, or 120 min) that you want the TV to remain on before shutting off automatically. Timer You can use the Timer to turn the TV on, turn it off, and tune to a specific channel at a scheduled time. The Timer feature will not be available until you set the Current Time. 1 Press V/v to highlight one of the following options, then press . Set: Select to set the timer by Day, Time, Duration, Channel and Volume Setup. Off: Select to turn off the timer. (Your previous settings are saved.) 2 If you selected Set in step 1, press V/v/B/b to set the day(s), hour, minute, AM/PM, duration, channel number (VHF/UHF, CATV or Digital), and volume. When Digital is selected, the last digital channel you viewed will automatically show when the TV is turned on. 3 Press MENU to exit Settings. To return to the Timer Settings after programming the Timer or Current Time, press B. Timer will be set to Off when: - Auto Program for analog channels is executed. - the AC power cord is disconnected and then reconnected to turn the TV on and the Current Time is displayed as --:-- --. Current Time Select to set the current time (day, hour, minute, and AM/PM). 1 Press to select Current Time. 2 Press V/v/B/b to set the current time (day, hour, minute, and AM/PM). 3 Press MENU to exit Settings. Select to reduce the power consumption by adjusting the backlight brightness. This also enhances the black level. Select from Off, Low, High and Picture Off. Select On to enable the automatic picture (screen) brightness control. The light sensor measures the room brightness which allows the TV to automatically adjust the backlight brightness based on the picture settings and the ambient room light conditions. Be sure not to put anything around the sensor, as its function may be affected. In low light the range of the backlight control is reduced when Light Sensor is set to On. Select to have the TV volume start at the minimum volume and gradually change to the set level when you turn it on. (Continued) 33
-
 1
1 -
2
-
3
-
4
-
5
-
6
-
7
-
8
-
9
-
10
-
11
-
12
-
13
-
14
-
15
-
16
-
17
-
18
-
19
-
20
-
21
-
22
-
23
-
24
-
25
-
26
-
27
-
 28
28 -
 29
29 -
 30
30 -
 31
31 -
 32
32 -
 33
33 -
 34
34 -
 35
35 -
 36
36 -
 37
37 -
 38
38 -
39
-
40
-
41
-
42
-
43
-
44
-
45
-
46
-
47
-
48
 |
 |