Sony KDL-40V2500 Operating Instructions - Page 36
Using the PC Settings, For the PC Input Signal Reference Chart, see - standby 3
 |
View all Sony KDL-40V2500 manuals
Add to My Manuals
Save this manual to your list of manuals |
Page 36 highlights
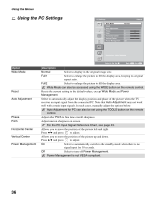
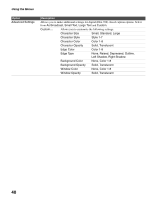
Using the Menus Using the PC Settings PC Settings Wide Mode Reset Auto Adjustment Phase Pitch Horizontal Center Vertical Center Power Management Normal 0 0 0 0 Off Video 8 Option Wide Mode Reset Auto Adjustment Phase Pitch Horizontal Center Vertical Center Power Management A Resolution: 1024x 768/60Hz D Select: Set: Back: RETURN Exit: MENU Description Normal Select to display in the original image size. Full1 Select to enlarge the picture to fill the display area, keeping its original aspect ratio. Full2 Select to enlarge the picture to fill the display area. Wide Mode can also be accessed using the WIDE button on the remote control. Resets the current setting to the default values, except Wide Mode and Power Management. Select to automatically adjust the display position and phase of the picture when the TV receives an input signal from the connected PC. Note that Auto Adjustment may not work well with certain input signals. In such cases, manually adjust the options below. Auto Adjustment for PC can also be set using the TOOLS button on the remote control. Adjust after Pitch to fine tune overall sharpness. Adjust uneven sharpness on screen. For the PC Input Signal Reference Chart, see page 43. Allows you to move the position of the picture left and right. Press B/b and press to adjust. Allows you to move the position of the picture up and down. Press V/v and press to adjust. On Select to automatically switch to the standby mode when there is no signal input for 30 seconds. Off Select to turn off Power Management. Power Management is not VESA-compliant. 36
-
 1
1 -
2
-
3
-
4
-
5
-
6
-
7
-
8
-
9
-
10
-
11
-
12
-
13
-
14
-
15
-
16
-
17
-
18
-
19
-
20
-
21
-
22
-
23
-
24
-
25
-
26
-
27
-
28
-
29
-
30
-
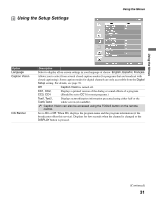 31
31 -
 32
32 -
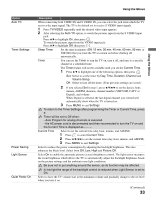 33
33 -
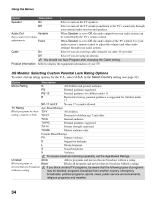 34
34 -
 35
35 -
 36
36 -
 37
37 -
 38
38 -
 39
39 -
 40
40 -
 41
41 -
42
-
43
-
44
-
45
-
46
-
47
-
48
 |
 |
