Sony KLHW26 Operating Instructions - Page 40
Side Panel
 |
UPC - 027242238817
View all Sony KLHW26 manuals
Add to My Manuals
Save this manual to your list of manuals |
Page 40 highlights
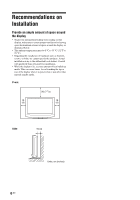
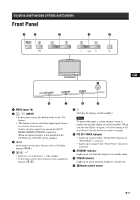
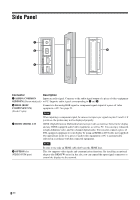
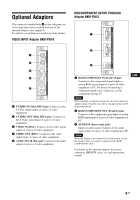
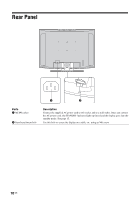
Side Panel RGB/COMPONENT IN AUDIO IN COM MON AUDIO OPTION (VIDEO/COM) HD 15 1 IN 2 IN Connector Description 1 AUDIO (COMMON Inputs an audio signal. Connects to the audio signal output of a piece of video equipment AUDIO IN) (Stereo mini jack) or PC. Supports audio signals corresponding to 2 and 3. 2 HD15 (RGB/ COMPONENT IN) (D-sub 15-pin) Connects to the analog RGB signal or component signal output of a piece of video equipment or PC. See page 29. Note When inputting a component signal, be sure not to input sync signals to pins 13 and 14. If you do so, the picture may not be displayed properly. 3 HDMI 1/HDMI 2 IN HDMI (High-Definition Multimedia Interface) provides an interface between the display and any HDMI-equipped audio/video equipment, as well as PC. You can enjoy enhanced or high-definition video, and two-channel digital audio. You can also connect a piece of DVI-equipped equipment to your display by using an HDMI-to-DVI cable (not supplied). The appropriate mode for a piece of audio/video equipment or PC is automatically selected in accordance with the connected equipment. 4 OPTION slot (VIDEO/COM port) Note Be sure to use only an HDMI cable that bears the HDMI logo. This slot supports video signals and communication functions. By installing an optional adaptor (the BKM-FW series) in this slot, you can expand the input signal connectors or control the display via the network. 8 GB
-
 1
1 -
2
-
3
-
4
-
5
-
6
-
7
-
8
-
9
-
10
-
11
-
12
-
13
-
14
-
15
-
16
-
17
-
18
-
19
-
20
-
21
-
22
-
23
-
24
-
25
-
26
-
27
-
28
-
29
-
30
-
31
-
32
-
33
-
34
-
 35
35 -
 36
36 -
 37
37 -
 38
38 -
 39
39 -
 40
40 -
 41
41 -
 42
42 -
 43
43 -
 44
44 -
 45
45 -
46
-
47
-
48
-
49
-
50
-
51
-
52
-
53
-
54
-
55
-
56
-
57
-
58
-
59
-
60
-
61
-
62
-
63
-
64
-
65
-
66
-
67
-
68
-
69
-
70
-
71
-
72
-
73
-
74
-
75
-
76
-
77
-
78
-
79
-
80
-
81
-
82
-
83
-
84
-
85
-
86
-
87
-
88
-
89
-
90
-
91
-
92
-
93
-
94
-
95
-
96
-
97
-
98
-
99
-
100
-
101
-
102
-
103
-
104
-
105
-
106
-
107
-
108
-
109
-
110
-
111
-
112
-
113
-
114
-
115
-
116
-
117
-
118
-
119
-
120
-
121
-
122
-
123
-
124
-
125
-
126
-
127
-
128
-
129
-
130
-
131
-
132
-
133
-
134
-
135
-
136
-
137
-
138
-
139
-
140
-
141
-
142
-
143
-
144
-
145
-
146
-
147
-
148
-
149
-
150
-
151
-
152
-
153
-
154
-
155
-
156
-
157
-
158
-
159
-
160
-
161
-
162
-
163
-
164
-
165
-
166
-
167
-
168
-
169
-
170
-
171
-
172
-
173
-
174
-
175
-
176
-
177
-
178
-
179
-
180
-
181
-
182
-
183
-
184
-
185
-
186
-
187
-
188
-
189
-
190
-
191
-
192
-
193
-
194
-
195
-
196
-
197
-
198
-
199
-
200
-
201
-
202
-
203
-
204
-
205
-
206
-
207
-
208
-
209
-
210
-
211
-
212
-
213
-
214
-
215
 |
 |
