Sony MHC-771 Operating Instructions - Page 18
Recording a CD, Specifying Track, Order program edit, Recording From the, Radio
 |
View all Sony MHC-771 manuals
Add to My Manuals
Save this manual to your list of manuals |
Page 18 highlights
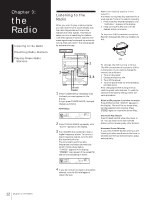
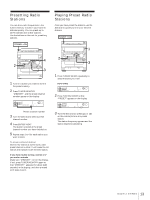
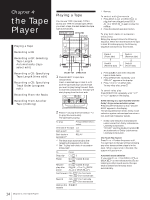
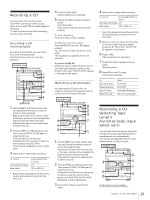
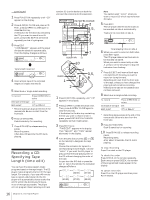
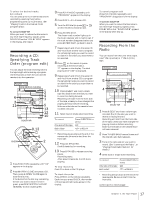
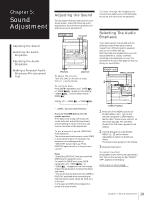
To select the desired tracks beforehand You can place priority on some tracks to be recorded by selecting them before programming (only up to 20 tracks). See "Playing Tracks in the Desired Order (program play)". To activate DOLBY NR When you want to reduce the hiss noise in low-level high-frequency signals, press DOLBY NR so that "DOLBY NR B" appears in the display after step 8. Recording a CD: Specifying Track Order (program edit) You can adjust the total recording time to the tape length while making a program. Use the buttons on both the unit and the remote to do this operation. POWERnON DISC SKIP EX-CHANGE π 2 6 4 1 3 11 5 13 12 10 DOLBY NR CHECK 1 8,13 5 2 1 Press FUNCTION repeatedly until "CD" appears in the display. 2 Press § OPEN/CLOSE and place a CD. Then, press § OPEN/CLOSE again to close the disc tray. If the button for the disc tray containing the CD you want to record is not lit green, press DISC SKIP EX-CHANGE repeatedly so that it lights green. 3 Press PLAY MODE repeatedly until "PROGRAM" appears in the display. 4 Press DISC 1 - 3 to choose a CD. 5 Turn the JOG dial (or press or on the remote) to choose a track. 6 Press ENTER/NEXT. The chosen track number lights up in the music calendar and is memorized. If the track number disappears before you press ENTER/NEXT, go back to step 5. 7 Repeat steps 5 and 6 from the same CD and 4 to 6 from another CD to program the remaining tracks you want to record on side A in the order you want them to be recorded. 8 Press on the remote to pause recording at the end of side A. "P" appears in the display. The total playing time "0.00" is displayed. 9 Repeat steps 5 and 6 from the same CD and 4 to 6 from another CD to program the remaining tracks you want to record on side B in the order you want them to be recorded. 10 Press § EJECT and insert a blank tape into deck B with the side you want to record on facing forward. Recording will start from the front side of the tape, unless you have changed the playing direction before recording. Make sure the tabs on the cassette have not been removed. 11 Select dual or single-sided recording. To record One side of the tape Both sides* Press DIRECTION to select A ß or RELAY * Recording always stops at the end of the reverse side. Be sure to start from the front side. 12 Press CD SYNCHRO. Deck B stands by for recording. 13 Press ∏ PAUSE to release recording pause. Recording starts. After about 10 seconds, the CD starts playing. To stop recording Press π on deck or the CD player. To check the order Press CHECK on the remote repeatedly. Each time you press CHECK, the number of the programmed tracks appear in the display. To cancel program edit Press PLAY MODE repeatedly until "PROGRAM" disappears from the display. To activate DOLBY NR When you want to reduce the hiss noise in low-level high-frequency signals, press DOLBY NR so that "DOLBY NR B" appears in the display after step 11. Recording From the Radio You can record from the tuner onto a tape. Use TYPE I (normal) or TYPE II (CrO2) tape. POWERnON 5 2 EN 4 6 1 DOLBY NR π 1 Press § EJECT and insert a blank tape into deck B with the side you want to record on facing forward. Recording will start from the front side of the tape, unless you have changed the playing direction before recording. Make sure the tabs on the cassette have not been removed. 2 Press TUNER/BAND several times until the desired radio band appears. 3 Tune in the radio station you want to record. (See "Listening to the Radio", or "Playing Preset Radio Stations" for details.) 4 Select dual or single-sided recording. To record One side of the tape Both sides* Press DIRECTION to select A ß or RELAY * Recording always stops at the end of the reverse side. Be sure to start from the front side. continue to next page 17 Chapter 4: the Tape Player
-
 1
1 -
2
-
3
-
4
-
5
-
6
-
7
-
8
-
9
-
10
-
11
-
12
-
 13
13 -
 14
14 -
 15
15 -
 16
16 -
 17
17 -
 18
18 -
 19
19 -
 20
20 -
 21
21 -
 22
22 -
 23
23 -
24
-
25
-
26
-
27
-
28
-
29
-
30
-
31
-
32
 |
 |