Sony MHC-771 Operating Instructions - Page 29
Maintenance
 |
View all Sony MHC-771 manuals
Add to My Manuals
Save this manual to your list of manuals |
Page 29 highlights
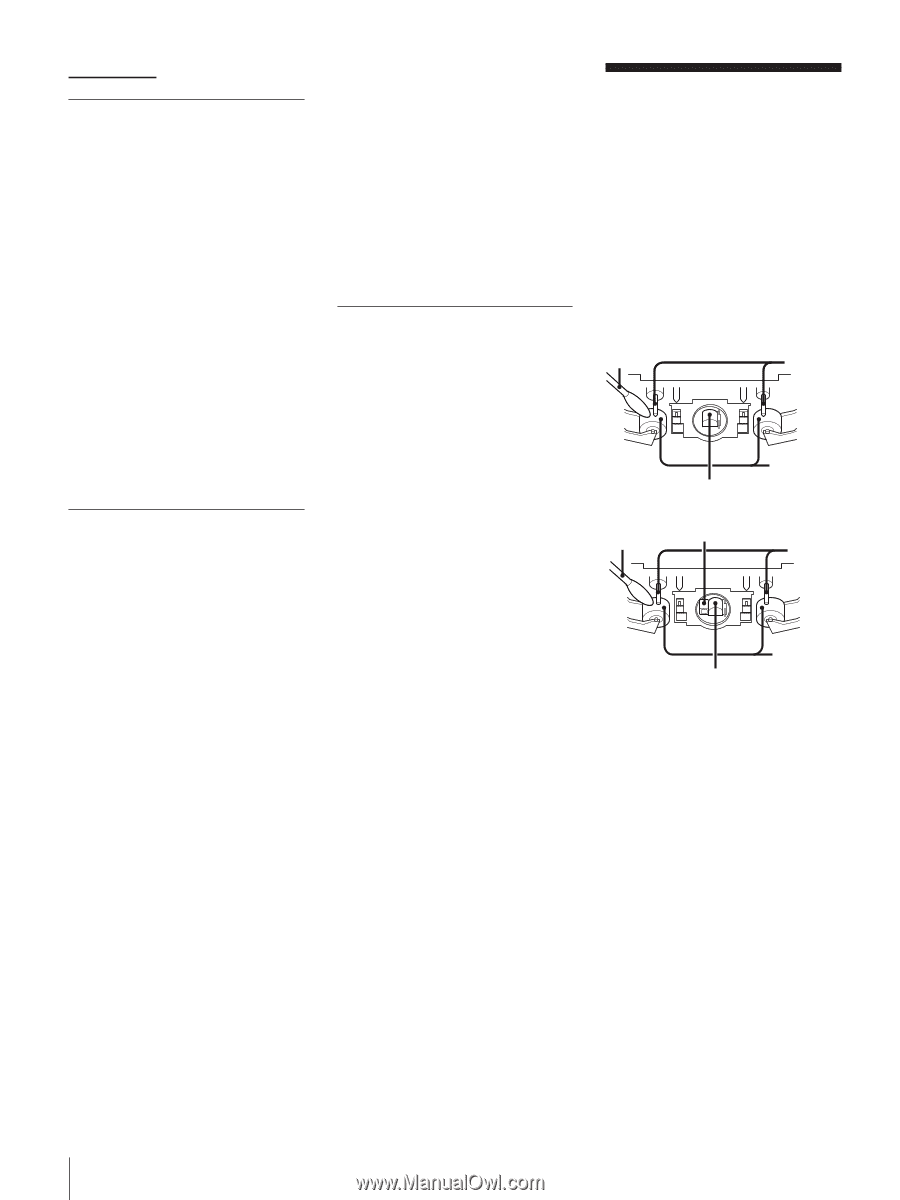
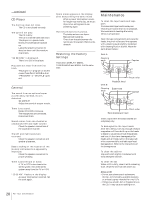
continued CD Player The disc tray does not close. The CD is not placed correctly. The CD will not play. The CD is dirty. The CD is inserted label side down. The player is in pause mode. Moisture condensation has built up. Leave the system turned on for about an hour until the moisture evaporates. "CD NO DISC" is displayed. There is no CD in the player. Play does not start from the first track. The player is in program or shuffle mode. Press PLAY MODE so that "PROGRAM" or "SHUFFLE" goes out. EN General The sound from an optional super woofer (Sony SA-W10, etc.) is distorted. Set DBFB off Adjust the sound of a super woofer. There is no sound. Rotate VOLUME clockwise. The headphones are connected. Disconnect them. Sound comes from one channel or unbalanced left and right volume. Check the speaker connections of the inoperative channel. The left and right sound are reversed. Check the speaker connection and speaker placement. Bass is lacking or the location of the musical instruments is apparently imprecise. Check the speaker connection for proper phasing. There is severe hum or noise. A TV or VCR is too close to the stereo system. Move the stereo system away from the TV or VCR. "12:00 AM" flashes in the display. A power interruption occurred. Set the clock again. Demo mode appears in the display after deactivating the demo mode. When a power interruption occurs for longer than half a day, set music clips, timer settings and tuner presetting again. The remote does not function. The batteries have run down. Replace both batteries. There is an obstacle between the remote and the system. Remove the obstacle. Restoring the Factory Settings Hold down DISPLAY/DEMO, TUNER/BAND and MENU 3 at the same time. Maintenance To clean the tape heads and tape path Contaminated tape heads cause poor recording or sound drop-out in playback. We recommend cleaning after every 10 hours of operation. Open the tape compartment and wipe the heads, the pinch rollers and the capstans with a cleaning swab slightly moistened with cleaning fluid or alcohol. Wipe the parts shown below: Deck A Cleaning swab Capstan Deck B Cleaning swab Playback head Erase head Pinch roller Capstan Erase head Pinch roller Record/playback head Insert a tape when the areas cleaned are completely dry. To demagnetize the tape heads After 20 to 30 hours of use, enough residual magnetism will have built up on the heads to begin to cause loss of high frequencies and hiss. At this time, demagnetize the heads and all metal parts in the tape path with a commercially available tape head demagnetizer. Refer to the instructions of the demagnetizer. To clean the cabinet Use a soft cloth slightly moistened with mild detergent solution. To clean the CD When a CD is dirty, clean it with a cleaning cloth. Wipe the CD from the center out. Notes on CD •Do not use solvents such as benzene, thinner, commercially available cleaners, or antistatic spray intended for vinyl LPs. •If there is a scratch, dirt or fingerprints on the CD, it may cause a tracking error. 28 For Your Information
-
 1
1 -
2
-
3
-
4
-
5
-
6
-
7
-
8
-
9
-
10
-
11
-
12
-
13
-
14
-
15
-
16
-
17
-
18
-
19
-
20
-
21
-
22
-
23
-
 24
24 -
 25
25 -
 26
26 -
 27
27 -
 28
28 -
 29
29 -
 30
30 -
 31
31 -
 32
32
 |
 |