Sony MHC-MDX10 Operating Instructions - Page 9
Audio Input L/r Jacks, Rec To Tape
 |
View all Sony MHC-MDX10 manuals
Add to My Manuals
Save this manual to your list of manuals |
Page 9 highlights
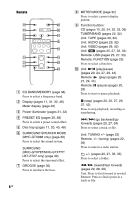
Guide to parts and controls K PUSH Z OPEN/CLOSE (page 29) Press to insert or eject a tape. Tape deck (pages 29, 36, 40, 47) L REC TO TAPE (page 37) Press to record onto a tape. REC TIMER (page 40) Press to set the Recording Timer. REC TO USB (page 24) Press to transfer onto the connected optional USB device. M FLANGER (pages 31, 43, 47) DELAY (pages 31, 43, 47) CHORUS (pages 31, 43, 47) SOUND FLASH (page 31) Press to create a party atmosphere. N Unit: MASTER VOLUME (pages 20, 27, 29, 42) Turn to adjust the volume. Remote: VOLUME +/-* (pages 20, 27, 29, 42) Press to adjust the volume. * The VOLUME + button has a tactile dot. Use the tactile dot as a reference when operating the system. O MIC (jack) (pages 39, 42, 52) Connect an optional microphone. MIC LEVEL (pages 37, 39, 42) Turn to adjust the microphone volume. P (indicator) Lights up when transferring to the connected optional USB device, or when erasing audio files or folders. (USB) port (pages 23, 25, 27, 46, 52) Connect an optional USB device. Q AUDIO INPUT L/R (jacks) (page 29) Connect to an audio component (Portable audio player, etc.). R PHONES (jack) (pages 42, 52) Connect the headphones. S ENTER (pages 20, 27, 30, 31, 34, 35, 38) Press to enter the selection. T RETURN (page 20) Press to return to the parent folder. Press to exit search mode. U ERASE (page 25) Press to erase audio files or folders on the connected optional USB device. Continued l 9GB
-
 1
1 -
2
-
3
-
 4
4 -
 5
5 -
 6
6 -
 7
7 -
 8
8 -
 9
9 -
 10
10 -
 11
11 -
 12
12 -
 13
13 -
 14
14 -
15
-
16
-
17
-
18
-
19
-
20
-
21
-
22
-
23
-
24
-
25
-
26
-
27
-
28
-
29
-
30
-
31
-
32
-
33
-
34
-
35
-
36
-
37
-
38
-
39
-
40
-
41
-
42
-
43
-
44
-
45
-
46
-
47
-
48
-
49
-
50
-
51
-
52
-
53
-
54
-
55
-
56
-
57
-
58
-
59
-
60
 |
 |
