Sony PCGA-DDRW2 Operating Instructions 1
Sony PCGA-DDRW2 Manual
 |
View all Sony PCGA-DDRW2 manuals
Add to My Manuals
Save this manual to your list of manuals |
Sony PCGA-DDRW2 manual content summary:
- Sony PCGA-DDRW2 | Operating Instructions 1 - Page 1
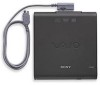
DVD±RW Drive PCGA-DDRW2 Operating Instructions / Mode d´émploi S400 - Sony PCGA-DDRW2 | Operating Instructions 1 - Page 2
servicing to qualified personnel only. For customers in Canada This Class B digital apparatus complies with Canadian ICES-003. Before using the PCGA-DDRW2, be sure to read the End User Software License Agreement that accompanies it. • Copyright laws prohibit reproducing the software or the manual - Sony PCGA-DDRW2 | Operating Instructions 1 - Page 3
original CDs and DVDs. If you have any questions regarding copyright laws or the terms of the End-user Software License, please consult the appropriate legal experts. • Operation of this drive with software other than that provided is not covered by the warranty. In this manual, Microsoft® Windows - Sony PCGA-DDRW2 | Operating Instructions 1 - Page 4
when writing data ...... 31 Playing an Audio CD 35 Playing a DVD video 35 Notes about playing DVD video ... 35 Notes about DVD video discs ....... 36 Performing a System Recovery on a Notebook 37 Precautions 38 Maintenance 39 Getting Help 40 Specifications 41 Troubleshooting 43 4 GB - Sony PCGA-DDRW2 | Operating Instructions 1 - Page 5
Overview This product is a DVD±RW drive compatible with the i.LINK (IEEE 1394) interface. The drive has the following features: • Supports 2.4× writing speed for DVD+R discs (3240 KB/s). • Supports 2.4× writing speed for DVD+RW discs (3240 KB/s). • Supports 4× writing speed for DVD-R discs (5400 KB - Sony PCGA-DDRW2 | Operating Instructions 1 - Page 6
preinstalled. (As of May, 2004) * Except those with a built-in DVD-RW or DVD±RW drive. Notes • This drive cannot be used with computers other than Sony VAIO computers. • This drive does not support Microsoft® Windows® Millennium Edition, Microsoft® Windows® 2000 Professional, Microsoft® Windows - Sony PCGA-DDRW2 | Operating Instructions 1 - Page 7
, and audio data. These discs can be erased and rewritten many times. Note that DVD+RW and DVD-RW are different types of discs. DVD+RW discs can store up to 4.7 GB of data, roughly 7 times that of a CD-RW. • DVD-R Write-once discs for storing computer programs and data, video data, and audio data - Sony PCGA-DDRW2 | Operating Instructions 1 - Page 8
With this drive, you can use the discs with any of the following icons. Disc type DVD+R *1 *3 *4 Icon DVD+RW *1 *3 DVD-R *1 *2 *3 DVD-RW *1 *2 *3 DVD-ROM DVD-Video CD-R CD-RW *5 CD-ROM Audio CD CD EXTRA CD TEXT Photo CD ---- 8 GB - Sony PCGA-DDRW2 | Operating Instructions 1 - Page 9
drive that supports CD-RW. • Compatibility with the playback software is required for playing each disc. For details, refer to the manual of the playback software. • Some types of DVD players do not play DVD videos created on DVD+R, DVD+RW, DVD-R, or DVD-RW discs. • This drive uses special software - Sony PCGA-DDRW2 | Operating Instructions 1 - Page 10
purchased this product or a Sony service representative in your area. • DVD±RW drive (1) • Software CD-ROM (1) • Peripheral cable(1) • i.LINK cable (1) • AC adapter (1) • Manual eject pin (1) (stored at bottom of drive) • AC power cord (1) • Operating Instructions (this document) (1) • Warranty - Sony PCGA-DDRW2 | Operating Instructions 1 - Page 11
Locating the Controls and Connectors Front Rear Bottom 1 POWER indicator 2 Eject button 3 BUSY indicator 4 Manual eject hole 5 DC IN connector 6 Peripheral cable screw hole 7 Peripheral device DC IN connector 8 i.LINK connector 9 i.LINK connector 0 Manual eject pin (see page 27) 11 GB - Sony PCGA-DDRW2 | Operating Instructions 1 - Page 12
use a Digital Video Camera Recorder, you can connect it to the drive using the supplied i.LINK cable (see page 19). i.LINK connector a peripheral device DC OUT connector, use the supplied i.LINK cable to connect the drive to the computer. In this case, the supplied AC adapter and AC power cord - Sony PCGA-DDRW2 | Operating Instructions 1 - Page 13
Notes • If your computer is not equipped with a peripheral device DC OUT connector, use the supplied i.LINK cable to connect the drive to the computer. For details about this connection, see page 16. • Whenever an i.LINK device is connected, disconnected, or powered on or off, the computer - Sony PCGA-DDRW2 | Operating Instructions 1 - Page 14
has multiple i.LINK connectors, do not connect other i.LINK devices together with this drive. Disconnect this drive before connecting any other i.LINK devices to your notebook. z Hint Also refer to the manuals provided with your notebook. i.LINK connector Peripheral device DC OUT connector 14 GB - Sony PCGA-DDRW2 | Operating Instructions 1 - Page 15
1 Turn on the notebook. 2 Insert the L-shaped plug of the supplied peripheral cable into the matching connector on the rear of the drive, and secure the plug with the screw. Turn the screw until it fits snugly. 3 Insert the straight plug of the supplied peripheral cable into the i. - Sony PCGA-DDRW2 | Operating Instructions 1 - Page 16
to a computer that has multiple i.LINK connectors, do not connect other i.LINK devices together with this drive. Furthermore, disconnect this drive before connecting any other i.LINK devices to your computer. i.LINK connector DC IN connector 16 GB i.LINK cable AC adapter i.LINK connector AC - Sony PCGA-DDRW2 | Operating Instructions 1 - Page 17
4 Connect the other end of the supplied i.LINK cable to the i.LINK connector on the computer. The drive is detected and identified by the computer. i.LINK cable i.LINK connector z Hint When this drive is connected to your computer for the first time, it takes a moment for the computer to detect - Sony PCGA-DDRW2 | Operating Instructions 1 - Page 18
cable). Note The drive does not support analog format and some types of Digital Video Camera Recorder formats. The following models cannot be used (as of May, 2004): - DCR-VX1000 - DCR-VX700 (versions with an upgraded DV terminal) Use the supplied Click to DVD software to create DVD videos using the - Sony PCGA-DDRW2 | Operating Instructions 1 - Page 19
to DVD software with the drive connected to your notebook using the supplied peripheral cable, connect your Digital Video Camera Recorder to the drive's i. AC adapter/charger to a power outlet. z Hint Also refer to the manual for the Digital Video Camera Recorder you want to connect. i.LINK cable - Sony PCGA-DDRW2 | Operating Instructions 1 - Page 20
Digital Video Camera Recorder operations, refer to your Digital Video Camera Recorder manual. 2 Connect the supplied i.LINK cable to the DV input/output to the i.LINK connector on the drive. 4 Click "Start", and then click "My Computer" to verify that (Sony DV camcorder or other equipment) has been - Sony PCGA-DDRW2 | Operating Instructions 1 - Page 21
computer with the supplied i.LINK cable To use the supplied Click to DVD software with the drive connected to your computer using the supplied i.LINK cable, connect your Digital Video Camera Recorder to the drive's i.LINK connector using another i.LINK cable (available separately), as shown below - Sony PCGA-DDRW2 | Operating Instructions 1 - Page 22
Video Camera Recorder operations, refer to the Digital Video Camera Recorder manual. 2 Connect the additional i.LINK cable (sold separately) to Recorder to the i.LINK connector on the drive. 4 Click "Start", and then click "My Computer" to verify that (Sony DV camcorder or other equipment) has been - Sony PCGA-DDRW2 | Operating Instructions 1 - Page 23
is not on, and then disconnect the peripheral cable or i.LINK cable. Notes • Before disconnecting the drive, close any running software. • When a Digital Video Camera Recorder is connected to the drive, disconnect the i.LINK cable from the Digital Video Camera Recorder before turning off the Digital - Sony PCGA-DDRW2 | Operating Instructions 1 - Page 24
is flashing. For details, refer to the manuals provided with your computer. • Before activating the power-saving modes of the computer, verify that the BUSY indicator of the drive is not on, and close all running software applications. • While the computer is in a power-saving mode, do not connect - Sony PCGA-DDRW2 | Operating Instructions 1 - Page 25
2 Pull the tray out fully until it stops. While supporting the tray from the other side with your hand, place the disc on the hub in the center of the tray. Make sure that the - Sony PCGA-DDRW2 | Operating Instructions 1 - Page 26
indicator Eject button 2 Pull the tray out fully until it stops. While supporting the tray with your hand, remove the disc. To release the disc, tray or the metal section on the rear. • When using writing software or DVD playback software, you may not be able to eject discs simply by pressing the - Sony PCGA-DDRW2 | Operating Instructions 1 - Page 27
If the disc does not eject 1 Confirm that the BUSY indicator is not flashing. 2 Detach the manual eject pin from the holder at the bottom of the drive, and insert the pin into the manual eject hole. The tray pops out, allowing you to remove the disc. Manual eject pin Manual eject hole 27 GB - Sony PCGA-DDRW2 | Operating Instructions 1 - Page 28
or add-on products, we cannot guarantee the performance of the software, nor provide support. Before using this product, please first carefully read the software license agreement. ■ SonicStage Ver.1.x DVD±RW Drive Support Update Program This software update allows you to create audio CD-R or CD - Sony PCGA-DDRW2 | Operating Instructions 1 - Page 29
Drag'n Drop CD+DVD software. • The SonicStage Ver.1.x DVD±RW Drive Support Update Program can only be installed if Drag'n Drop CD+DVD software and the SonicStage CD-R Writing Module are already installed. The SonicStage CD-R Writing Module can be found on the Sony applications CD-ROM supplied - Sony PCGA-DDRW2 | Operating Instructions 1 - Page 30
the computer you are using. Follow the on-screen instructions. 6 Restart your computer after installing "Click to DVD", "Click to DVD Menu Data", and "Drag'n Drop CD+DVD" software. 7 On the "Start" menu, click "My Computer", double-click "Drive E*", open "SonicStage Update Program", and then double - Sony PCGA-DDRW2 | Operating Instructions 1 - Page 31
• Do not disconnect or manually operate any devices (such as a Digital Video Camera Recorder) connected to this drive while writing data to DVD+R, DVD+RW, DVD-R, or DVD-RW discs. • Installing or updating the driver software for the drive while writing data can result in operating problems. • Do not - Sony PCGA-DDRW2 | Operating Instructions 1 - Page 32
at least 256 MB of RAM in your computer when using Click to DVD software to write data. For details on expanding memory, refer to the manuals provided with your computer. • Data is written to DVD+R, DVD+RW, DVD-R, or DVD-RW discs, using the "Disc-at-once" format. Therefore, it is not possible to - Sony PCGA-DDRW2 | Operating Instructions 1 - Page 33
space used 6 GB 10.4 GB 10.4 GB 10.4 GB Bit rate 9 Mbps 8 Mbps 6 Mbps 4 Mbps • With Click to DVD you can use the following file formats. For details, refer to the Click to DVD software online help. Video files: DV-AVI, MPEG1, MPEG2, DVR-MS Picture files: Bitmap, JPEG, TIFF To display "Click - Sony PCGA-DDRW2 | Operating Instructions 1 - Page 34
is ejected from this drive, or when a certain amount of time elapses. To always display the boxes, right-click in the taskbar and add a check to [Shows Boxes]. • When using Drag'n Drop CD+DVD software to write data, you cannot use DVD+R, DVD+RW, DVD-R, DVD-RW, CD-R, or CD-RW discs preformatted with - Sony PCGA-DDRW2 | Operating Instructions 1 - Page 35
point to "Drag'n Drop CD+DVD", and select "User registration and Support". For more information about Drag'n Drop CD+DVD software, contact: Easy System Japan Ltd. Website: http://www.ddcd.jp/dd3e/sony/cd/ Playing an Audio CD For users of computers with a built-in CD-ROM drive Play the audio CD with - Sony PCGA-DDRW2 | Operating Instructions 1 - Page 36
may be intentionally limited by software producers. Since this drive plays DVD videos according to the disc contents provided by the software producers, some playback features may not be available. Also refer to the instructions supplied with the DVD videos. Symbols on DVD video discs The following - Sony PCGA-DDRW2 | Operating Instructions 1 - Page 37
marks, see the instructions on the DVD video discs. Mark Sony notebooks with the Windows XP operating system preinstalled. However, if your notebook has an integrated drive, use that drive to reset the notebook. (As of May, 2004) For more details about resetting your notebook, refer to the manuals - Sony PCGA-DDRW2 | Operating Instructions 1 - Page 38
, the label edges may peel or the label may come off entirely inside the disc drive, leading to malfunction and damage of the drive. Before inserting a disc, make sure that the label is properly attached. In no event will Sony Corporation be liable for any damage or media loss caused by 38 GB - Sony PCGA-DDRW2 | Operating Instructions 1 - Page 39
is properly fixed on the disc surface before using the disc. Sony assumes no libility for any malfunction of your drive or damage to the media caused by improper labeling. Please thoroughly read instruction notes of your label software and label sheets. • Do not store discs in locations subject to - Sony PCGA-DDRW2 | Operating Instructions 1 - Page 40
for your DVD±RW drive. When you have questions about your DVD±RW drive or the software, refer to the following: ❑ This guide explains how to use your DVD±RW drive. ❑ Sony Online Support provides instant access to infomation on commonly encountered problems. Type a description of the problem and the - Sony PCGA-DDRW2 | Operating Instructions 1 - Page 41
DVD+R DVD+RW DVD-R DVD-RW DVD-ROM DVD-Video CD-R CD-RW (Ultra Speed CD-RW not supported) CD-ROM CD-DA (audio CD) CD Extra (CD+) CD TEXT Photo CD Disc diameter: 12 cm 8 cm (reading only) Drive performance Data transfer rate Data read DVD+R/DVD+RW: max. 4× speed DVD-R/DVD-RW: max. 4× speed DVD - Sony PCGA-DDRW2 | Operating Instructions 1 - Page 42
Other specifications Power consumption Read/write: approx. 8 W Dimensions Approx. 5.7 × 0.9 × 6.1 inches (Approx. 144 × 21 × 154 mm) (w × h × d) (maximum dimensions including protruding parts) Mass Approx. 14.5 oz. (410 g) (main unit only) Design and specifications are subject to change without - Sony PCGA-DDRW2 | Operating Instructions 1 - Page 43
Troubleshooting If a problem occurs during operation of the unit, refer to the information provided in this section and in your Sony computer documentation. If the problem persists, consult your nearest Sony dealer. For contact information, see "Getting Help" on page 40. Also refer to the manuals - Sony PCGA-DDRW2 | Operating Instructions 1 - Page 44
computers connected to both i.LINK connectors on the drive, the drive may not function properly, and data reading and writing may not be the computer may be set too low. (For details, refer to the manuals provided with your Sony computer.) c The disc may be scratched or dirty. Clean the disc - Sony PCGA-DDRW2 | Operating Instructions 1 - Page 45
. Computer to which this drive is connected does not go into power saving mode. DVD+R, DVD+RW, DVD-R, DVD-RW, CD-R, or CD-RW data reading or data writing speed setting. (For details, refer to the manuals provided with your computer.) c When the drive is operating, the computer may not go into power - Sony PCGA-DDRW2 | Operating Instructions 1 - Page 46
c If the supplied software has not been installed correctly, writing is not possible. c If the drive was brought from a cold to a warm location, condensation may have formed inside the drive. Allow the unit to stand for a while. c If a CD-R or CD-RW disc was written with "Drag'n Drop CD+DVD", it is - Sony PCGA-DDRW2 | Operating Instructions 1 - Page 47
DVD-ROM is dirty, carefully wipe it with a soft cloth. For information on disc maintenance, see "Cleaning the disc" on page 40. c The notebook model may not support recovery of the operating system using this drive ". (For details, refer to the manual provided with your Digital Video Camera Recorder - Sony PCGA-DDRW2 | Operating Instructions 1 - Page 48
drive the manuals provided with your computer. c The i.LINK interface is designed to support the DVD software online help for details. c With Click to DVD software you can only use the following video file formats: DV-AVI, MPEG1, MPEG2, DVR-MS. c To read files in DVR-MS format, Windows XP Service - Sony PCGA-DDRW2 | Operating Instructions 1 - Page 49
c You should have at least 256 MB of RAM in your computer when using Click to DVD software to write data. For details on expanding memory, refer to the manuals provided with your computer. c You cannot add data to DVD+R, DVD+RW, DVD-R, or DVD-RW discs that already have data on them. c If you create - Sony PCGA-DDRW2 | Operating Instructions 1 - Page 50
NMB-003 du Canada. Avant d'utiliser le DDRW2, veuillez lire l'Accord de licence du logiciel pour détenteur des droits d'auteur. • En aucun cas, SONY ne pourra être tenue pour responsable en cas de , qu'il s'agisse d'un CD-ROM, d'un DVD-ROM, d'un DVD vidéo ou d'un CD de musique, peut enfreindre - Sony PCGA-DDRW2 | Operating Instructions 1 - Page 51
des marques commerciales de Sony Corporation. • Copyright © 2001 DigiOn Inc. et Easy Systems Japan Ltd. Tous droits réservés. Drag'n Drop CD+DVD est une marque droits réservés. • Tous les noms des systèmes, produits et services sont des marques déposées de leur détenteur respectif. • Dans - Sony PCGA-DDRW2 | Operating Instructions 1 - Page 52
utilisation32 Précautions à prendre lors de l'écriture de données 32 Lecture d'un CD audio 37 Lecture d'un DVD-Vidéo 37 Remarques sur la lecture des DVDVidéo 37 Remarques sur les DVD-Vidéo .... 38 Récupération du système d'exploitation sur l'ordinateur portable 40 Précautions 41 Entretien 43 - Sony PCGA-DDRW2 | Operating Instructions 1 - Page 53
× pour les disques CD-R (2400 Ko/s). • Prend en charge une vitesse d'écriture 8× pour les disques CD-RW (1200 Ko/s). • Le graveur lit des DVD+R, DVD+RW, DVD-R, DVD-RW, DVD-ROM, CD-R, CD-RW et CD-ROM. Les DVD-ROM sont lus à une vitesse maximale de 8× (10800 Ko/s) et les CD-ROM à une vitesse maximale - Sony PCGA-DDRW2 | Operating Instructions 1 - Page 54
ère mise à jour : Mai 2004) * Les modèles disposant d'un graveur DVD-RW ou DVD±RW intégré font exception. Remarques • Ce graveur ne convient pas à l'utilisation avec des ordinateurs autres que les ordinateurs VAIO de Sony. • Ce graveur ne prend pas en charge Microsoft® Windows® Millennium Edition - Sony PCGA-DDRW2 | Operating Instructions 1 - Page 55
de disque possède une capacité de stockage de 4,7 Go environ, ce qui équivaut à presque sept fois la capacité d'un CD-RW. • DVD-R Disques inscriptibles une seule fois et utilisés comme support de stockage de programmes et de données informatiques, de données vidéo, etc. Ce type de disque possède une - Sony PCGA-DDRW2 | Operating Instructions 1 - Page 56
, jeux, etc. sont livrés sur CD-ROM. Avec ce graveur, vous pouvez utiliser tous les disques portant les icônes suivantes : Type de disque DVD+R *1 *3 *4 Icône DVD+RW *1 *3 8 FR DVD-R *1 *2 *3 DVD-RW *1 *2 *3 DVD-ROM DVD-Vidéo CD-R CD-RW *5 CD-ROM Audio CD CD EXTRA CD TEXT Photo CD ---- - Sony PCGA-DDRW2 | Operating Instructions 1 - Page 57
de lecture installé sur l'ordinateur doit supporter le type du disque. Reportez-vous à la documentation du logiciel de lecture pour plus d'informations. • Certains graveurs DVD ne peuvent pas lire les DVD vidéos créés sur des disques DVD+R, DVD+RW, DVD-R ou DVD-RW. • Ce graveur utilise un logiciel - Sony PCGA-DDRW2 | Operating Instructions 1 - Page 58
de l'ensemble des accessoires représentés ci-dessous. S'il manque un élément, contactez votre distributeur Sony ou un représentant Sony local. • Graveur DVD±RW (1) • Software-CD-ROM (1) • Câble de périphérique d'ordinateur(1) • Câble i.LINK (1) • Adaptateur secteur (1) • Tige d'éjection manuelle - Sony PCGA-DDRW2 | Operating Instructions 1 - Page 59
Emplacement des commandes et des connecteurs Avant 1 Témoin POWER (témoin d'alimentation) 2 Touche Eject (touche d'éjection) 3 Témoin BUSY (témoin de transfert de données) 4 Orifice d'éjection manuelle Arrière 5 Connecteur DC IN 6 Orifice pour vis de câble de périphérique 7 Connecteur DC IN pour - Sony PCGA-DDRW2 | Operating Instructions 1 - Page 60
Raccordement du graveur La procédure de raccordement de ce graveur diffère selon l'ordinateur que vous utilisez. • Si l'ordinateur est équipé d'un connecteur DC OUT pour périphérique d'ordinateur portable (voir page 14). Si l'ordinateur portable est équipé d'un connecteur DC OUT pour périphérique , - Sony PCGA-DDRW2 | Operating Instructions 1 - Page 61
Remarques • Si votre ordinateur n'est pas doté d'un connecteur DC OUT pour périphérique, utilisez un câble i.LINK pour raccorder le graveur. Pour plus de détails sur le raccordement, voir page 16. • Qu'un dispositif i.LINK soit raccordé ou pas, sous tension ou hors tension, l'ordinateur procède à ce - Sony PCGA-DDRW2 | Operating Instructions 1 - Page 62
Raccordement du graveur à votre ordinateur portable via le câble périphérique fourni Si l'ordinateur portable est équipé d'un connecteur DC OUT pour périphérique, utilisez le câble pour périphérique d'ordinateur fourni pour raccorder le graveur au portable. Si l'ordinateur portable n'est pas équipé - Sony PCGA-DDRW2 | Operating Instructions 1 - Page 63
1 Mettez l'ordinateur portable sous tension. 2 Insérez la prise en forme de L du câble pour périphérique fourni dans le connecteur correspondant à l'arrière du graveur et immobilisez la prise à l'aide de la vis. Tournez la vis jusqu'à ce qu'elle soit complètement serrée. 3 Insérez la prise droite du - Sony PCGA-DDRW2 | Operating Instructions 1 - Page 64
4 Cliquez sur « Démarrer » et ensuite sur «Poste de travail» afin de vérifier que l'icône (E : ou un autre nom de graveur) a été ajoutée dans la fenêtre « Poste de travail ». Raccordement du graveur à votre ordinateur via le câble i.LINK fourni Si l'ordinateur n'est pas équipé d'un connecteur DC OUT - Sony PCGA-DDRW2 | Operating Instructions 1 - Page 65
1 Mettez l'ordinateur sous tension. 2 Raccordez le cordon d'alimentation secteur à l'adaptateur secteur fourni puis branchez le cordon d'alimentation secteur sur une prise secteur et branchez le câble de l'adaptateur sur le connecteur DC IN du graveur. Le témoin vert POWER (témoin d'alimentation) du - Sony PCGA-DDRW2 | Operating Instructions 1 - Page 66
vous pouvez raccorder un caméscope numérique au graveur pour créer des DVD vidéo à partir des images vidéo du caméscope numérique. La caméscope numérique que vous raccordez au graveur doit être un caméscope numérique Sony qui : • peut enregistrer des images vidéo aux formats DV ou MICROMV®. • est - Sony PCGA-DDRW2 | Operating Instructions 1 - Page 67
■ Lors du raccordement du graveur à votre ordinateur via le câble périphérique fourni Pour utiliser le logiciel Click to DVD fourni lorsque le graveur est raccordé à votre ordinateur portable à l'aide du câble pour périphérique fourni, raccordez votre caméscope numérique au connecteur i.LINK - Sony PCGA-DDRW2 | Operating Instructions 1 - Page 68
1 Mettez le caméscope numérique sous tension et réglez-le en mode de lecture vidéo. Pour de plus amples informations sur le fonctionnement du caméscope numérique, reportez-vous au manuel du caméscope numérique. 2 Raccordez le câble i.LINK fourni au connecteur d'entrée/ sortie DV sur le caméscope num - Sony PCGA-DDRW2 | Operating Instructions 1 - Page 69
ordinateur via le câble i.LINK fourni Pour utiliser le logiciel Click to DVD fourni lorsque le graveur est raccordé à votre ordinateur à l'aide VMC-IL4415A/ IL4415B (4 broches y 4 broches de 1,5 m). (Câble i.LINK Sony recommandé.) • Raccordez le graveur à votre ordinateur avant de raccorder le camé - Sony PCGA-DDRW2 | Operating Instructions 1 - Page 70
1 Mettez le caméscope numérique sous tension et réglez-le en mode de lecture vidéo. Pour de plus amples informations sur l'utilisation du caméscope numérique, reportez-vous au mode d'emploi du caméscope numérique. 2 Raccordez le câble i.LINK vendu séparément au connecteur d'entrée/sortie DV du camé - Sony PCGA-DDRW2 | Operating Instructions 1 - Page 71
Restriction (exemple de raccordement incorrect) Ne raccordez pas ce graveur à deux ordinateurs , ainsi qu'il est illustré cidessous. Câble i.LINK Câble de périphérique Déconnexion du graveur de l'ordinateur Avec le système d'exploitation Windows XP, aucune procédure particulière n'est requise pour - Sony PCGA-DDRW2 | Operating Instructions 1 - Page 72
d'énergie n'est pas activé lorsque le témoin BUSY (témoin de transfert de données) du graveur clignote. Reportez-vous aux manuels de votre ordinateur Sony pour plus de détails. • Avant d'activer le mode d'économie d'énergie de l'ordinateur, vérifiez que le témoin BUSY du graveur est éteint et fermez - Sony PCGA-DDRW2 | Operating Instructions 1 - Page 73
2 Tirez le plateau complètement jusqu'à ce qu'il s'arrête. Tout en le soutenant avec la main de l'autre côté, placez le disque sur le moyeu au centre du plateau. Assurez-vous que le disque se met en place - vous devez l'entendre - et qu'il est bien positionné. Remarques • Ne touchez pas l'optique - Sony PCGA-DDRW2 | Operating Instructions 1 - Page 74
touchez pas l'optique dans le plateau ni la partie métallique à l'arrière. • Lors de l'utilisation d'un logiciel d'écriture ou d'un logiciel de lecture de DVD, il est possible qu'une simple pression sur le bouton Eject ne soit pas suffisante pour éjecter le disque. Pour de plus amples informations - Sony PCGA-DDRW2 | Operating Instructions 1 - Page 75
Si le disque ne s'éjecte pas 1 Vérifiez que le témoin BUSY ne clignote pas. 2 Détachez la tige d'éjection manuelle du support situé sous le graveur et introduisez-la dans l'orifice d'éjection manuelle. Le plateau sort et vous pouvez retirer le disque. Tige d'ejection manuelle Orifice d'éjection - Sony PCGA-DDRW2 | Operating Instructions 1 - Page 76
la garantie de fonctionnement. Avant d'utiliser ce logiciel, veuillez lire attentivement le contrat de licence d'utilisation qui s'affiche au moment de son installation. ■ SonicStage Ver.1.x DVD±RW Drive Support Update Program La mise à jour de ce logiciel vous permet de créer des disques CD-R ou CD - Sony PCGA-DDRW2 | Operating Instructions 1 - Page 77
de mise à jour du support du graveur DVD±RW SonicStage Ver.1.x peut être installé uniquement si Drag'n Drop CD+DVD et le module d'écriture SonicStage CD-R sont déjà installés. Vous pouvez trouver le module d'écriture SonicStage CD-R sur le CD-ROM contenant les applications Sony fourni avec votre - Sony PCGA-DDRW2 | Operating Instructions 1 - Page 78
nom différent en fonction de l'ordinateur que vous utilisez. Suivez les instructions à l'écran. 6 Redémarrez votre ordinateur après l'installation de « Click to DVD »,« Click to DVD Menu Data » et de « Drag'n Drop CD+DVD ». 7 Dans le menu « Démarrer », cliquez sur «Poste de travail», double-cliquez - Sony PCGA-DDRW2 | Operating Instructions 1 - Page 79
« DirectX9 », puis double-cliquez sur « dxsetup.exe ». * Le graveur peut avoir un nom différent en fonction de l'ordinateur que vous utilisez. Suivez les instructions à l'écran. 10 Cliquez sur le bouton « Démarrer » et placez le curseur sur « Tous les Programmes », puis vérifiez que « Click to - Sony PCGA-DDRW2 | Operating Instructions 1 - Page 80
nergie de votre ordinateur, reportez-vous aux manuels fournis avec votre ordinateur. • Avant de démarrer l'écriture des données sur un disque DVD+R, DVD+RW, DVD-R ou DVD-RW, ne déconnectez pas les appareils raccordés au graveur, tels qu'un caméscope numérique. En outre, pendant l'écriture de données - Sony PCGA-DDRW2 | Operating Instructions 1 - Page 81
. • Les DVD+R, DVD+RW, DVD-R, DVD-RW, CD-R ou CD-RW formatés avec un logiciel d'écriture joint comme DirectCD (y compris des CD-RW préformatés disponibles dans le commerce) ne peuvent pas être lus sur ce graveur. • Les disques DVD+R, DVD+RW, DVD-R, DVD-RW, CD-R ou CD-RW de marque Sony sont recommand - Sony PCGA-DDRW2 | Operating Instructions 1 - Page 82
nécessaire à l'écriture d'un disque DVD+R, DVD+RW, DVD-R ou DVD-RW peut varier de quelques heures à plusieurs guide général pour la quantité d'espace mémoire de disque dur requise pour « Mode automatique Click to DVD » afin de créer des DVD vidéo de durées différentes. « Mode automatique Click to DVD - Sony PCGA-DDRW2 | Operating Instructions 1 - Page 83
Mbps) 60 minutes 5 Go 7 Go 90 minutes 7 Go 10 Go 120 minutes 10 Go - Haute qualité (8.1 Mbps) 10 Go - - Création d'un DVD vidéo depuis un enregistrement de caméscope numérique Durée Débit binaire Lecture longue (LP) (4.6 Mbps) Lecture standard (SP) (6.4 Mbps) Haute qualité (8.1 Mbps - Sony PCGA-DDRW2 | Operating Instructions 1 - Page 84
de détails, reportez-vous à l'aide en ligne ou au site Web Drag'n Drop CD+DVD. • Pour lire des CD de musique créés sur CD-R ou CD- RW, vous devez utiliser des appareils prenant en charge ces types de support. • Il peut être illégal de faire des copies de données vidéo ou - Sony PCGA-DDRW2 | Operating Instructions 1 - Page 85
un test en lecture normale, tout d'abord, afin de ne pas endommager les haut-parleurs. • Lorsqu'un DVD-Vidéo est inséré dans le graveur, il est impossible d'utiliser la commande Jog Dial® ou les combinaisons de d'affichage. • Lorsque vous utilisez un ordinateur de la série Sony VAIO PCG-C1M, 37 FR - Sony PCGA-DDRW2 | Operating Instructions 1 - Page 86
-Vidéo ou sur leur emballage. Chaque symbole indique le contenu du disque ou les fonctions enregistrés sur celui-ci. Selon les DVD-Vidéo, il est possible qu'aucun symbole ni aucune indication ne soit imprimée sur l'étiquette, même si le disque contient des données ou des - Sony PCGA-DDRW2 | Operating Instructions 1 - Page 87
Symbole 3 2 3 16:9 LB 2 Signification Indique le nombre de pistes audio. Indique le nombre de sous-titres. Indique le nombre d'angles. Indique les formats d'affichage que vous pouvez sélectionner. Indique le code local. 39 FR - Sony PCGA-DDRW2 | Operating Instructions 1 - Page 88
portables pour lesquels une récupération est possible Les ordinateurs portables pouvant être réinitialisés avec ce graveur sont les ordinateurs portables de Sony sur lesquels le système d'exploitation Windows XP est préinstallé. Par ailleurs, si votre ordinateur portable dispose d'un graveur intégr - Sony PCGA-DDRW2 | Operating Instructions 1 - Page 89
Précautions Lieux d'utilisation et de stockage N'utilisez pas ou ne stockez pas ce graveur dans des endroits soumis à une humidité importante, des températures élevées, de fortes vibrations ou au rayonnement direct du soleil. Fonctionnement • Pour éviter tout dysfonctionnement, ne déplacez pas le - Sony PCGA-DDRW2 | Operating Instructions 1 - Page 90
disque, assurez-vous que l'étiquette est bien collée. Sony Corporation ne pourra en aucun cas être tenue responsable d'un dommage quelconque ou d'une perte de support résultant d'un problème d'étiquette. Suivez attentivement les instructions pour tous les logiciels d'impression d'étiquettes et les - Sony PCGA-DDRW2 | Operating Instructions 1 - Page 91
Entretien Nettoyage du boîtier Essuyez l'extérieur du graveur à l'aide d'un chiffon doux et sec. Pour enlever les taches difficiles, humidifiez le chiffon à l'aide d'un produit nettoyant doux et neutre. N'utilisez pas de diluants, alcool, benzine ou autres produits qui pourraient endommager la - Sony PCGA-DDRW2 | Operating Instructions 1 - Page 92
qui fonctionnent avec votre ordinateur. Pour consulter le Centre des services d'information client Sony, composez le 1-888-4SONYPC (1-888-476-6972). Disques compatibles DVD+R DVD+RW DVD-R DVD-RW DVD-ROM DVD-Vidéo CD-R CD-RW (Les CD-RW enregistrables à vitesse élevée ne sont pas pris en charge) CD - Sony PCGA-DDRW2 | Operating Instructions 1 - Page 93
Connecteurs Connecteur i.LINK (IEEE 1394) S400 (4-broches) (2) S400 = 400 Mbps DC IN (1) Connecteur DC IN pour spécifique d'ordinateur portable VAIO(1) Environnement d'exploitation Température de fonctionnement 5ºC à 35ºC (41°F à 95°F) (diminution de température inférieure à 10°C (18°F)/heure) - Sony PCGA-DDRW2 | Operating Instructions 1 - Page 94
les informations fournies dans cette section et dans la documentation de votre ordinateur. Si le problème persiste, contactez votre distributeur Sony. Voir « Aide » à la page 44 pour obtenir des informations sur les contacts. Reportez-vous également aux manuels fournis avec votre ordinateur - Sony PCGA-DDRW2 | Operating Instructions 1 - Page 95
Ordinateurs compatibles » (page 6) ainsi qu'aux manuels fournis avec votre ordinateur Sony. c Débranchez le câble i.LINK, puis rebranchez-le. Si la est peut-être réglée trop bas. (Reportez-vous aux manuels de votre ordinateur Sony pour plus de détails.) c Le disque est peut-être rayé ou sale. - Sony PCGA-DDRW2 | Operating Instructions 1 - Page 96
la puissance de l'ordinateur est peut-être activée. Vérifiez le paramètre de vitesse de l'UC. (Reportez-vous aux manuels de votre ordinateur Sony pour plus de détails). L'ordinateur auquel ce graveur est raccordé ne passe pas en mode d'économie d'énergie. c Lorsque ce graveur est en fonctionnement - Sony PCGA-DDRW2 | Operating Instructions 1 - Page 97
Symptôme Echec de lecture ou d'écriture des données du DVD+R, DVD+RW, DVD-R, DVD-RW, CD-R ou CD-RW. Cause/Remède c Voir « Précautions à prendre lors de l'écriture de données » à la page 32. c Une réinitialisation du bus a peut être été occasionnée pendant la - Sony PCGA-DDRW2 | Operating Instructions 1 - Page 98
ou d'un CD avec la fenêtre « DISC Backup ». • avoir sélectionné « Fermer le disque » dans la « Data DISC Options ». c Le DVD+R, DVD+RW, DVD-R, DVD-RW, CD-R ou CD-RW est peut-être déjà plein. Si un disque est plein, vous ne pouvez pas ajouter de données. c Il n'est pas possible d'enregistrer de donn - Sony PCGA-DDRW2 | Operating Instructions 1 - Page 99
de la touche d'éjection de cassette. Cause/Remède c Le code local du DVD ne correspond pas au code local du graveur. Ce graveur est réglé sur le ètre de vitesse de l'UC. (Reportez-vous aux manuels de votre ordinateur Sony pour plus de détails.) c Réglez le commutateur d'alimentation sur « Video - Sony PCGA-DDRW2 | Operating Instructions 1 - Page 100
Symptôme Le caméscope numérique raccordÈ à ce graveur ne peut pas être utilisé. Si vous tentez de l'utiliser, un message indiquant que le caméscope numérique est hors tension ou qu'il ne fonctionne pas s'affiche à l'écran de l'ordinateur. Cause/Remède cAssurez-vous que le caméscope numérique est - Sony PCGA-DDRW2 | Operating Instructions 1 - Page 101
Pack 1 et le programme de montage Q810243 sont nécessaires. Vous pouvez installer Windows XP Service Pack 1 et Q810243 à partir de Windows Update. c Le disque DVD+R, DVD+RW, DVD-R ou DVD-RW que vous utilisez contient peut-être déjà des données. Impossible d'ajouter des données sur les disques - Sony PCGA-DDRW2 | Operating Instructions 1 - Page 102
me d'écriture) est manquant. Installez Drag'n Drop CD+DVD avant d'installer Click to DVD. Il est possible que Windows Media Format 9 SDK ces cas, installez Windows XP Service Pack 1 et Windows Media Player 9. Vous pouvez installer Windows XP Service Pack 1 et Windows Media Player 9 à partir - Sony PCGA-DDRW2 | Operating Instructions 1 - Page 103
- Sony PCGA-DDRW2 | Operating Instructions 1 - Page 104
http://www.sony.net/ 2004 Sony Corporation / Printed in Japan 2-024-761-11 (1) Printed on 100% recycled paper using VOC (Volatile Organic Compound)-free vegetable oil based ink.
-
 1
1 -
 2
2 -
 3
3 -
 4
4 -
 5
5 -
 6
6 -
 7
7 -
8
-
9
-
10
-
11
-
12
-
13
-
14
-
15
-
16
-
17
-
18
-
19
-
20
-
21
-
22
-
23
-
24
-
25
-
26
-
27
-
28
-
29
-
30
-
31
-
32
-
33
-
34
-
35
-
36
-
37
-
38
-
39
-
40
-
41
-
42
-
43
-
44
-
45
-
46
-
47
-
48
-
49
-
50
-
51
-
52
-
53
-
54
-
55
-
56
-
57
-
58
-
59
-
60
-
61
-
62
-
63
-
64
-
65
-
66
-
67
-
68
-
69
-
70
-
71
-
72
-
73
-
74
-
75
-
76
-
77
-
78
-
79
-
80
-
81
-
82
-
83
-
84
-
85
-
86
-
87
-
88
-
89
-
90
-
91
-
92
-
93
-
94
-
95
-
96
-
97
-
98
-
99
-
100
-
101
-
102
-
103
-
104
 |
 |

DVD±RW Drive
PCGA-DDRW2
Operating Instructions / Mode d´émploi
S400