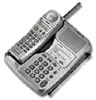
Sony SPP-SS966 Operating Instructions - Page 5
Table of contents, Getting Started, Basics - handset
 |
View all Sony SPP-SS966 manuals
Add to My Manuals
Save this manual to your list of manuals |
Page 5 highlights
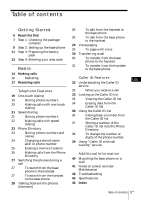
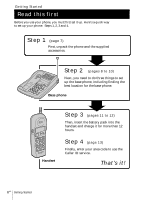
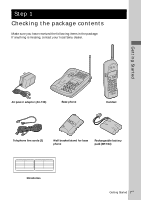
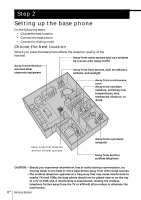
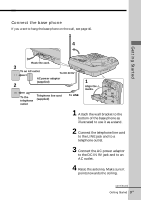
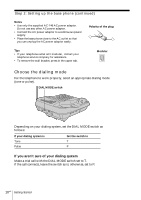
Table of contents Getting Started 6 Read this first 7 Step 1: Checking the package contents 8 Step 2: Setting up the base phone 11 Step 3: Preparing the battery pack 13 Step 4: Entering your area code Basics 14 Making calls 16 Redialing 17 Receiving calls Telephone Features 19 One-touch dialing 19 Storing phone numbers 20 Making calls with one-touch dialing 21 Speed dialing 21 Storing phone numbers 22 Making calls with speed dialing 23 Phone Directory 23 Storing phone numbers and names 24 Changing a stored name and/or phone number 25 Erasing a memory location 26 Making calls from the Phone Directory 27 Switching the phones during a call 27 To switch from the base phone to the handset 27 To switch from the handset to the base phone 28 Talking between the phones (Intercom) 28 To talk from the handset to the base phone 28 To talk from the base phone to the handset 29 Voice paging 29 To page with voice 30 Transferring a call 30 To transfer from the base phone to the handset 31 To transfer from the handset to the base phone Caller ID Features US 32 Understanding the Caller ID service 32 When you receive a call 33 Looking at the Caller ID list 33 Viewing the Caller ID list 34 Erasing data from the Caller ID list 36 Using the Caller ID list 36 Calling back a number from the Caller ID list 37 Storing a number of the Caller ID list into the Phone Directory 38 To change the number of digits of the phone number 39 Using "Caller ID with call waiting" service Additional Information 40 Mounting the base phone on a wall 41 Notes on power sources/ Maintenance 42 Troubleshooting 45 Specifications 46 Index Table of contents 5US
-
 1
1 -
 2
2 -
 3
3 -
 4
4 -
 5
5 -
 6
6 -
 7
7 -
 8
8 -
 9
9 -
 10
10 -
 11
11 -
12
-
13
-
14
-
15
-
16
-
17
-
18
-
19
-
20
-
21
-
22
-
23
-
24
-
25
-
26
-
27
-
28
-
29
-
30
-
31
-
32
-
33
-
34
-
35
-
36
-
37
-
38
-
39
-
40
-
41
-
42
-
43
-
44
-
45
-
46
-
47
-
48
-
49
-
50
-
51
-
52
-
53
-
54
-
55
-
56
-
57
-
58
-
59
-
60
-
61
-
62
-
63
-
64
-
65
-
66
-
67
-
68
-
69
-
70
-
71
-
72
-
73
-
74
-
75
-
76
-
77
-
78
-
79
-
80
-
81
-
82
-
83
-
84
-
85
-
86
-
87
-
88
-
89
-
90
-
91
-
92
-
93
-
94
-
95
-
96
 |
 |