Sony STR-DE875 Operating Instructions - Page 27
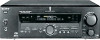
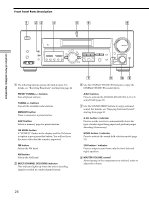
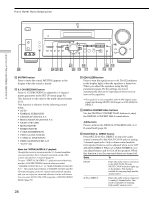
INPUT MODE button, 2ND ROOM button STR-DE975 only, FUNCTION control, MODE button - stereo receiver
 |
View all Sony STR-DE875 manuals
Add to My Manuals
Save this manual to your list of manuals |
Page 27 highlights
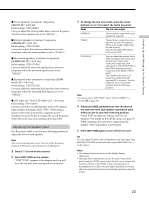
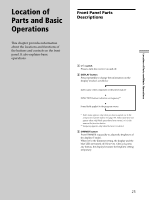
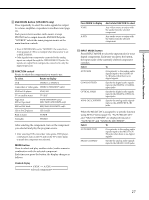
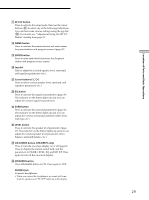
Location of Parts and Basic Operations 9 2ND ROOM button (STR-DE975 only) Press repeatedly to select the audio signals for output to a stereo amplifier or speakers in another room (page 12). Each press selects another audio source (except PHONO) to be output from the 2ND ROOM jacks. "SOURCE" selects the same program source as the main function controls. • Even if 2ND ROOM is set to "SOURCE", the sound from front speakers (L/R) is not output when the receiver is set to MULTI CH IN. • Only signals from components connected to the analog inputs are output through the 2ND ROOM OUT jacks. No signals are output from components connected to only the digital input jacks. 0 FUNCTION control Rotate to select the component you want to use. To select Rotate to display VCR VIDEO 1 or VIDEO 2 Camcorder or video game VIDEO 3 (STR-DE975 only) DVD or LD player DVD/LD TV or satellite tuner TV/SAT Tape deck MD or Tape deck TAPE (STR-DE975 only) MD/TAPE (STR-DE875 only) MD or DAT deck MD/DAT (STR-DE975 only) CD or SACD player CD/SACD Built in tuner TUNER Turntable PHONO After selecting the component, turn on the component you selected and play the program source. • After selecting VCR, camcorder, video game, DVD player, or LD player, turn on the TV and set the TV's video input to match the component you selected. MODE button Press to select and play another video/audio source in combination with the selected component. Each time you press the button, the display changes as follows: Standard display t V:XXX t A:XXX selected component T Press MODE to display V:XXX A:XXX And rotate FUNCTION to select Any video source to enjoy with the audio from the selected component Any audio source to enjoy with the video from the selected component qa INPUT MODE button Press INPUT MODE to select the input mode for your digital components. Each time you press the button, the input mode of the currently selected component switches. Select To AUTO 2CH Give priority to the analog audio signals input to the AUDIO IN (L/R) jacks when there is no digital signals. COAXIAL FIXED Specify the digital audio signals input to the DIGITAL COAXIAL input jacks. OPTICAL FIXED Specify the digital audio signals input to the DIGITAL OPTICAL input jacks. ANALOG 2CH FIXED Specify the analog audio signals input to the AUDIO IN (L/R) jacks. When the MULTI CH is assigned to a specific function using SET UP menu (page 51), "AUTO MULTI CH" and "MULTI CH FIXED" are displayed instead of "AUTO 2CH" and "ANALOG 2CH FIXED". Select To AUTO MULTI CH Give priority to the analog audio signals input to the MULTI CH IN jacks when there is no digital signals. MULTI CH FIXED Specify the analog audio signals input to the MULTI CH IN jacks. 27
-
 1
1 -
2
-
3
-
4
-
5
-
6
-
7
-
8
-
9
-
10
-
11
-
12
-
13
-
14
-
15
-
16
-
17
-
18
-
19
-
20
-
21
-
 22
22 -
 23
23 -
 24
24 -
 25
25 -
 26
26 -
 27
27 -
 28
28 -
 29
29 -
 30
30 -
 31
31 -
 32
32 -
33
-
34
-
35
-
36
-
37
-
38
-
39
-
40
-
41
-
42
-
43
-
44
-
45
-
46
-
47
-
48
-
49
-
50
-
51
-
52
-
53
-
54
-
55
-
56
-
57
-
58
-
59
-
60
-
61
-
62
-
63
-
64
-
65
-
66
-
67
-
68
-
69
-
70
-
71
-
72
 |
 |
