Sony STRDG720 Operating Instructions - Page 29
: Calibrating the appropriate settings automatically (AUTO CALIBRATION), AUTO CALIBRATION - manual
 |
UPC - 027242727472
View all Sony STRDG720 manuals
Add to My Manuals
Save this manual to your list of manuals |
Page 29 highlights
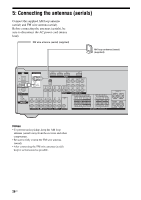
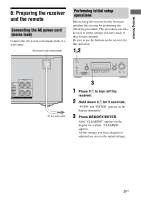
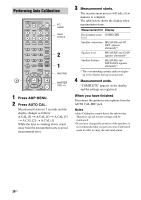
Getting Started 8: Calibrating the appropriate settings automatically (AUTO CALIBRATION) The DCAC (Digital Cinema Auto Calibration) function allows you to perform automatic calibration such as: • Checking the connection between each speaker and the receiver. • Adjusting the speaker level. • Measuring the distance of each speaker from your listening position. The DCAC is designed to obtain proper sound balance in your room. However, you can adjust the speaker levels and balance manually according to your preference. For details, see "9: Adjusting the speaker levels and balance (TEST TONE)" (page 33). Before you perform Auto Calibration Before you perform Auto Calibration, install and connect the speakers (page 14, 15). • The AUTO CAL MIC jack is used for the supplied optimizer microphone only. Do not connect other microphones to this jack. Doing so may damage the receiver and the microphone. • During calibration, the sound that comes out of the speakers is very loud. The volume of the sound cannot be adjusted. Pay attention to the presence of children or to the effect on your neighborhood. • Perform Auto Calibration in a quiet environment to avoid the effect of noise and to get a more accurate measurement. • If there are any obstacles in the path between the optimizer microphone and the speakers, the calibration cannot be performed correctly. Remove any obstacles from the measurement area to avoid measurement error. Notes • The Auto Calibration function does not work when headphones are connected. • If the muting function has been activated before you perform Auto Calibration, the muting function will be set to off automatically. ?/1 SPEAKERS (OFF/A/B) AUTO CAL MIC PHONES TUNING MODE TUNING DISPLAY INPUT MODE INPUT SELECTOR MASTER VOLUME VIDEO 2 IN/PORTABLE AV IN VIDEO L AUDIO R MEMORY/ CATEGORY ENTER MODE CATEGORY 2CH A.F.D. MOVIE MUSIC ANALOG DIRECT MUTING Optimizer microphone 1 Connect the supplied optimizer microphone to the AUTO CAL MIC jack. 2 Set up the optimizer microphone. Place the optimizer microphone at your listening position.You can also use a stool or tripod so that the optimizer microphone remains at the same height as your ears. 29US
-
 1
1 -
2
-
3
-
4
-
5
-
6
-
7
-
8
-
9
-
10
-
11
-
12
-
13
-
14
-
15
-
16
-
17
-
18
-
19
-
20
-
21
-
22
-
23
-
 24
24 -
 25
25 -
 26
26 -
 27
27 -
 28
28 -
 29
29 -
 30
30 -
 31
31 -
 32
32 -
 33
33 -
 34
34 -
35
-
36
-
37
-
38
-
39
-
40
-
41
-
42
-
43
-
44
-
45
-
46
-
47
-
48
-
49
-
50
-
51
-
52
-
53
-
54
-
55
-
56
-
57
-
58
-
59
-
60
-
61
-
62
-
63
-
64
-
65
-
66
-
67
-
68
-
69
-
70
-
71
-
72
-
73
-
74
-
75
-
76
-
77
-
78
-
79
-
80
-
81
-
82
-
83
-
84
-
85
-
86
-
87
-
88
-
89
-
90
-
91
-
92
 |
 |
