Sony VRDMC6 Operating Instructions - Page 57
stop button to stop, To record an additional video - waiting for input signal
 |
UPC - 027242767805
View all Sony VRDMC6 manuals
Add to My Manuals
Save this manual to your list of manuals |
Page 57 highlights
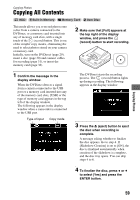
z Hint • When the prompt message [Format disc for DV/ VIDEO recording?] appears after inserting a blank disc, select [OK]. Formatting a disc may take several seconds to complete. You cannot record HD (High Definition) videos onto a formatted disc under this message. Copying From Video Devices 5 Operate the video device to start playback, and press the (record) button of the DVDirect to start recording. During recording, the message [Recording] appears in the display window, and the (record) button lights up. The following appears in the display window. To pause recording Press the (record) button during recording. To resume recording, press the (record) button again. z Hint • The DVDirect starts and stops recording automatically as it detects video input signals from a connected video device. For example: - When you press the (record) button before the connected video device starts playing, the DVDirect pauses. When the video device starts playing back, the DVDirect automatically starts recording video. - If you stop playback on the video device during recording, video signal is interrupted and the DVDirect pauses recording. If you resume playback on the video device, the DVDirect resumes recording. When the DVDirect waits a video signal to resume recording, the message [Waiting for input signal.] appears in the DVDirect's display window. If no video signal is detected for 2 minutes, the DVDirect stops recording. (As video devices always output video signals from their operation screen or TV screen other than playback, some video devices may not operate as above.) 6 Press the (stop) button to stop recording. 7 To record an additional video, repeat steps 5 and 6. 57
-
 1
1 -
2
-
3
-
4
-
5
-
6
-
7
-
8
-
9
-
10
-
11
-
12
-
13
-
14
-
15
-
16
-
17
-
18
-
19
-
20
-
21
-
22
-
23
-
24
-
25
-
26
-
27
-
28
-
29
-
30
-
31
-
32
-
33
-
34
-
35
-
36
-
37
-
38
-
39
-
40
-
41
-
42
-
43
-
44
-
45
-
46
-
47
-
48
-
49
-
50
-
51
-
 52
52 -
 53
53 -
 54
54 -
 55
55 -
 56
56 -
 57
57 -
 58
58 -
 59
59 -
 60
60 -
 61
61 -
 62
62 -
63
-
64
-
65
-
66
-
67
-
68
-
69
-
70
-
71
-
72
-
73
-
74
-
75
-
76
-
77
-
78
-
79
-
80
-
81
-
82
-
83
-
84
-
85
-
86
-
87
-
88
-
89
-
90
-
91
-
92
 |
 |
