TEAC CG-10M Owners Manual
TEAC CG-10M Manual
 |
View all TEAC CG-10M manuals
Add to My Manuals
Save this manual to your list of manuals |
TEAC CG-10M manual content summary:
- TEAC CG-10M | Owners Manual - Page 1
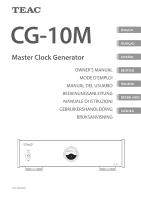
Z CG-10M ENGLISH FRANÇAIS Master Clock Generator ESPAÑOL OWNER'S MANUAL MODE D'EMPLOI MANUAL DEL USUARIO BEDIENUNGSANLEITUNG MANUALE DI ISTRUZIONI GEBRUIKERSHANDLEIDING BRUKSANVISNING DEUTSCH ITALIANO NEDERLANDS SVENSKA D01322850A - TEAC CG-10M | Owners Manual - Page 2
to the presence of important operating and maintenance (servicing) instructions in the literature accompanying the appliance. WARNING: TO USER SERVICEABLE PARTS ARE INSIDE. oo IF YOU ARE EXPERIENCING PROBLEMS WITH THIS PRODUCT, CONTACT THE STORE WHERE YOU PURCHASED THE UNIT FOR A SERVICE REFERRAL. - TEAC CG-10M | Owners Manual - Page 3
Regulations. EN Model for USA This equipment has been tested and found to comply with the limits for a Class installed and used in accordance with the instructions, may cause harmful interference to radio contact your city office, waste disposal service or the shop where you purchased - TEAC CG-10M | Owners Manual - Page 4
safe place for future reference. IMPORTANT SAFETY INSTRUCTIONS 2 Included items 4 Using the TEAC Global Site 4 Product registration 4 Before use 5 Maintenance 5 Connecting equipment 6 Names and functions of parts 7 Basic operation 8 Troubleshooting 8 Specifications 9 Check to be sure the - TEAC CG-10M | Owners Manual - Page 5
firmly to the bottom plate of this unit. The stands for these feet are loose, but when the unit is placed in position, it is supported by these pinpoint feet, which will effectively disperse vibrations. Chassis Pinpoint foot (metal) Foot-stand (metal) Screws that attach foot-stand oo Apply the - TEAC CG-10M | Owners Manual - Page 6
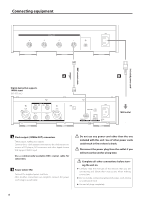
supports 10MHz input (UD-503, etc.) B c Wall outlet A Clock output (10MHz OUT) connectors These output 10MHz clock signals. Connect these clock output connectors to the clock oo Carefully read the manuals of the devices that you are connecting and follow their instructions when making connections. - TEAC CG-10M | Owners Manual - Page 7
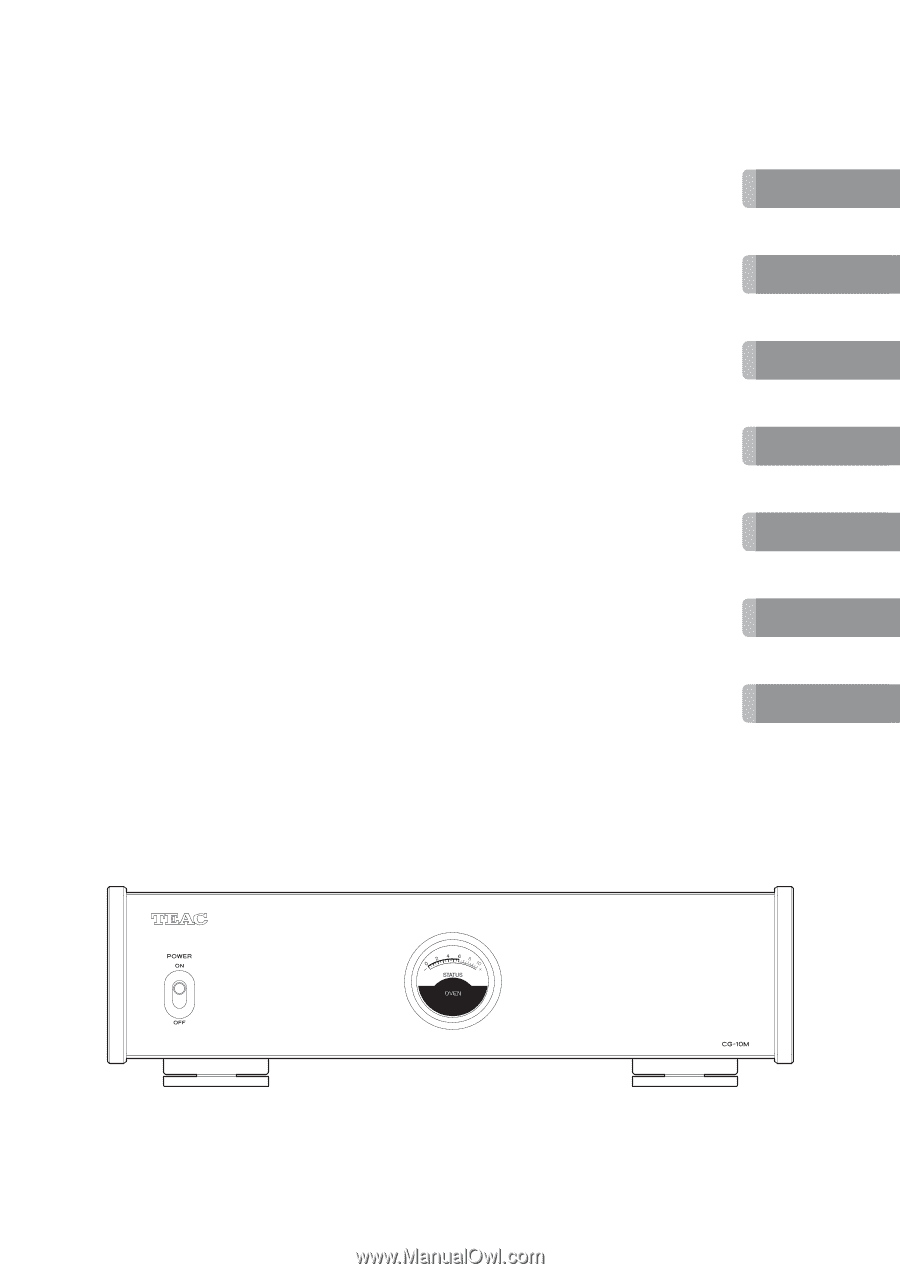
( ) Use this to adjust the brightness of the meter. Meter indicator example OCXO heater output (STATUS) 2 10 (minutes) Elapsed time OCXO The master clock that provides the reference for this unit contains an oven-controlled crystal oscillator (OCXO). This OCXO, which actually has both a crystal - TEAC CG-10M | Owners Manual - Page 8
Basic operation Troubleshooting 1 Shift the POWER switch to its ON position to turn the unit on. If you experience a problem with this unit, please take a moment to review the following information before requesting service. If it still does not operate correctly, contact the retailer where you - TEAC CG-10M | Owners Manual - Page 9
Specifications Clock outputs Included items BNC connectors 4 Power cord × 1 Output sampling frequency 10 MHz Owner's manual (this document, including warranty) × 1 Output impedance 50 Ω oo For information about the warranty, users living in the USA and EN Input level 0.5 Vrms Canada - TEAC CG-10M | Owners Manual - Page 10
INSTRUCTIONS DE SÉCURITÉ IMPORTANTES AT TENTION : POUR RÉDUIRE LE RISQUE D'ÉLECTROCUTION, NE RETIREZ PAS LE CAPOT (OU L'ARRIÈRE). AUCUNE PIÈCE INTERNE N'EST RÉPARABLE PAR L'UTILISATEUR. CONFIEZ TOUTE RÉPARATION À UN SERVICE avec des chariots, socles, trépieds, supports ou tables spécifiés par le - TEAC CG-10M | Owners Manual - Page 11
détaillées sur la mise au rebut des vieux équipements électriques/ électroniques et piles/accumulateurs hors d'usage, veuillez contacter votre mairie, le service d'ordures ménagères ou le magasin dans lequel vous avez acquis l'équipement. Les noms de société et de produit cités dans ce document - TEAC CG-10M | Owners Manual - Page 12
référer ultérieurement. INSTRUCTIONS DE SÉCURITÉ IMPORTANTES 10 Éléments fournis 12 Utilisation du site mondial TEAC 12 Avant l'utilisation 13 Entretien 13 Branchement de l'équipement 14 Nomenclature et fonctions des parties 15 Fonctionnement de base 16 Guide - TEAC CG-10M | Owners Manual - Page 13
Avant l'utilisation Entretien VVPrécautions concernant l'emplacement Essuyez les saletés du capot supérieur et des autres surfaces au oo Quand vous installez cette unité, laissez un peu d'espace (au moins 3 cm) entre elle et les murs et d'autres appareils afin de permettre une bonne dissipation - TEAC CG-10M | Owners Manual - Page 14
les branchements avant de mettre l'unité sous tension. oo Lisez attentivement les modes d'emploi des appareils que vous branchez et suivez leurs instructions quand vous faites les branchements. oo Ne regroupez pas les câbles de connexion avec des cordons d'alimentation. Cela pourrait entraîner des - TEAC CG-10M | Owners Manual - Page 15
Avant A Arrière Nomenclature et fonctions des parties FR B C A Interrupteur d'alimentation POWER Sert à mettre l'unité sous et hors tension. B Indicateur d'état du four (OVEN) Il affiche le statut de fonctionnement (sortie de chauffage) du four dans l'oscillateur OCXO. À la mise sous tension, le - TEAC CG-10M | Owners Manual - Page 16
Fonctionnement de base Guide de dépannage 1 Basculez l'interrupteur d'alimentation POWER en position ON pour allumer l'unité. Si vous rencontrez un problème avec cette unité, veuillez prendre un moment - TEAC CG-10M | Owners Manual - Page 17
Caractéristiques techniques Sorties d'horloge Éléments fournis Prises BNC 4 Cordon d'alimentation × 1 Fréquence d'échantillonnage de sortie 10 MHz Impédance de sortie 50 Ω Niveau d'entrée 0,5 Vrms (onde sinusoïdale) Mode d'emploi (ce document, y compris la garantie) × 1 oo Pour plus d' - TEAC CG-10M | Owners Manual - Page 18
APARATO HASTA QUE HAYA SIDO REPARADO. oo EL USO DE CONTROLES, AJUSTES O PROCEDIMIENTOS QUE NO SEAN LOS ESPECIFICADOS EN ESTE MANUAL PUEDE CAUSAR EXPOSICIÓN A RADIACIONES PELIGROSAS. 1) Lea estas instrucciones. 2) Conserve estas instrucciones. 3) Cumpla con lo indicado en los avisos. 4) Siga todas - TEAC CG-10M | Owners Manual - Page 19
AVISO Los productos con construcción de Clase ! están equipados con un cable de alimentación que tiene conexión de tierra. El cable de estos productos deberá conectarse a una toma de corriente que tenga conexión de protección de tierra. EN EE. UU./CANADÁ, UTILICE SOLO ALIMENTACIÓN CON CORRIENTE DE - TEAC CG-10M | Owners Manual - Page 20
incluidos Gracias por elegir TEAC. Lea este manual atentamente para obtener el mejor rendimiento de esta unidad. Después de leerlo, guárdelo en un lugar seguro para futuras consultas. INSTRUCCIONES IMPORTANTES DE SEGURIDAD 18 Accesorios incluidos 20 Web global de TEAC 20 Registro del producto - TEAC CG-10M | Owners Manual - Page 21
Antes de su utilización Mantenimiento VVPrecauciones de emplazamiento oo Para permitir una buena disipación del calor, deje un poco de espacio (al menos 3 cm) entre esta unidad y las paredes u otros dispositivos cuando la instale. Si se coloca en un rack, tome precauciones para evitar un - TEAC CG-10M | Owners Manual - Page 22
la unidad durante un largo periodo de tiempo. VVTermine de realizar todas las conexiones antes de encender la unidad. oo Lea atentamente todos los manuales de los dispositivos que esté conectando y siga sus instrucciones para hacer las conexiones. oo No mezcle ni agrupe los cables de las conexiones - TEAC CG-10M | Owners Manual - Page 23
Panel frontal A Panel posterior Nombres y funciones de las partes ES B C A Interruptor POWER Se utiliza para encender y apagar la unidad. B Medidor del horno (OVEN) Muestra el estado operativo (salida del calefactor) del horno del OCXO. Al encender la alimentación, el movimiento de la aguja del - TEAC CG-10M | Owners Manual - Page 24
. Para más información sobre cómo hacer esto, consulte el manual de instrucciones del dispositivo que esté recibiendo la entrada de reloj diferente en la toma de electricidad para confirmar que suministra corriente. No sale sonido. ee Reconfirme las conexiones con los demás componentes del equipo. - TEAC CG-10M | Owners Manual - Page 25
dicho motivo, recomendamos que se oo Las ilustraciones de este manual pueden diferir ligeramente de los dejen 10 minutos de calentamiento antes de frecuencia dentro de ±3 ppb Precisión de frecuencia dentro de ±0,1 ppm (cuando sale de fábrica) (ppm = 10−6, ppb = 10−9) General Alimentación Modelo - TEAC CG-10M | Owners Manual - Page 26
). DIE BAUTEILE IM GERÄTEINNEREN BEDÜRFEN NICHT DER WARTUNG DURCH DEN NUTZER. WENDEN SIE SICH IM WARTUNGS-/REPARATURFALL AN DEN QUALIFIZIERTEN SERVICE. < Das Blitzsymbol mit Pfeilspitze in einem gleichseitigen Dreieck weist den Benutzer auf das Vorhandensein ein er nicht isolierten „gefährlichen - TEAC CG-10M | Owners Manual - Page 27
WARNUNG Der Netzstecker von „Class !"-Produkten besitzt einen Schutz kontakt. Achten Sie darauf, dass die verwendete Wandsteckdose geerdet ist (Schutzkontaktsteckdose). WICHTIGER HINWEIS oo Vermeiden Sie die Einwirkung von Tropf- oder Spritzwasser. oo Stellen Sie niemals Vasen oder andere mit Flü - TEAC CG-10M | Owners Manual - Page 28
, damit Sie zu einem späteren Zeitpunkt darauf zurückgreifen können. WICHTIGE SICHERHEITSHINWEISE 26 Lieferumfang 28 Die weltweite Webseite von TEAC 28 Vorbereitung 29 Wartung 29 Verkabelung der Geräte 30 Bezeichnungen und Funktionen am Gerät 31 Grundlegende Bedienung 32 Fehlerbehebung 32 - TEAC CG-10M | Owners Manual - Page 29
Vorbereitung Wartung VVHinweis zur Wahl des Aufstellungsorts oo Lassen Sie bei der Aufstellung des Geräts Abstand (wenigstens 3 cm) zur nächsten Wand oder anderen Geräten, sodass eine ausreichende Belüftung gewährleistet ist. Wenn Sie das Gerät in ein Rack einbauen, sollten Sie zum Schutz vor - TEAC CG-10M | Owners Manual - Page 30
BNC-Kabel A Digitalgerät mit einem 10MHz-Eingang (UD-503 o. ä.) B c Steckdose A Clock-Ausgangsbuchsen (10MHz OUT) Über die Anschlüsse werden die 10MHz Clock-Signale ausgegeben. Verbinden Sie diese Clock-Ausgangsbuchsen mit den ClockEingangsbuchsen von CD-Spielern, D/A-Wandlern und anderen - TEAC CG-10M | Owners Manual - Page 31
der Anzeige an. Beispiel für die Darstellung auf der Anzeige OCXOWärmeabgabe (STATUS) 2 10 (Minuten) Verstrichene Zeit OCXO Die Master-Clock, die das Referenzsignal für dieses Gerät ausgibt, wird über einen beheizten Quarzoszillator (OXCO) generiert. Dieser OCXO kombiniert einen Quarzoszillator - TEAC CG-10M | Owners Manual - Page 32
lesen Sie bitte zuerst die folgenden Informationen, bevor Sie den technischen Service kontaktieren. Wenn weiterhin Fehler auftreten, wenden Sie sich zuerst an angeschlossenen Quellgerät. Vergewissern Sie sich, dass sich der Clock-Eingang im Empfangs gerät auf das Signal synchronisiert. Einzelheiten - TEAC CG-10M | Owners Manual - Page 33
dem Rückeinband (Garantieschein). Anwender aus Europa und anderen Regionen finden die Garantieinformationen auf Seite 58. Unterlegscheiben × 3 Stabilisierungsdauer der Clock etwa 2 Minuten (Dauer, bis sich der Oszillator nach dem Einschalten des Geräts stabilisiert hat) oo Allerdings wird die - TEAC CG-10M | Owners Manual - Page 34
IMPORTANTI ISTRUZIONI PER LA SICUREZZA CAUTELA: PER RIDURRE IL RISCHIO DI SCOSSE ELETTRICHE, NON RIMUOVERE IL COPERCHIO (O IL RETRO). NON CI SONO PARTI RIPARABILI ALL'INTERNO DESTINATE ALL'UTENTE. PER LE RIPARAZIONI RIVOLGERSI SOLO A PERSONALE QUALIFICATO. < Il simbolo di un fulmine appuntito - TEAC CG-10M | Owners Manual - Page 35
CAUTELA oo Non esporre questo apparecchio a gocce o schizzi. oo Non appoggiare alcun contenitore, come un vaso, pieno d'ac- qua sopra l'apparecchio. oo Non installare questo apparecchio in spazi ristretti come una libreria o ambienti simili. oo Questo apparecchio dovrebbe essere collocato sufficien- - TEAC CG-10M | Owners Manual - Page 36
Indice Accessori inclusi Grazie per aver scelto TEAC. Leggere attentamente questo manuale per ottenere le migliori prestazioni da questa unità. Dopo averlo letto, conservarlo in un luogo sicuro per riferimenti futuri. IMPORTANTI ISTRUZIONI PER LA SICUREZZA 34 - TEAC CG-10M | Owners Manual - Page 37
Prima dell'uso Manutenzione VVPrecauzioni per il posizionamento oo Quando si installa questa unità, lasciare un po' di spazio (almeno 3 cm) dalle pareti e altri dispositivi per consentire una buona dissipazione del calore. Se lo si mette in un rack, prendere le precauzioni necessarie per evitare - TEAC CG-10M | Owners Manual - Page 38
10 MHz (UD-503 ecc.) B c Presa a muro A Connettori dell'uscita clock (10MHz OUT) Questi mandano in uscita segnali di clock a 10 MHz. Collegare questi connettori di uscita clock ai connettori di ingresso clock di lettori CD, convertitori D/A e altri dispositivi digitali che supportano l'ingresso 10 - TEAC CG-10M | Owners Manual - Page 39
la luminosità del misuratore. Esempio di indicatore del misuratore Uscita del riscaldatore OCXO (STATUS) 2 10 (minuti) Tempo trascorso OCXO Il master clock che fornisce il riferimento per questa unità contiene un oscillatore a cristallo controllato a forno (OCXO). Questo OCXO, che ha in realt - TEAC CG-10M | Owners Manual - Page 40
venga agganciato nel dispositivo di ricezione. Per i dettagli su come effettuare questa operazione, consultare il manuale di istruzioni del dispositivo che riceve l'ingresso clock. L'unità non si accende. ee Controllare che il cavo di alimentazione sia completamente inserito nella presa di corrente - TEAC CG-10M | Owners Manual - Page 41
) OCXO (oscillatore a cristallo) Tempo di stabilizzazione del clock circa 2 minuti (tempo impiegato dall'oscillatore a stabilizzarsi dopo dimensioni sono approssimativi. oo Le illustrazioni contenute in questo manuale potrebbero differire leggermente dai modelli di produzione. IT Generali - TEAC CG-10M | Owners Manual - Page 42
BELANGRIJKE VEILIGHEIDSINSTRUCTIES LET OP: LET OP: VERWIJDER HET DEKSEL (OF DE ACHTERKANT) NIET OM EEN ELEKTRISCHE SCHOK TE VOORKOMEN. BEVAT GEEN ONDERDELEN WAAR GEBRUIKERS AAN KUNNEN WERKEN. LAAT ONDERHOUD OVER AAN BEVOEGD ONDERHOUDSPERSONEEL. < Het bliksemsymbool in de driehoek waarschuwt de - TEAC CG-10M | Owners Manual - Page 43
WAARSCHUWING Producten die met een Class ! constructie zijn uitgerust met een driepolige plug met massaverbinding. Het snoer van zo'n apparaat dient te worden aangesloten op een stopcontact met randaarde. LET OP oo Stel dit apparaat niet bloot aan regen of spatten. oo Plaats geen met vloeistof - TEAC CG-10M | Owners Manual - Page 44
lezen op een veilige plek op, zodat u deze later kunt raadplegen. BELANGRIJKE VEILIGHEIDSINSTRUCTIES 42 Meegeleverde onderdelen 44 Gebruik van de TEAC Global site 44 Vóór gebruik 45 Onderhoud 45 Apparatuur aansluiten 46 Namen en functies van onderdelen 47 Basisbediening 48 Problemen oplossen - TEAC CG-10M | Owners Manual - Page 45
Vóór gebruik Onderhoud VVVoorzorgsmaatregelen bij plaatsing oo Laat bij het installeren van dit apparaat enige ruimte (minstens 3 cm) tussen het apparaat en de wand en andere apparatuur om voldoende warmteafvoer mogelijk te maken. Als het apparaat in een rek wordt geplaatst, neem dan maatregelen - TEAC CG-10M | Owners Manual - Page 46
Apparatuur aansluiten Meegeleverd netsnoer BNC-coaxkabel A Digitaal apparaat dat een 10-MHz-ingangssignaal ondersteunt (UD-503 etc.) B c Stopcontact A Klokuitgang aansluitingen (10MHz OUT) Hier worden 10-MHz-signalen uitgevoerd. Sluit deze klokuitgangen aan op de klokingangen van cdspelers, D/A- - TEAC CG-10M | Owners Manual - Page 47
Frontpaneel Namen en functies van onderdelen A B Achterpaneel NL C A POWER-schakelaar Hiermee wordt het apparaat in- of uitgeschakeld. B Meter (OVEN) Dit geeft de bedrijfsstatus weer (uitvoer verwarmer) van de oven in de OCXO. Als het apparaat wordt ingeschakeld zijn de bewegingen van de - TEAC CG-10M | Owners Manual - Page 48
schakelaar op ON om het appa- raat in te schakelen. Als u een probleem met dit apparaat ervaart, controleer dan eerst de volgende informatie, alvorens service aan te vragen. Als er nog steeds niet correct werkt, neem dan contact op met de leverancier waar u het apparaat heeft gekocht. Algemeen oo - TEAC CG-10M | Owners Manual - Page 49
Specificaties Klokuitgangen BNC-aansluitingen 4 Uitgangs-samplingfrequentie 10 MHz Uitgangsimpedantie 50 Ω Ingangsniveau 0,5 Vrms (sinus) OCXO (kristaloscillator) Klokstabilisatietijd ongeveer 2 minuten (tijd totdat de oscillator stabiliseert nadat het apparaat is ingeschakeld) oo Zelfs nadat - TEAC CG-10M | Owners Manual - Page 50
för att utsätta elektroniken. Det finns inga delar inuti som användaren kan reparera. oo Om du upplever problem med denna produkt skall du kontakta butiken där du köpte enheten för service. Använd inte produkten tills den har reparerats. oo Användning av kontroller eller justering eller prestanda av - TEAC CG-10M | Owners Manual - Page 51
FÖRSIKTIGHET oo Utsätt inte denna apparat för dropp eller stänk. oo Ställ inga föremål som innehåller vätska, t.ex. vaser, på apparaten. oo Installera inte apparaten i ett slutet utrymme såsom en bok- hylla eller liknande. oo Apparaten ska placeras tillräckligt nära vägguttaget så att du lätt kan nå - TEAC CG-10M | Owners Manual - Page 52
. Efter att du har läst den, vänligen spara den på en säker plats för framtida bruk. VIKTIGA SÄKERHETSINSTRUKTIONER 50 Medföljande delar 52 Använda TEAC Global Site 52 Före användning 53 Underhåll 53 Utrustning för anslutning 54 Namn och funktion på enhetens delar 55 Grundläggande användning - TEAC CG-10M | Owners Manual - Page 53
Före användning Underhåll VVFörsiktighetsåtgärder vid placering oo När du installerar den här enheten, lämna lite utrymme (minst 3 cm) mellan enheten och väggar och andra enheter för att möjliggöra god värmeavledning. Om du sätter den i en hållare, utför åtgärder för att lämna minst 5 cm öppna - TEAC CG-10M | Owners Manual - Page 54
Utrustning för anslutning Nätsladd ingår BNC koaxial kabel A Digital enhet som stöder 10-MHz-ingångssignaler (UD-503 etc.) B c Vägguttag A Klockutgångskontakter (10MHz OUT) Dessa matar ut 10-MHz-klocksignaler. Anslut dessa klockutgångskontakter till klockingångskontakter på CD-spelare, D/A- - TEAC CG-10M | Owners Manual - Page 55
Namn och funktion på enhetens delar Front A B Baksida C SV A POWER-brytare Används för att slå på och av enheten. B Indikator för ugn (OVEN) Denna visar ugnens driftstatus (värmeproduktion) i OCXO. När den tillkopplas, kommer rörelsen av indikatorvisaren bli instabil. Efter cirka två minuter - TEAC CG-10M | Owners Manual - Page 56
1 Ställ POWER-brytaren till ON för att slå på enheten. Felsökning Om du upplever problem med denna enhet, vänligen ta dig lite tid att se över den följande informationen innan du ringer efter service. Om denna enhet fortfarande inte fungerar korrekt, kontakta återförsäljaren, där du köpte enheten - TEAC CG-10M | Owners Manual - Page 57
Specifikationer Klockutgångar BNC-kontakter 4 Utgångssamplingsfrekvens 10 MHz Utgångsimpedans 50 Ω Ingångsniv 0,5 Vrms (sinus) OCXO (kristalloscillator) Klockstabiliseringstid cirka 2 minuter (tid tills oscillatorn stabiliseras efter att enheten startats) oo Även efter att två minuter har gått - TEAC CG-10M | Owners Manual - Page 58
manual or otherwise provided with the product. oo Damage occurring during shipment of the product (Claims must be presented to the carrier). oo Damage resulting from the repair or attempted repair by anyone other than TEAC or an authorized TEAC service du non-respect des instructions conte- nues dans - TEAC CG-10M | Owners Manual - Page 59
service après-vente agréé par TEAC dans le pays d'achat du produit. Si vous ne trouvez pas de service après-vente agréé dans votre région, veuillez contacter TEAC of the country of purchase. In case of a defect or a problem, please contact the dealer where you bought the product. Ce produit est - TEAC CG-10M | Owners Manual - Page 60
) Model/Modèle : CG-10M Serial No./N° de série Owner's address/Adresse du propriétaire Date of purchase/Date de l'achat Owner's name/Nom du propriétaire Dealer's name/Nom du détaillant Dealer's address/Adresse du détaillant Z TEAC CORPORATION TEAC AMERICA, INC. TEAC AUDIO EUROPE 1-47 Ochiai
-
 1
1 -
 2
2 -
 3
3 -
 4
4 -
 5
5 -
 6
6 -
 7
7 -
8
-
9
-
10
-
11
-
12
-
13
-
14
-
15
-
16
-
17
-
18
-
19
-
20
-
21
-
22
-
23
-
24
-
25
-
26
-
27
-
28
-
29
-
30
-
31
-
32
-
33
-
34
-
35
-
36
-
37
-
38
-
39
-
40
-
41
-
42
-
43
-
44
-
45
-
46
-
47
-
48
-
49
-
50
-
51
-
52
-
53
-
54
-
55
-
56
-
57
-
58
-
59
-
60
 |
 |
ENGLISH
FRANÇAIS
ESPAÑOL
DEUTSCH
ITALIANO
NEDERLANDS
SVENSKA
D01322850A
Z
CG-10M
Master Clock Generator
OWNER’S MANUAL
MODE D’EMPLOI
MANUAL DEL USUARIO
BEDIENUNGSANLEITUNG
MANUALE DI ISTRUZIONI
GEBRUIKERSHANDLEIDING
BRUKSANVISNING