TEAC LP-R400 Owners Manual - Page 22
Recording, MANUAL/AUTO REC button.
 |
View all TEAC LP-R400 manuals
Add to My Manuals
Save this manual to your list of manuals |
Page 22 highlights
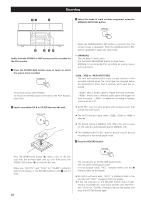
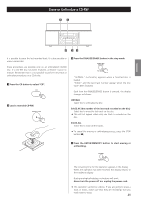
13 4 Recording 3 Select the mode of track number assignment using the MANUAL/AUTO REC button. 5 2 27 Audio from the PHONO or AUX sources can be recorded on the CD recorder. 1 Press the PHONO/AUX button once or twice to select the source to be recorded. When the MANUAL/AUTO REC button is pressed once, the current mode is displayed. Press the MANUAL/AUTO REC button repeatedly to select any other mode. - - (MANUAL) The unit doesn't divide tracks. Use the TRACK INCREMENT button to divide tracks. MANUAL is recommended for recording an analog source such as a record. -20db, -30db or -40db (AUTO REC) The unit will automatically insert a track division in the recorded material when the sound level has dropped below the threshold for more than 2 seconds, and sound has restarted. To record a record, select PHONO. To record an external source connected to the AUX IN jacks, select AUX. "-20db" takes a louder signal to trigger the track increment. "-40db" means that a relatively quiet signal will trigger the track increment. "-40db" is suitable for recording a noiseless source such as a CD. 2 Load a recordable CD-R or CD-RW disc into the unit. < AUTO REC may not work properly with analog sources that contain low-level noises. < The AUTO indicator lights when -20dB, -30dB or -40dB is selected. < The default setting is MANUAL (off). When the unit is turned on, the setting is automatically reset to MANUAL (off). < The MANUAL/AUTO REC button doesn't work during recording or in the record pause mode. 4 Press the RECORD button. Press the OPEN/CLOSE button (L), place a disc on the disc tray with the printed label side up, and then press the OPEN/CLOSE button (L) to close the disc tray. Make sure "NO TOC" and "CD-R" (or "CD-RW") indicators light on the display, or the RECORD button in step 4 will not work. 22 The red indicator on the RECORD button blinks. The unit enters record pause mode. In record pause mode, "REC" indicator blinks and the J indicator lights on the display. < No button will work while "bUSY" is displayed. Wait a few seconds until "bUSY" disappears from the display. < If the red indicator on the RECORD button doesn't light, reload a recordable disc, wait a few seconds until "NO TOC" and "CD-R" (or "CD-RW") indicators light on the display, and press the RECORD button again.
-
 1
1 -
2
-
3
-
4
-
5
-
6
-
7
-
8
-
9
-
10
-
11
-
12
-
13
-
14
-
15
-
16
-
 17
17 -
 18
18 -
 19
19 -
 20
20 -
 21
21 -
 22
22 -
 23
23 -
 24
24 -
 25
25 -
 26
26 -
 27
27 -
28
-
29
-
30
-
31
-
32
-
33
-
34
-
35
-
36
-
37
-
38
-
39
-
40
-
41
-
42
-
43
-
44
-
45
-
46
-
47
-
48
-
49
-
50
-
51
-
52
-
53
-
54
-
55
-
56
-
57
-
58
-
59
-
60
-
61
-
62
-
63
-
64
-
65
-
66
-
67
-
68
-
69
-
70
-
71
-
72
-
73
-
74
-
75
-
76
 |
 |
