Toshiba 46G300U User Manual - Page 55
Setting up the network address for, the LAN port
 |
View all Toshiba 46G300U manuals
Add to My Manuals
Save this manual to your list of manuals |
Page 55 highlights
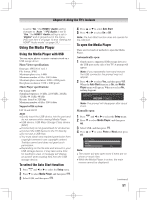
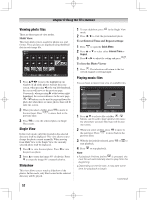
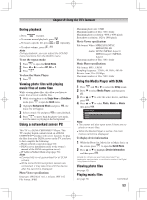
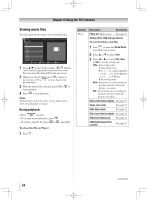
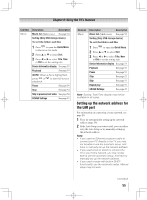
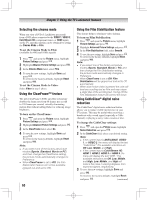
Chapter 6: Using the TV's features Contents Movie Description Description Movie list (Multi view) See page 54. Sorting (Only USB storage device) To sort the folders and files 1無 Press to open the Quick Menu in the movie list mode. 2無 Press or to select Sort. 3無 Press or to select Title, New or Old to set the sorting rule. Device Information display See page 53 Playback See page 54 NOTE: When a file is highlighted, press or playback. to start full screen Pause See page 54 Stop See page 54 Skip to previous/next video See page 54 SOUND Settings See page 45 Contents Music Description Description Music list (Multi view) See page 52. Sorting (Only USB storage device) To sort the folders and files 1無 Press to open the Quick Menu. 2無 Press or to select Sort. 3無 Press or to select Title, New or Old to set the sorting rule. Device Information display See page 53 Playback See page 52 Pause Stop See page 52 See page 52 Skip Repeat play SOUND Settings See page 53 See page 53 See page 45 Note: Sorting, Total Time display may not be available in all cases. Setting up the network address for the LAN port For information on connecting a home network, see page 20. 1無 First, try automatically setting up the network address (page 56). 2無 If the Auto Setup is not successful, you can either retry the Auto Setup or try manually setting up the network address. Note: • If you used an Ethernet crossover cable to connect your PC directly to the TV, you may not be able to use the automatic setup, and have to manually set up the network address. • If you used a hub or switch to connect the TV to your home network, you may not be able to use the automatic setup, and have to manually set up the network address. • If you used a router with built-in DHCP functionality, use the automatic setup. Manual setup may not work. (continued) 55
-
 1
1 -
2
-
3
-
4
-
5
-
6
-
7
-
8
-
9
-
10
-
11
-
12
-
13
-
14
-
15
-
16
-
17
-
18
-
19
-
20
-
21
-
22
-
23
-
24
-
25
-
26
-
27
-
28
-
29
-
30
-
31
-
32
-
33
-
34
-
35
-
36
-
37
-
38
-
39
-
40
-
41
-
42
-
43
-
44
-
45
-
46
-
47
-
48
-
49
-
 50
50 -
 51
51 -
 52
52 -
 53
53 -
 54
54 -
 55
55 -
 56
56 -
 57
57 -
 58
58 -
 59
59 -
 60
60 -
61
-
62
-
63
-
64
-
65
-
66
-
67
-
68
-
69
-
70
-
71
-
72
 |
 |