Toshiba 46L5200U1 User Guide
Toshiba 46L5200U1 Manual
 |
View all Toshiba 46L5200U1 manuals
Add to My Manuals
Save this manual to your list of manuals |
Toshiba 46L5200U1 manual content summary:
- Toshiba 46L5200U1 | User Guide - Page 1
"Troubleshooting" on page 122 in this guide. Owner's Record The model number and serial number are on the back and side of your TV. Record these numbers in the spaces below. Refer to these numbers whenever you communicate with your Toshiba dealer about this TV Model number Serial number Note - Toshiba 46L5200U1 | User Guide - Page 2
Toshiba LED TV. This manual will help you use the many exciting features of your new LED TV. Before operating your LED TV, carefully read this manual completely. WARNING To prevent injury, this apparatus must be securely attached to the floor/wall in accordance with the installation instructions - Toshiba 46L5200U1 | User Guide - Page 3
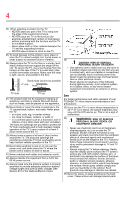
: a) the warranty, and b) the user's authority to operate this equipment under the rules of the Federal Communications Commission. 23) DANGER: RISK OF SERIOUS PERSONAL INJURY, DEATH, OR EQUIPMENT DAMAGE! Never place the TV on an unstable cart, stand, or table. The TV may fall, causing serious - Toshiba 46L5200U1 | User Guide - Page 4
subject to excessive dust or vibration. 26) Always place the TV on the floor or a sturdy, level, stable surface that can support the weight of the unit. To secure the TV, use a sturdy strap from the hook(s) on the rear of the TV to a wall stud, pillar, or other immovable structure. Make sure the - Toshiba 46L5200U1 | User Guide - Page 5
are attached to the wall and the back of the TV as described in the instructions provided with the wall bracket. 6) After attaching the appropriate bracket(s) to the wall and the back of the TV, remove the pedestal stand from the TV, as described below. 7) VESA Mounting Pattern TV Size Hole Pattern - Toshiba 46L5200U1 | User Guide - Page 6
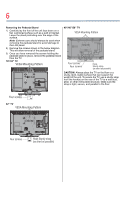
in place, remove the pedestal stand from the TV. 19"/24" TV VESA Mounting Pattern 40"/46"/50" TV VESA Mounting Pattern Four screws Four screws Hook Sturdy strap (as short as possible) CAUTION: Always place the TV on the floor or a sturdy, level, stable surface that can support the weight of the - Toshiba 46L5200U1 | User Guide - Page 7
or an experienced radio/TV technician for help. Caution: Changes or modifications to this equipment not expressly approved by Toshiba could void the user's authority to operate this equipment. ENERGY STAR® User Information ENERGY STAR User Information Statement: the factory default settings of this - Toshiba 46L5200U1 | User Guide - Page 8
guide is copyrighted by Toshiba America Information Systems, Inc. with all rights reserved. Under the copyright laws, this guide remove the acoustical problems caused by small MANUAL. IN NO EVENT SHALL TOSHIBA BE LIABLE FOR ANY INCIDENTAL, CONSEQUENTIAL, SPECIAL, OR EXEMPLARY DAMAGES, WHETHER BASED - Toshiba 46L5200U1 | User Guide - Page 9
Contents Chapter 1: Introduction 15 Features 16 Overview of installation, setup, and use 17 TV front and side panel controls and connections ..18 TV back panel connections 19 Chapter 2: Connecting Your TV 22 Overview of cable types 22 Coaxial (F-type) cable 22 Standard A/V cables (red/white/ - Toshiba 46L5200U1 | User Guide - Page 10
3: Using the Remote Control 41 Installing batteries 41 Remote control effective range 42 Learning about the remote control 43 Chapter 4: Menu Layout and Navigation 46 Main menu layout 46 Setup/Installation menu layout 48 Navigating the menu system 48 Chapter 5: Setting up your TV 50 Initial - Toshiba 46L5200U1 | User Guide - Page 11
78 Using the FREEZE feature 78 Adjusting the picture 79 Selecting the picture mode 79 Adjusting the picture quality 80 Using closed captions 81 Base closed captions 81 Digital CC settings 82 CC Selector 83 Adjusting the audio 84 Muting the sound 84 Using the digital audio selector 84 - Toshiba 46L5200U1 | User Guide - Page 12
your PIN code 90 Using parental controls (for USA region 90 Blocking TV programs and movies by rating (V- settings feature 100 Setting the PC Audio 101 Using the Media Player 102 Auto Start function 103 To open the Media Player 103 Viewing photo files 105 Playing music files 106 Viewing - Toshiba 46L5200U1 | User Guide - Page 13
120 MPEG Noise Reduction 120 Game Mode 121 Chapter 8: Troubleshooting 122 General troubleshooting 122 Picture problems 123 Sound problems 125 Remote control problems 125 Channel tuning problems 126 Closed caption problems 126 Rating blocking (V-Chip) problems 126 No HDMI® CEC operation - Toshiba 46L5200U1 | User Guide - Page 14
14 Contents Power maximum current 129 Power consumption 129 Audio power 129 Speaker type 130 Video/audio terminals 130 Video/audio input 130 ColorStream® (component video) HD input...130 HDMI® input 130 Digital audio output 130 PC input 130 Dimensions 131 Mass (weight 131 Operating - Toshiba 46L5200U1 | User Guide - Page 15
Chapter 1 Introduction Safety icons This manual contains safety instructions that must be observed to avoid potential been classified according to the seriousness of the risk, and icons highlight these instructions as follows: Indicates an imminently hazardous situation which, if not avoided, will - Toshiba 46L5200U1 | User Guide - Page 16
your new Toshiba wide screen, integrated HD, LED TV: ❖ Integrated digital tuning (8VSB ATSC and QAM)- Eliminates the need for a separate digital converter set-top box (in most cases). ❖ 1366 x 768 output resolution 19L4200U, 32L4200U. ❖ 1920 x 1080 output resolution 24L4200U, 40L5200U, 46L5200U, and - Toshiba 46L5200U1 | User Guide - Page 17
, care, and service information. Keep this manual for future reference. 2 To choose a location for the TV: ❖ Read "Important notes about your TV" on page 7. ❖ Place the TV on the floor or a sturdy, level, stable surface that can support the weight of the unit. Secure the TV to a wall, pillar, or - Toshiba 46L5200U1 | User Guide - Page 18
controls and connections Right side panel TV front TV top (Sample Illustration) L5200U Series front and side panel controls and connections 1 Power On/Standby LED-Power indicator light, (glows green when the TV power is On). 2 Remote sensor (embedded)-Point the remote control toward this remote - Toshiba 46L5200U1 | User Guide - Page 19
adjust the volume level. 9 INPUT-Changes the source you are viewing. Press repeatedly to change from one source to the next. 10 USB port (L5200U Series)-Accesses JPEG or MP3 files, or updates TV firmware. TV back panel connections For explanations of cable types and connections, see "Overview - Toshiba 46L5200U1 | User Guide - Page 20
Setting the PC Audio" on page 101. 4 ANT/CABLE-Antenna input that supports analog (NTSC) and digital (ATSC) off-air antenna signals and analog and digital cable TV Illustration) L5200U Series back panel connections 1 USB port-Accesses JPEG or MP3 files, or updates TV firmware. Component/Standard ( - Toshiba 46L5200U1 | User Guide - Page 21
Introduction 21 TV back panel connections 2 Digital AUDIO OUT-Optical audio output in the Audio Setup menu, see"Setting the PC Audio" on page 101. 6 ANT/CABLE-Antenna input that supports analog (NTSC) and digital (ATSC) off-air antenna signals and analog and digital cable TV (QAM) signals. 7 PC - Toshiba 46L5200U1 | User Guide - Page 22
can purchase cables from most stores that sell audio/video devices. Coaxial (F-type) cable (Sample Illustration) Coaxial cable Coaxial (F-type) cable connects your antenna, cable TV service, and/or cable converter box to the ANT/CABLE input on your - Toshiba 46L5200U1 | User Guide - Page 23
in sets of three, and connects to video devices with analog audio and composite video output. These cables (and the related inputs on your TV) are video cables come in sets of three and connects with video devices with component video output. (ColorStream® is Toshiba's brand of component video - Toshiba 46L5200U1 | User Guide - Page 24
configurations. The connection illustrations in this manual are representative of typical device connections only. The input/output terminals on your devices may differ from those illustrated herein. For details on connecting and using your specific devices, refer to each device's User's Guide. - Toshiba 46L5200U1 | User Guide - Page 25
Stereo VCR VIDEO AUDIO L R IN CH 3 CH 4 OUT L R IN from ANT OUT to TV (Sample Illustration) L4200U Series-Connecting to a VCR, antenna, or cable TV or camcorder Camcorder TV back panel From Cable TV or antenna Cable box Stereo VCR (Sample Illustration) L5200U Series-Connecting to a VCR - Toshiba 46L5200U1 | User Guide - Page 26
set to). Use the cable box controls to change channels. To view the VCR or camcorder video: Turn On the VCR or camcorder video. Select VIDEO input source on the TV.* *To select the video input source, press the INPUT button on the remote control & satellite receiver TV back panel DVD player - Toshiba 46L5200U1 | User Guide - Page 27
connected simultaneously. TV back panel TV back panel DVD TV. The COLOR STREAM HD terminal can be used to display Progressive (480p, 720p) and Interlaced (480i, 1080i) scan systems. Please note that 1080p is not supported. Check the User's Guide of the DVD player in order to determine the best - Toshiba 46L5200U1 | User Guide - Page 28
Video, switch AV input mode appropriately. To view antenna or Cable channels: Select the ANT/CABLE video input source on the TV.* To view the DVD player: Turn input source on the TV* to view the DVD. *To select the video input source, press the INPUT button on the remote control, see "Selecting the - Toshiba 46L5200U1 | User Guide - Page 29
For detailed signal specifications, see "HDMI® signal formats" on page 132. Supported Audio format: Linear PCM, sampling rate 32/44.1/48 kHz. NOTE To connect required (see illustration). See "Setting the HDMI® audio mode" on page 56 TV back panel Playback device (Sample Illustration) L4200U - Toshiba 46L5200U1 | User Guide - Page 30
device to the HDMI® input TV back panel Playback device (Sample Illustration) L5200U Series-HDMI® connections To view the HDMI® device video: Select HDMI 1, HDMI 2, or HDMI 3 (for L5200U Series) video input source on the TV. (Press the INPUT button on the remote control. For more information, see - Toshiba 46L5200U1 | User Guide - Page 31
Connecting Your TV 31 Connecting an HDMI® or DVI device to the HDMI® input For more information, see "Setting the HDMI® audio mode" on page 56 TV back panel Playback device (Sample Illustration) L4200U Series-DVI connections TV back panel Playback device (Sample Illustration) L5200U Series-DVI - Toshiba 46L5200U1 | User Guide - Page 32
basic functions of connected audio/video devices using the TV's remote control if you connect a HDMI® CEC compatible audio receiver or playback device. The HDMI® CEC Control feature uses CEC technology as regulated by the HDMI® standard. TV back panel Audio receiver Playback device (HDMI® CEC DVD - Toshiba 46L5200U1 | User Guide - Page 33
Before controlling the device(s): ❖ After completing the above connections, configure the HDMI® CEC Setup menu with the desired settings, see models incorporating Toshiba's HDMI® CEC. However, Toshiba is not liable for those operations. Refer to the individual instruction manuals for compatibility - Toshiba 46L5200U1 | User Guide - Page 34
"mini-optical" connector.) TV back panel Dolby® Digital decoder or other digital audio system (Sample Illustration) L5200U Series-Connecting a digital audio system To control the audio: 1 Turn on the TV and the digital audio device. 2 Press the MENU button on the remote control and open the Sound - Toshiba 46L5200U1 | User Guide - Page 35
Connecting Your TV 35 Connecting a (Sample Image) Audio Setup screen - Done 6 To save the new settings, highlight Done, and then press the ENTER button. To revert to the may not be compatible with Dolby Digital bitstream signals. Older audio systems that are not compatible with standard optical - Toshiba 46L5200U1 | User Guide - Page 36
to adjust the level. You will need standard audio cables. TV back panel Audio system (Sample Illustration) L4200/L5200U Series-Connecting an ® connection, you can view your computer's display on the TV and hear the sound from the TV's speakers. Connecting a computer to the TV's PC IN terminal When - Toshiba 46L5200U1 | User Guide - Page 37
a computer Computer PC audio cable PC audio output Conversion adaptor (if necessary) (Sample Illustration) L4200U Series Computer connections TV back panel Computer PC audio cable PC audio output Conversion adaptor (if necessary) (Sample Illustration) L5200U Series Computer connections - Toshiba 46L5200U1 | User Guide - Page 38
computer To use a computer, set the monitor output resolution on the computer before connecting it to the TV. The supported signal formats are VGA, SVGA , see "Setting the PC Audio" on page 101. ❖ Some computer models cannot be connected to this TV. ❖ If the computer has a compatible mini D-sub15 - Toshiba 46L5200U1 | User Guide - Page 39
a computer Computer PC audio cable PC audio output HDMI® to DVI adapter cable (Sample Illustration) L4200U Series Connections to HDMI® terminal TV back panel Computer PC audio cable PC audio output HDMI® to DVI adapter cable (Sample Illustration) L5200U Series Connections to HDMI® terminal - Toshiba 46L5200U1 | User Guide - Page 40
40 Connecting Your TV Connecting a computer The supported signal formats are VGA, SVGA, XGA, WXGA, SXGA, 480i (60Hz), (HDMI®), 480p (HDMI®), 720p, 1080i, or 1080p signal program, Native mode scales the video to display the entire picture within the borders of the screen (i.e. no overscanning). - Toshiba 46L5200U1 | User Guide - Page 41
batteries To install batteries: 1 Remove the battery cover from the back of the remote control. Squeeze tab and lift cover (Sample Illustration) Removing the remote back cover 2 Insert two AAA batteries, corresponding to the (+) and (-) markings on the battery compartment. (Sample Illustration - Toshiba 46L5200U1 | User Guide - Page 42
battery acid from leaking into the battery compartment Remote control effective range For optimum performance, aim the remote control directly at the TV and make sure there is no obstruction between the remote control and the TV. 16.4 ft (5m) (Sample Illustration) Remote control effective range - Toshiba 46L5200U1 | User Guide - Page 43
the Remote Control 43 Learning about the remote control Learning about the remote control The buttons used for operating the TV are described below. For the HDMI® CEC remote control functions, see "HDMI® CEC playback device (DVD player, etc.) control" on page 111. (Sample Illustration) Remote - Toshiba 46L5200U1 | User Guide - Page 44
44 Using the Remote Control Learning about the remote control 1 The POWER button turns the TV On/Off. When the TV is on, the power LED indicator on the TV front glows green. 2 The PIC SIZE button cycles through the picture sizes, see "Selecting the picture size" on page 71. 3 The PIC MODE button - Toshiba 46L5200U1 | User Guide - Page 45
the main TV menu system. See "Navigating the menu system" on page 48 The following key functions allow you to control Toshiba HDMI® CEC compatible devices via FF button fast-forwards the DVD or tape. (Press during play mode to view the picture moving rapidly forward.) 25 The EJECT button ejects the - Toshiba 46L5200U1 | User Guide - Page 46
open the Installation menus (illustrated below), press MENU on the remote control or TV control panel. Icon Picture Sound Item Mode Picture Settings Noise Reduction Game Mode Theater Settings Digital Audio Selector Audio Settings Audio Setup Option Dynamic/Standard/Movie/PC/Preference Opens the - Toshiba 46L5200U1 | User Guide - Page 47
Base CC Mode Digital CC Settings Input Labeling AV Input Menu Language Channel Browser Setup HDMI® CEC Player Control Energy Saving Settings /TV Auto Input Switch/TV Auto Power/Device Auto Standby/Speaker Preference 10-minute increments, from 0 min to a maximum of 12 hours Opens the PC Settings menu - Toshiba 46L5200U1 | User Guide - Page 48
the Signal Meter menu Opens the System Information screen Navigating the menu system You can use the buttons on the remote control or TV control panel to access and navigate your TV's on-screen menu system. 1 Press the MENU button to open the menu system. (Sample Image) Navigating the menu system - Toshiba 46L5200U1 | User Guide - Page 49
Navigation 49 Navigating the menu system 3 Press the ENTER button to save your menu settings or select a highlighted item. A highlighted menu item appears in a different color in background may sometimes appear black, depending on the signal the TV is receiving. This is not a sign of malfunction. - Toshiba 46L5200U1 | User Guide - Page 50
Setup When you first turn on or reset the TV, the Initial Setup window will appear. 1 In the Menu Language field, press the ( / arrow) buttons to select your preferred language. 2 Press the ( / arrow) buttons to select Time Zone Setup. Then set your desired time zone, using the ( / arrow) buttons - Toshiba 46L5200U1 | User Guide - Page 51
up your TV 51 Initial Setup Menu language You can choose from three different menu language settings (English, Français, and Españ 3 Press the EXIT button to close the Preferences menu. ANT/CABLE IN This setting configures the input source for the ANT/CABLE terminal. 1 Press the MENU button and - Toshiba 46L5200U1 | User Guide - Page 52
want when you press the CH arrow buttons on the remote control or the control panel, store those channels in the TV's memory. Auto Tuning You can set up the TV to detect all active channels in your area and store them in its memory. Then you can manually add or erase individual channels from memory. - Toshiba 46L5200U1 | User Guide - Page 53
TV's memory. ❖ To tune the TV to a channel not programmed in the channel memory, you must use the Channel Number buttons on the remote control have to repeat the programming process again unless your Cable TV service lineup changes significantly. To program channels automatically: 1 Configure the - Toshiba 46L5200U1 | User Guide - Page 54
, and store all active channels in the channel memory. While the TV is cycling through the channels, the message "Scanning channels, please wait" appears. 5 To cancel channel programming, press the EXIT button on the remote control or highlight Cancel in the on-screen display, and then press the - Toshiba 46L5200U1 | User Guide - Page 55
information, see "Locking channels" on page 98 To manually add digital sub-channels on a physical channel: ❖ Use the Channel Numbers and the (Dash 100) on the remote control to enter the channel number (for example, 56-1). If the channel is found, the number will be added to the list and the box - Toshiba 46L5200U1 | User Guide - Page 56
56 Setting up your TV Setting the AV input mode NOTE Skipped channels cannot be selected with the CH arrow buttons; however, they can be accessed using the number keys on the remote control. If an encrypted channel is accidentally added to the channel list while programming channels, you can - Toshiba 46L5200U1 | User Guide - Page 57
Setting up your TV 57 Viewing the digital signal meter mode.) See "Connecting an HDMI® or DVI device to the HDMI® input" on page 29. (Sample Image) HDMI® Audio mode selection Mode: Auto Digital Analog Description: When viewing the HDMI 1 input, if digital audio from the HDMI® input is - Toshiba 46L5200U1 | User Guide - Page 58
number listed in the Signal Meter screen may not correspond to a virtual TV channel number. Contact your local broadcasters to obtain the RF channel numbers . This feature allows the TV status information to display the correct time zone information for your viewing area. To set the time zone: 1 In - Toshiba 46L5200U1 | User Guide - Page 59
Setting up your TV 59 Viewing the system status 3 Open the System Status menu, highlight System Information, and then press the ENTER button. 4 Press the ( / arrow) buttons to scroll through the menu bar to select Factory Defaults or Support Information. The related information appears. To close - Toshiba 46L5200U1 | User Guide - Page 60
input source to view: 1 Press the INPUT button on the remote control or TV control panel. 2 Do one of the following: ❖ Press 0-4 (L4200U Series) or 0-5 (L5200U Series). ❖ Repeatedly press the ( / arrow) buttons on the remote control, and then press the ENTER button to change the input setting. 60 - Toshiba 46L5200U1 | User Guide - Page 61
input source ❖ Repeatedly press the INPUT button on the remote control or TV control panel to change the input setting. The current signal source displays in the top right if no signal is received in video input mode. ❖ If a CEC device is connected to an HDMI® input, the HDMI® CEC icon appears. - Toshiba 46L5200U1 | User Guide - Page 62
remote control or TV control panel repeatedly to highlight HDMI 1 or HDMI 2. If the connected CEC device has any connected devices, a separate device selection pop-up window appears: (Sample Illustration) HDMI® setting ❖ DTV ❖ DVD ❖ Game Console ❖ HDMI® Switch (HDMI® inputs only) ❖ Laser Disc ❖ - Toshiba 46L5200U1 | User Guide - Page 63
. This will cause that input to be grayed out in the Input Selection screen and skipped over when you press the INPUT button on the remote control. VCR Video Recorder DTV (Sample Image) L5200U Series Input Labeling screen - Toshiba 46L5200U1 | User Guide - Page 64
64 Using the TV's features Labeling the video input sources 5 To save the new input labels, highlight Done, and then press the ENTER button. To revert to the factory - Toshiba 46L5200U1 | User Guide - Page 65
Using the TV's features 65 Tuning channels using the Channel Browser Tuning browser" on page 66. ❖ Quickly surf and tune your recently viewed channels/inputs from the Channel Browser History List. ❖ Surf via Browse mode (to immediately tune channels as you highlight them in the Channel Browser - Toshiba 46L5200U1 | User Guide - Page 66
TV's features Tuning channels using the Channel Browser Favorites browser The Favorites Browser allows you to quickly set the channel or input to delete by pressing BACK CB or NEXT CB arrow buttons. 3 Press arrow) buttons to select either Browse Mode or Select Mode. HDMI-CEC List (Sample Image) - Toshiba 46L5200U1 | User Guide - Page 67
Using the TV's features to select On or Off. NOTE HDMI® CEC List is automatically grayed out and set to Off when Enable HDMI® CEC is switched to Off. See "Using HDMI® the Channel Browser: ❖ Press BACK CB or NEXT CB arrow buttons on the remote control. ❖ Press the BACK CB arrow button to surf - Toshiba 46L5200U1 | User Guide - Page 68
68 Using the TV's features Tuning channels using the Channel Browser 3 Channel or input currently being viewed. 4 Channel or input a channel or input in Browse mode: 1 While watching TV, press BACK CB or NEXT CB arrow buttons to display the Channel Browser and surf back to a previous item or surf - Toshiba 46L5200U1 | User Guide - Page 69
to the left, eventually moving off the left side. Press the BACK CB arrow button to surf backward through the previously tuned channels/inputs. remote control. NOTE Whenever an item is selected that cannot be tuned (for various reasons), the TV will automatically tune to the previously viewed - Toshiba 46L5200U1 | User Guide - Page 70
you want to view. 2 Select a second channel using the Channel Number buttons (and the (Dash 100) button if selecting a digital channel). 3 Press the CH RTN button on the remote control. The previous channel will display. Each time you press the CH RTN button, the TV will switch back and forth - Toshiba 46L5200U1 | User Guide - Page 71
the picture size that displays the current program in the way that looks best to you. You can save separate picture size preferences for each input on your TV. To select the picture size: 1 Press the PIC SIZE button on the remote. 2 With the Picture Size menu displayed, do one of the following - Toshiba 46L5200U1 | User Guide - Page 72
TV's features Selecting the picture size To select the picture size using the menus: 1 Select Picture Size in the Theater Settings menu. 2 Press the ( / arrow) buttons to select the desired picture size setting on page 76. Full The Full 16:9 setting is for viewing in the 16:9 (480i, 480p) source - Toshiba 46L5200U1 | User Guide - Page 73
Using the TV's features 73 Selecting the picture size The Full setting is for viewing in 1080i, 1080p, and 720p program source. (Sample Illustration) Picture size - Full The edges of the picture may be hidden. TheaterWide 1 This setting is for viewing in 4:3 format programs. (Sample - Toshiba 46L5200U1 | User Guide - Page 74
of the screen (i.e. no over-scanning). ❖ This is especially useful for external HD sources such as DVD movies, Video Games, or computer graphics. NOTE ❖ The Native mode is supported only for HDMI® (1080i, 1080p, 720p, 480i, and 480p), ColorStream® (1080i and 720p), and ANT/CABLE (digital) inputs - Toshiba 46L5200U1 | User Guide - Page 75
Using the TV's features 75 Selecting the picture size 4:3 (Sample Illustration) Picture size - 4:3 Some program formats will display with sidebars and/or bars at the top and bottom. Normal This setting is for viewing VGA, SVGA, XGA, WXGA, and SXGA sources. (Sample Illustration) Picture size - - Toshiba 46L5200U1 | User Guide - Page 76
76 Using the TV's features Scrolling the TheaterWide® picture (TheaterWide 2 and 3 only) Scrolling the TheaterWide® picture (TheaterWide 2 and 3 only) You can set separate scroll settings for the TheaterWide 2 and TheaterWide 3 modes for each input. To set the scroll settings: 1 Press the MENU - Toshiba 46L5200U1 | User Guide - Page 77
Aspect feature Using the Auto Aspect feature When this feature is set to On, the TV will automatically select the picture size when one of the following input In the Auto Aspect Ratio field, select On. 4 To save the new settings, highlight Done, and then press the ENTER button. To revert to the - Toshiba 46L5200U1 | User Guide - Page 78
Selecting the cinema mode Selecting the cinema mode When you view a DVD (3:2 pulldown processed) from a DVD player connected to the VIDEO, ColorStream® HD (component video), or HDMI® inputs on the TV, smoother motion can be obtained by setting the Cinema Mode to Film. To set the Cinema Mode to Film - Toshiba 46L5200U1 | User Guide - Page 79
PC Preference Description: Bright and dynamic picture (factory setting) Standard picture settings (factory setting) Lower contrast for darkened room (factory setting) Designed for viewing of PC tables and documents Your personal preferences NOTE PC mode is available for HDMI® and PC inputs only - Toshiba 46L5200U1 | User Guide - Page 80
TV's features Adjusting the picture 3 Press the ( / arrow) buttons to select the picture mode you prefer, and then press the ENTER button. (Sample Image) Mode entire screen. When in video mode and no signal is input, this selection is automatically set to 0. (Settings are stored in memory.) ** - Toshiba 46L5200U1 | User Guide - Page 81
press the ENTER button. You can use any of the picture modes (see "Selecting the picture mode" on page 79) as a starting point for adjusting the picture settings. To revert back to the base mode that you began adjusting the picture settings from, highlight Reset, and then press the ENTER button. The - Toshiba 46L5200U1 | User Guide - Page 82
not closed captioned, no captions will display onscreen. To view text, highlight T1, T2, T3, or T4. (Sample Illustration) Captions - text NOTE If text is not available in your area, a black rectangle may appear on screen. If this happens, set the Base CC Mode to Off. To turn off closed caption - Toshiba 46L5200U1 | User Guide - Page 83
change back to the current Base CC Mode setting. You can also use the CC Selector to select digital closed caption services, if available. When such services are not available, the CC Selector presents a default list of services. If the selected service is not available, the next best service will - Toshiba 46L5200U1 | User Guide - Page 84
order: 1/2 Mute, Mute, Volume, 1/2 Mute, etc. (Sample Image) Levels of mute If closed caption mode is set to Off when you select MUTE mode, the closed caption feature becomes active if the TV program is closed captioned. To mute the audio without activating the closed captioning, press the VOL - Toshiba 46L5200U1 | User Guide - Page 85
arrow) buttons to select the desired service. 4 Press the EXIT button. Selecting stereo/SAP broadcasts The multi-channel TV sound (MTS) feature allows you settings to the factory defaults, highlight Reset, and then press the ENTER button. NOTE ❖ You can typically leave the TV in Stereo mode - Toshiba 46L5200U1 | User Guide - Page 86
above. NOTE ❖ A second audio program (SAP) can be heard only on those TV stations that offer it. For example, a station might broadcast another language as a there is no sound at all in SAP mode. If this happens, set the MTS feature to Stereo mode. Adjusting the audio quality You can adjust the - Toshiba 46L5200U1 | User Guide - Page 87
Using the TV's features 87 Adjusting the audio Audyssey Premium Television™ These speakers. To turn on Audyssey ABX™: 1 Press the MENU button and open the Sound menu. 2 Highlight Audio Settings, and the press the ENTER button. 3 Press the ( / arrow) buttons to highlight the Audyssey ABX™ field - Toshiba 46L5200U1 | User Guide - Page 88
settings to the factory defaults, highlight Reset, and then press the ENTER button. NOTE ❖ This feature is available when the TV is tuned to a digital RF channel with the Dolby Digital signal. ❖ The Dolby Digital Dynamic Range Control will function in relation to Optical Output Format (PCM mode - Toshiba 46L5200U1 | User Guide - Page 89
Using the TV's features 89 Using the Locks menu Using the Locks menu The Locks menu if a PIN code has not been stored. (Sample Image) Lock system - store PIN screen ❖ Press the Channel Number buttons to enter a new fourdigit code, enter the code a second time to confirm, and then press the ENTER - Toshiba 46L5200U1 | User Guide - Page 90
the ENTER button. 5 Press the Number buttons to enter a new four-digit code. Reenter the PIN code to confirm it. 6 Press the ENTER button. The new PIN code is now active. NOTE The PIN code cannot be set to "0000." Using parental controls (for USA region) Blocking TV programs and movies by rating - Toshiba 46L5200U1 | User Guide - Page 91
Using the TV's features 91 Using parental controls (for USA region) 1 Press the MENU button and highlight a definition for the rating appears at the bottom of the screen. 8 To save the new settings, highlight Done, and then press the ENTER button. NOTE The above blocking level selection is for - Toshiba 46L5200U1 | User Guide - Page 92
92 Using the TV's features Using parental controls (for USA region) NOTE The currently tuned station must be receiving a digital signal before an additional rating system can be downloaded. - Toshiba 46L5200U1 | User Guide - Page 93
Using the TV's features 93 Using parental controls (for USA region) To download the additional rating system, if A box with an "X" is a rating that will be blocked. 9 To save the new settings, highlight Done, and then press the ENTER button. 10 In the Edit Rating Limits screen, highlight Done, - Toshiba 46L5200U1 | User Guide - Page 94
only be downloaded one time. You will not be able to download any updates to the rating system should such updates become available. ❖ The additional rating system is not designed, transmitted or controlled by the TV or Toshiba, nor is the availability of an additional rating system determined or - Toshiba 46L5200U1 | User Guide - Page 95
Using the TV's features 95 Using parental controls (for USA region) Independent rating system for movies: Ratings: X ratings To display the rating of the program you are watching, press the INFO button on the remote control. If it is rated "None" the word "NONE" appears in the INFO screen. If - Toshiba 46L5200U1 | User Guide - Page 96
96 Using the TV's features Using parental controls (for USA region) 3 Enter your four-digit PIN code, and prefer. A box with an "X" is a rating that will be blocked. 9 To save the new settings, highlight Done, and then press the ENTER button. 10 In the Edit Rating Limits screen, highlight Done, - Toshiba 46L5200U1 | User Guide - Page 97
program that exceeds the rating limits you have set, the TV will enter program lock mode and a warning message appears on the screen. HDMI 2, HDMI 3, and PC) and channels 3 and 4. You will not be able to view the input sources or channels until you unlock the inputs. To lock/unlock the video inputs: - Toshiba 46L5200U1 | User Guide - Page 98
98 Using the TV's features Locking channels Locking channels With the Lock feature, the lock column. 5 Press the ENTER button. PIN code entry will be required to set a locked channel. NOTE If the PIN code has not yet been set, a warning message appears. 6 A check appears in the box. 7 To remove - Toshiba 46L5200U1 | User Guide - Page 99
set a time limit for playing a video game (30-120 minutes). When the GameTimer® expires, the TV enters Input Lock mode and locks out the input source for the video game device. To set Panel Lock is set to On, none of the controls on the control panel operate except POWER. To lock the control panel: 1 - Toshiba 46L5200U1 | User Guide - Page 100
TV control panel for approximately 15 seconds until the volume icon appears. Using the PC settings feature You can view an image from a PC on the TV screen. When a PC is connected to the TV To adjust the PC settings: 1 Repeatedly press the INPUT button to select PC Input mode, see "Selecting the - Toshiba 46L5200U1 | User Guide - Page 101
is disrupted momentarily while adjusting the PC settings. This is not a sign of malfunction. Mode: Horizontal Position Vertical Position Clock Phase it to your TV using the PC IN terminal and an analog RGB cable, see "Connecting a computer to the TV's PC IN terminal" on page 36. To set the PC Audio - Toshiba 46L5200U1 | User Guide - Page 102
"Setting the HDMI® audio mode" on page 56) Using the Media Player Using Media Player with a USB device You can enjoy photos or music contents stored on a USB storage device. Photo Viewer specifications: ❖ Data type: JPEG EXIF ver 2.1 ❖ File format: JPEG ❖ Maximum photo size: 6 MB ❖ Maximum number - Toshiba 46L5200U1 | User Guide - Page 103
the ( / arrow) buttons to select On or Off. To open the Media Player There are two methods for starting the Media Player: auto start and manual start. Auto Start: 1 Gently insert a supported USB storage device to the USB port on the back of the TV. A prompt will appear. - Toshiba 46L5200U1 | User Guide - Page 104
104 Using the TV's features Using the Media Player NOTE If you repeatedly insert and remove NOTE ❖ The prompt will disappear after about 10 sec. ❖ If Auto Start is set to off, you can start the Media Player manually. Manual Start: 1 Press the MENU button and open the Setup menu. 2 Press the ( - Toshiba 46L5200U1 | User Guide - Page 105
the ENTER button to view the selected photo in Single View mode. Single view In this view mode, only files located in the selected directory will be displayed. This view allows you to change the photo content manually. When you move from Multi View to the Single View, the currently selected photo - Toshiba 46L5200U1 | User Guide - Page 106
directory will be played. To use slide show: 1 Press the ENTER button in the Single View mode. 2 Press the ( / arrow) buttons to view the previous or next photo. To set Interval Time and Repeat settings: 1 Press the MENU button to open the Quick Menu. 2 Press the ( / arrow) buttons to select - Toshiba 46L5200U1 | User Guide - Page 107
TV's features Using the Media Player 107 2 Select the desired folder and press the ENTER button to move to the next layer. Press the CH RTN button to move back you can adjust the SOUND menu functions from the Quick Menu. To set the repeat mode: 1 Press the MENU button to open the Quick Menu. 2 - Toshiba 46L5200U1 | User Guide - Page 108
108 Using the TV's features Using the Media Player 3 Select a music file and press the ENTER button to start playback. 4 Press CH RTN twice to move back to photo view mode. The music is now playing in the background. Sorting photo or music files From the photos Multi View or from the music list, - Toshiba 46L5200U1 | User Guide - Page 109
Time display may not be available in all cases. Setting the sleep timer You can set the sleep timer to turn off the TV after a set length of time (maximum of 12 hours). To set the sleep timer using the remote control: 1 Press the SLEEP button on the remote control to set the length of time until the - Toshiba 46L5200U1 | User Guide - Page 110
be configured to automatically turn itself off after 4 hours if you do not operate the TV either from the remote control or the TV control panel. 1 From the Preferences menu, highlight Energy Saving Settings and press ENTER. 2 Press the ( / arrow) buttons to select Automatic Power Down. 3 Press the - Toshiba 46L5200U1 | User Guide - Page 111
new feature that uses CEC technology and allows you to control Toshiba HDMI® CEC compatible devices from the TV remote via HDMI® connection (see "HDMI® CEC connection" on page 32). When Enable HDMI® CEC in the HDMI® CEC Setup menu is set to On (see "Setting up HDMI® CEC" on page 114), the HDMI® CEC - Toshiba 46L5200U1 | User Guide - Page 112
NOTE These functions depend on the devices that are connected. The HDMI® CEC Player Control item will be grayed out in the following conditions: ❖ A non-HDMI® input is currently selected. ❖ The Enable HDMI® CEC item is set to Off. ❖ The connected CEC device is not a playback or recording device. - Toshiba 46L5200U1 | User Guide - Page 113
" on page 60. VOLUME and MUTE controls of Audio Receiver With your TV's remote control, you can adjust or mute the sound volume of the Audio Receiver. ❖ VOL (+ -) buttons adjust the volume level. ❖ MUTE button turns off the sound. To use this function: ❖ Set Speaker Preference to Audio Receiver in - Toshiba 46L5200U1 | User Guide - Page 114
: ❖ Press the RECALL button on the remote control. The following information will be displayed (if applicable): ❖ Current input (ANT/CABLE, Video, etc.) ❖ If ANT/CABLE is the current input, either "CABLE" (for cable TV) or "ANT" (for over-the-air broadcasts). ❖ Channel number (if in ANT/CABLE mode) - Toshiba 46L5200U1 | User Guide - Page 115
rating status ❖ GameTimer (if set) o close the Recall screen, press the RECALL button again. To display TV status information using INFO, press the last mode memory feature If the power is cut off while you are viewing the TV, the Last Mode Memory feature automatically turns on the TV when the - Toshiba 46L5200U1 | User Guide - Page 116
Chapter 7 Using the TV's Advanced Features Using the advanced picture settings Dynamic Contrast Dynamic Contrast detects changes in picture quality that affect the appearance of your contrast settings and then automatically adjusts the video. To select Dynamic Contrast preference: 1 From the Picture - Toshiba 46L5200U1 | User Guide - Page 117
highlight Reset, and then press the ENTER button. NOTE If you select one of the factory-set picture modes (Dynamic, Standard, Movie or PC) and then change the Static Gamma setting, the picture mode automatically changes to Preference. Color temperature You can change the quality of the picture by - Toshiba 46L5200U1 | User Guide - Page 118
settings and will change based on which setting is selected in step 5 above. 6 To save your new settings, highlight Done, and then press the ENTER button. To revert to your original settings, highlight Reset, and then press the ENTER button. NOTE If you select one of the factory set picture modes - Toshiba 46L5200U1 | User Guide - Page 119
the ENTER button. NOTE ❖ If you select one of the factory-set picture modes (Dynamic, Standard, Movie or PC) and then change the ClearFrame setting, the picture mode automatically changes to Preference. ❖ When ClearFrame is set to Off, the Film Stabilization feature will not be available (grayed - Toshiba 46L5200U1 | User Guide - Page 120
feature allows you to reduce visible interference in your TV picture. This may be useful when receiving a broadcast with a weak signal (especially a Cable channel) or playing a noisy video cassette or disc. To change the CableClear settings: 1 Press the MENU button and open the Picture menu - Toshiba 46L5200U1 | User Guide - Page 121
Using the TV's Advanced Features Using the advanced picture settings 121 Game Mode You can use the Game Mode feature for shorter frame delays when you need split-second timing between the on-screen display and input from the controller (such as music creation and high-action games). This feature - Toshiba 46L5200U1 | User Guide - Page 122
troubleshooting Before calling a service technician, review this chapter or visit the Toshiba technical support Web site at support.toshiba.com for possible causes/solutions for the problem you are experiencing. Before you begin to troubleshoot any problem, first unplug the TV from the AC wall - Toshiba 46L5200U1 | User Guide - Page 123
Troubleshooting section or the recommended solution has not worked, use the Reset Factory Defaults procedure, see "Resetting Factory Defaults" on page 59. TV will not turn on. Ensure the power cord is plugged in properly, and then press the POWER button. Replace the batteries in the remote control - Toshiba 46L5200U1 | User Guide - Page 124
124 Troubleshooting Picture problems Video Input Selection problems If the Input Selection window does not appear when you press INPUT on the remote control or TV, press INPUT a second time. This will cause a change to the next video input source and display the Input Selection window. Cannot view - Toshiba 46L5200U1 | User Guide - Page 125
audio mode" on page 56. Remote control problems Remove all obstructions between the remote control and the TV. Replace the remote control's batteries, see "Installing batteries" on page 41. Your TV's remote control may not operate certain features on your external devices. Refer to the User's Guide - Toshiba 46L5200U1 | User Guide - Page 126
Troubleshooting Channel tuning problems Channel tuning problems Ensure that the remote control is set to the correct device mode, see "Learning about the remote control . For additional information, see "TV stops responding to controls." on page 122. If the problem persists, use the Reset Factory - Toshiba 46L5200U1 | User Guide - Page 127
changed settings of the device, turn off your TV and unplug the power cord, then plug in and turn on again. If several devices are connected, the HDMI® CEC feature may not operate properly. Read the instruction manual furnished with the connected HDMI® CEC device. HDMI® problems HDMI® cables - Toshiba 46L5200U1 | User Guide - Page 128
without notice. ❖ These models may not be compatible with features and/or specifications that may be added in the future. Television system NTSC standard ATSC standard Digital Cable 8VSB 64 QAM, 256 QAM; in-the-clear, unencrypted Channel coverage VHF UHF Cable TV - Toshiba 46L5200U1 | User Guide - Page 129
A 1.3 A Power consumption 19L4200U 24L4200U 32L4200U 40L5200U 46L5200U 50L5200U Audio power 0.2 W in Standby mode 0.2 W in Standby mode 0.2 W in Standby mode 0.3 W in Standby mode 0.2 W in Standby mode 0.2 W in Standby mode 19L4200U 24L4200U 32L4200U 40L5200U 46L5200U 50L5200U 6 5W 6 5W 6 7W - Toshiba 46L5200U1 | User Guide - Page 130
130 Specifications Speaker type Speaker type 19L4200U 24L4200U 32L4200U 40L5200U 46L5200U 50L5200U Two 3.7 x 1.06 x 0.8" Two 3.58 x 0.98 x 0.9" Two 3.93 x 1.18 x 0.78" Two 10.38 x 2.6 x 0.71" (Box type) Two 10.38 x 2.6 x 0.71" (Box type) Two 10. - Toshiba 46L5200U1 | User Guide - Page 131
10'-1/8" (256.58mm) 3'-5 3/4" (1061.5mm) 2'-3" (685.7mm) 10'-1/8" (257.6mm) 3'-8 3/4" (1138.2mm) 2'-4 3/4" (728.9mm) 11'-3/8" (287.6mm) 19L4200U 24L4200U 32L4200U 40L5200U 46L5200U 50L5200U 7.7 lbs (3.5 kg) 9.9 lbs (4.5 kg) 17.6 lbs (7.9 kg) 36.4 lbs (16.5 kg) 43.0 lbs (19.5 kg) 48.4 lbs (21.9 kg - Toshiba 46L5200U1 | User Guide - Page 132
Supplied accessories Supplied accessories ❖ Remote control with two size "AAA" batteries ❖ Warranty ❖ Resource Guide ❖ Quick Start Guide ❖ Pedestal and hardware Acceptable signal kHz 63.981 kHz Pixel Clock Frequency 25.175 MHz 40.000 MHz 65.000 MHz 79.500 MHz 85.500 MHz 108.000 MHz Pixel - Toshiba 46L5200U1 | User Guide - Page 133
.250 MHz 148.500 MHz NOTE ❖ Some illustrations in this User's Guide are for explanation purposes and may differ from the actual unit. ❖ Designs and specifications are subject to change without notice. ❖ These models may not be compatible with features and/or specifications that may be added in the - Toshiba 46L5200U1 | User Guide - Page 134
offering. The Toshiba warranty provided in respect of the Digital TV is the only warranty provided and no additional warranties are provided in respect of the software components subject to EULAs. Some of the software components distributed under EULAs are made available for use by the user on the - Toshiba 46L5200U1 | User Guide - Page 135
or performance of these software components are assumed by the user. TOSHIBA shall not be liable whatsoever for any cost of repair or changes or redistributes the software with consent from the copyright holders or based on the aforementioned licenses shall not be held liable whatsoever for any - Toshiba 46L5200U1 | User Guide - Page 136
user accepts full responsibility for any undesirable consequences; the authors accept NO LIABILITY for damages of any kind. These conditions apply to any software derived from or based LZW patent, GIF reading support has been removed altogether, GIF(sm) is a Service Mark property of CompuServe - Toshiba 46L5200U1 | User Guide - Page 137
137 License Agreement This license was inspired by the BSD, Artistic, and IJG (Independent JPEG Group) licenses, which all encourage inclusion and use of free software in commercial and freeware products alike. As a consequence, its main points are that: ❖ We don't promise that this software works. - Toshiba 46L5200U1 | User Guide - Page 138
ABX™ 87 Dolby® Digital Dynamic Range Control 88 muting sound 84 optical audio output format 88 stereo/SAP broadcasts 85 Audyssey Dynamic Volume® using 87 Auto Aspect using 77 auto power down set 110 Auto Start function 138 Media Player 103 AV input mode setting 56 B blocking programs Canada rating - Toshiba 46L5200U1 | User Guide - Page 139
audio selector using 84 digital signal meter viewing 57 F factory defaults reset 59 favorites browser 66 features 16 Freeze feature 78 G GameTimer® using 99 H HDMI® audio mode setting 56 HDMI® CEC additional functions 113 using 111 volume/mute controls 113 HDMI® CEC input source selection 113 - Toshiba 46L5200U1 | User Guide - Page 140
parental controls blocking programs/movies by rating (V-Chip) 90 using 90 PC Audio setting 101 PC settings feature using 100 picture adjusting 79 adjusting quality 80 picture mode selecting supplied accessories 132 TV system 128 video/audio terminals 130 SurfLock™ switching between two channels - Toshiba 46L5200U1 | User Guide - Page 141
zone setting 58 timer sleep timer 109 troubleshooting 122 channel tuning problems 126 closed caption problems 126 contact Toshiba 127 HDMI® 127 media player problems 127 No HDMI® CEC operation 127 picture problems 123 Rating blocking problems 126 remote control problems 125 sound problems 125 TV
-
 1
1 -
 2
2 -
 3
3 -
 4
4 -
 5
5 -
 6
6 -
 7
7 -
8
-
9
-
10
-
11
-
12
-
13
-
14
-
15
-
16
-
17
-
18
-
19
-
20
-
21
-
22
-
23
-
24
-
25
-
26
-
27
-
28
-
29
-
30
-
31
-
32
-
33
-
34
-
35
-
36
-
37
-
38
-
39
-
40
-
41
-
42
-
43
-
44
-
45
-
46
-
47
-
48
-
49
-
50
-
51
-
52
-
53
-
54
-
55
-
56
-
57
-
58
-
59
-
60
-
61
-
62
-
63
-
64
-
65
-
66
-
67
-
68
-
69
-
70
-
71
-
72
-
73
-
74
-
75
-
76
-
77
-
78
-
79
-
80
-
81
-
82
-
83
-
84
-
85
-
86
-
87
-
88
-
89
-
90
-
91
-
92
-
93
-
94
-
95
-
96
-
97
-
98
-
99
-
100
-
101
-
102
-
103
-
104
-
105
-
106
-
107
-
108
-
109
-
110
-
111
-
112
-
113
-
114
-
115
-
116
-
117
-
118
-
119
-
120
-
121
-
122
-
123
-
124
-
125
-
126
-
127
-
128
-
129
-
130
-
131
-
132
-
133
-
134
-
135
-
136
-
137
-
138
-
139
-
140
-
141
 |
 |
GMA300009011
4/12
Note: To display a High Definition
picture, the TV must be receiving a
High Definition signal (such as an over-
the-air High Definition TV broadcast, a
High Definition digital cable program, or
a High Definition digital satellite
program). For details, contact your TV
antenna installer, cable provider, or
satellite provider
If you need assistance:
Toshiba's Support Web site
support.toshiba.com
Call Toshiba Customer Support Center:
Within the United States at (800) 631-3811
Outside the United States at (949) 583-3050
For more information, see
“Troubleshooting” on page 122
in this guide.
Owner's Record
The model number and serial number are on the back and side of your TV.
Record these numbers in the spaces below. Refer to these numbers whenever you
communicate with your Toshiba dealer about this TV
Model number: ______________________________________________
Serial number: _______________________________________________
Integrated High Definition
LED
Television
User’s Guide:
19L4200U
24L4200U
32L4200U
40L5200U
46L5200U
50L5200U