Toshiba Portege R100 Memory Replacement Guide - Page 12
palmrest as shown in the illustrations below.
 |
View all Toshiba Portege R100 manuals
Add to My Manuals
Save this manual to your list of manuals |
Page 12 highlights
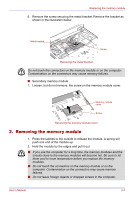
Replacing the memory module 3. Remove three screws (left, center, and right) as shown in the illustration below. Screws Removing the keyboard (1) Be careful not to drop the screws inside the computer when removing the keyboard. 4. Lift the back of the keyboard toward you and lay it face down on the palmrest as shown in the illustrations below. The keyboard is connected to the computer by a ribbon cable. Be careful not to apply tension to this cable when you lift the keyboard. Do not disconnect this cable. Slits Tabs Removing the keyboard (2) 3-4 User's Manual
-
 1
1 -
2
-
3
-
4
-
5
-
6
-
 7
7 -
 8
8 -
 9
9 -
 10
10 -
 11
11 -
 12
12 -
 13
13 -
 14
14 -
 15
15 -
 16
16 -
 17
17 -
18
-
19
-
20
-
21
-
22
-
23
-
24
 |
 |

3-4
User’s Manual
Replacing the memory module
3.
Remove three screws (left, center, and right) as shown in the illustration
below.
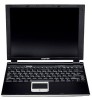
Removing the keyboard (1)
4.
Lift the back of the keyboard toward you and lay it face down on the
palmrest as shown in the illustrations below.
Removing the keyboard (2)
Screws
Be careful not to drop the screws inside the computer when removing the
keyboard.
The keyboard is connected to the computer by a ribbon cable. Be careful
not to apply tension to this cable when you lift the keyboard. Do not
disconnect this cable.
Tabs
Slits