Toshiba Portege R100 Memory Replacement Guide - Page 14
palmrest as shown in the illustration below.
 |
View all Toshiba Portege R100 manuals
Add to My Manuals
Save this manual to your list of manuals |
Page 14 highlights
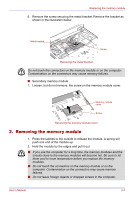
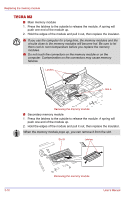
Replacing the memory module Only remove the keyboard brace after completing steps 1-3. Otherwise, you may damage the keyboard brace. 4. Remove two screws securing the keyboard as shown in the illustration below. Keyboard brace Screws Removing the keyboard brace and two screws Use a size 0 Phillips screwdriver. 5. Lift the back of the keyboard toward you and lay it face down on the palmrest as shown in the illustration below. ■ When you move the keyboard forward, do not touch the keys. Doing so could cause misalignment. Hold the keyboard by the sides and lay it gently on the palmrest. ■ The keyboard is connected to the computer by a ribbon cable. Be careful not to apply tension to this cable when you lift the keyboard. Do not disconnect this cable. Lift the keyboard 3-6 User's Manual
-
 1
1 -
2
-
3
-
4
-
5
-
6
-
7
-
8
-
 9
9 -
 10
10 -
 11
11 -
 12
12 -
 13
13 -
 14
14 -
 15
15 -
 16
16 -
 17
17 -
 18
18 -
 19
19 -
20
-
21
-
22
-
23
-
24
 |
 |
