Toshiba S20-Silver User Manual - Page 17
Options for Record Menu, Movie Record Mode Menu
 |
View all Toshiba S20-Silver manuals
Add to My Manuals
Save this manual to your list of manuals |
Page 17 highlights
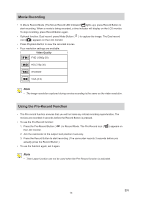
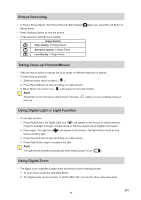
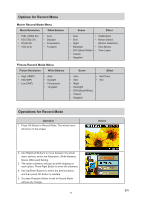
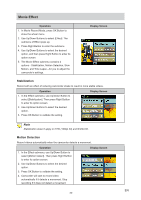
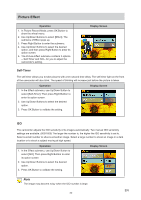
Options for Record Menu Movie Record Mode Menu Movie Resolution White Balance • FHD (1080p 30) • HD (720p 30) • WVGA 60 • VGA (4:3) • Auto • Daylight • Fluorescent • Tungsten Scene Effect • Auto • Stabilization • Skin • Motion Detect. • Night (Motion Detection) • Backlight • Slow Motion • B/W (Black/White) • Time Lapse • Classic • Negative Picture Record Mode Menu Picture Resolution White Balance • High (16MP) • Std (5MP) • Low (3MP) • Auto • Daylight • Fluorescent • Tungsten Scene Effect • Auto • Skin • Night • Backlight • B/W (Black/White) • Classic • Negative • Self-Timer • ISO Operations for Record Mode Operation 1. Press OK Button in Record Mode. The wheel menu will show on the screen. Screen 2. Use Right/Left Buttons to move between the wheel menu options, which are Resolution, White Balance, Scene, Effect,and Setting. 3. The option submenu will pop up while stopping on each option. Press Right Button to enter the submenu. 4. Use Up/Down Buttons to select the desired option, and then press OK Button to validate. 5. Or press Playback Button to exit to Reocrd Mode without any change. EN 17
-
 1
1 -
2
-
3
-
4
-
5
-
6
-
7
-
8
-
9
-
10
-
11
-
 12
12 -
 13
13 -
 14
14 -
 15
15 -
 16
16 -
 17
17 -
 18
18 -
 19
19 -
 20
20 -
 21
21 -
 22
22 -
23
-
24
-
25
-
26
-
27
-
28
-
29
-
30
-
31
-
32
-
33
-
34
-
35
-
36
-
37
-
38
-
39
-
40
-
41
-
42
-
43
-
44
-
45
-
46
-
47
-
48
-
49
 |
 |