Toshiba Tecra 9000 Replacement Instructions - Page 5
Tough Enough for Today's World.
 |
View all Toshiba Tecra 9000 manuals
Add to My Manuals
Save this manual to your list of manuals |
Page 5 highlights
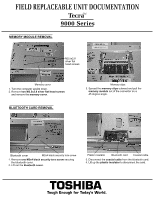
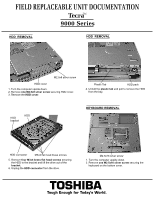
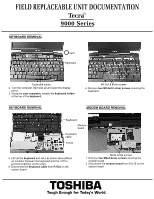
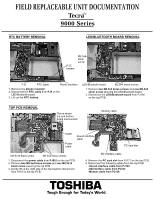
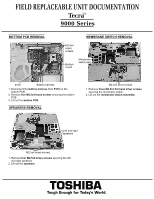
FIELD REPLACEABLE UNIT DOCUMENTATION TecraTM 9000 Series HDD REMOVAL HDD REMOVAL M2.5x8 silver screw HDD cover 1. Turn the computer upside down. 2. Remove one M2.5x8 silver screw securing HDD cover. 3. Remove the HDD cover. Plastic Tab HDD pack 4. Unfold the plastic tab and pull to remove the HDD from the bay. HDD bracket HDD KEYBOARD REMOVAL HDD connector M3x4 flat head brass screws 5. Remove four M3x4 brass flat head screws securing the HDD to the bracket and lift the drive out of the bracket. 6. Unplug the HDD connector from the drive. M2.5x16 silver screw 1. Turn the computer upside down. 2. Remove one M2.5x16 silver screw securing the keyboard on the bottom cover. TOSHIBA Tough Enough for Today's World.
-
 1
1 -
 2
2 -
 3
3 -
 4
4 -
 5
5 -
 6
6 -
 7
7 -
 8
8 -
 9
9 -
 10
10 -
 11
11
 |
 |

HDD
REMOVAL
5. Remove
four M3x4 brass flat head screws
securing
the HDD to the bracket and lift the drive out of the
bracket
.
6. Unplug the
HDD connector
from the drive.
TOSHIBA
Tough Enough for Today’s World.
FIELD REPLACEABLE UNIT DOCUMENTATION
Tecra
TM
9000 Series
4. Unfold the
plastic tab
and pull to remove the HDD
from the bay.
HDD
HDD
bracket
1. Turn the computer upside down.
2. Remove
one M2.5x8 silver screw
securing HDD cover.
3. Remove the
HDD cover
.
HDD
REMOVAL
HDD cover
M2.5x8 silver screw
Plastic Tab
HDD pack
HDD connector
M3x4 flat head brass screws
KEYBOARD REMOVAL
1. Turn the computer upside down.
2. Remove
one M2.5x16 silver screw
securing the
keyboard on the bottom cover.
M2.5x16 silver screw