Tripp Lite SU5000RT4UHV Owner's Manual for SmartOnline Single-Phase 5kVA-6kVA - Page 28
Internal Battery Replacement
 |
View all Tripp Lite SU5000RT4UHV manuals
Add to My Manuals
Save this manual to your list of manuals |
Page 28 highlights
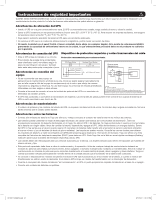
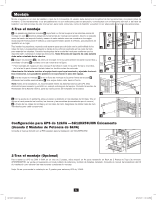
Internal Battery Replacement Under normal conditions, the original batteries in your UPS will last many years. See Safety section before replacing batteries. The batteries are designed for hot-swap replacement (i.e. leaving the UPS ON), but some qualified service personnel may wish to completely turn the UPS OFF and disconnect equipment before proceeding. It is suggested that you remove the batteries before the installation process. 1 Remove the screws A which secure the front bezel. 2 Separate the front bezel B from the front panel. 3 Remove the battery connector snap covers. Save these covers for reuse. 4 Disconnect the battery connectors C and remove the screws D that secure the battery retention bracket in A place. 1 13 5 Remove the battery retention bracket E and remove/ recycle the middle battery pack F . 6 Remove/recycle the side battery packs G . 7 Replace the battery packs F and G . 8 Re-attach the battery retention bracket E . 9 Replace the screws D to secure the battery retention bracket in place. B 2 12 10 Connect the battery connectors C . Attach connectors black-to-black, red-to-red, white-to-white and green- to-green. 11 Reinstall the battery connector snap covers. D 12 Replace the front bezel B . 13 Replace the screws A to secure the front bezel in place. C 4 D 9-10 201207113 933070.indb 28 5 G F E 7-8 6 28 G 7 9/17/2012 1:20:10 PM
-
 1
1 -
2
-
3
-
4
-
5
-
6
-
7
-
8
-
9
-
10
-
11
-
12
-
13
-
14
-
15
-
16
-
17
-
18
-
19
-
20
-
21
-
22
-
 23
23 -
 24
24 -
 25
25 -
 26
26 -
 27
27 -
 28
28 -
 29
29 -
 30
30 -
 31
31 -
 32
32 -
 33
33 -
34
-
35
-
36
-
37
-
38
-
39
-
40
-
41
-
42
-
43
-
44
-
45
-
46
-
47
-
48
-
49
-
50
-
51
-
52
-
53
-
54
-
55
-
56
-
57
-
58
-
59
-
60
-
61
-
62
-
63
-
64
-
65
-
66
-
67
-
68
-
69
-
70
-
71
-
72
-
73
-
74
-
75
-
76
-
77
-
78
-
79
-
80
-
81
-
82
-
83
-
84
-
85
-
86
-
87
-
88
-
89
-
90
-
91
-
92
-
93
-
94
-
95
-
96
-
97
-
98
-
99
-
100
-
101
-
102
-
103
-
104
-
105
-
106
-
107
-
108
-
109
-
110
-
111
-
112
-
113
-
114
-
115
-
116
 |
 |
