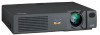
ViewSonic PJ501 User Guide - Page 11
Example of System Setup, Plug & Play - operators manual
 |
UPC - 766907692815
View all ViewSonic PJ501 manuals
Add to My Manuals
Save this manual to your list of manuals |
Page 11 highlights
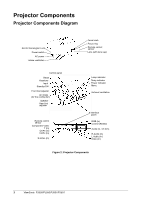
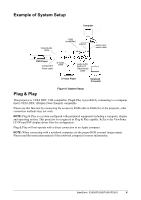
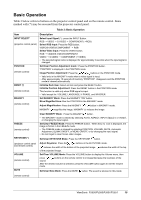
Example of System Setup Computer Video/Audio cable RGB (computer) RS232 stereo-mini audio cable DVD Player Component Video cable S-Video cable audio (L/R) portion of Video/Audio cable S-Video Player Notebook Computer Plug & Play Figure 8: System Setup This projector is VESA DDC 1/2B compatible. Plug& Play is possible by connecting to a computer that is VESA DDC (Display Data Channel) compatible. Please use this function by connecting the accessory RGB cable to RGB (In) of the projector; other connection methods may not work. NOTE: Plug & Play is a system configured with peripheral equipment including a computer, display and operating system. This projector is recognized as Plug & Play capable. Refer to the ViewSonic CD Wizard INF display driver files for configuration. Plug & Play will not operate with a direct connection to an Apple computer. NOTE: When connecting with a notebook computer, set the proper RGB external image output. Please read the instruction manual of the notebook computer for more information. ViewSonic PJ500/PJ550/PJ501/PJ551 8
-
 1
1 -
2
-
3
-
4
-
5
-
 6
6 -
 7
7 -
 8
8 -
 9
9 -
 10
10 -
 11
11 -
 12
12 -
 13
13 -
 14
14 -
 15
15 -
 16
16 -
17
-
18
-
19
-
20
-
21
-
22
-
23
-
24
-
25
-
26
-
27
-
28
-
29
-
30
-
31
-
32
 |
 |
