ViewSonic PJ501 User Guide - Page 15
MAIN Menu
 |
UPC - 766907692815
View all ViewSonic PJ501 manuals
Add to My Manuals
Save this manual to your list of manuals |
Page 15 highlights
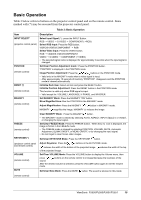
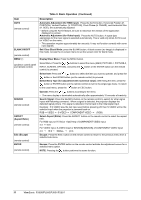
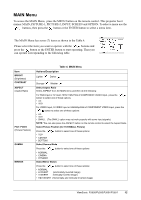
MAIN Menu To access the MAIN Menu, press the MENU button on the remote control. This projector has 6 menus: MAIN, PICTURE-1, PICTURE-2, INPUT, SCREEN and OPTION. To select a menu use the / buttons, then press the button or the ENTER button to select a menu item. The MAIN Menu has seven (7) items as shown in the Table 4. Please select the item you want to operate with the / buttons and press the button or the ENTER button to start operating. Then you can operate corresponding to the following table. Item BRIGHT (Brightness) CONTRAST ASPECT (Aspect Ratio) PICT. POSIT. (Picture Position) GAMMA MIRROR Table 4: MAIN Menu Actions/Description Lighter Darker Stronger Weaker Select Aspect Ratio Select ASPECT from the MAIN menu and then do the following: For RGB Input or Hi-Vision 1035i/1125i/750p of COMPONENT VIDEO Input , press the / button to select one of these options: • 4:3 • 16:9 For VIDEO Input, S-VIDEO Input or 525i/525p/625i of COMPONENT VIDEO Input, press the / button to select one of these options: • 4:3 • 16:9 • SMALL (The SMALL option may not work properly with some input signals.) NOTE: You can also press the ASPECT button on the remote control to select the Aspect Ratio. Select Picture Position (for 16:9/SMALL Picture) Press the / button to select one of these options: • TOP • CENTER • BOTTOM Select Gamma Mode Press the / button to select one of these options: • NORMAL • CINEMA • DYNAMIC Select Mirror Status: Press the / button to select one of these options: • NORMAL • H:INVERT • V:INVERT (Horizontally Inverted image) (Vertically Inverted image) • H&V:INVERT (Horizontally and Vertically Inverted image) ViewSonic PJ500/PJ550/PJ501/PJ551 12
-
 1
1 -
2
-
3
-
4
-
5
-
6
-
7
-
8
-
9
-
 10
10 -
 11
11 -
 12
12 -
 13
13 -
 14
14 -
 15
15 -
 16
16 -
 17
17 -
 18
18 -
 19
19 -
 20
20 -
21
-
22
-
23
-
24
-
25
-
26
-
27
-
28
-
29
-
30
-
31
-
32
 |
 |
