ViewSonic PJ658 PJ658 User Guide - Page 18
Connecting power supply
 |
UPC - 766907222210
View all ViewSonic PJ658 manuals
Add to My Manuals
Save this manual to your list of manuals |
Page 18 highlights
Setting up Connecting power supply WARNING ►Please use extra caution when connecting the power cord, as incorrect or faulty connections may result in fire and/or electrical shock. • Only use the power cord that came with the projector. If it is damaged, contact your dealer to newly get correct one. • Only plug the power cord into an outlet rated for use with the power cord's specified voltage range. • Never modify the power cord. Never attempt to defeat the ground connection of the three-pronged plug. AC inlet Connector of the power cord 1. Connect the connector of the power cord to the AC inlet of the projector. 2. Firmly plug the power cord's plug into the outlet. ViewSonic PJ658 14
-
 1
1 -
2
-
3
-
4
-
5
-
6
-
7
-
8
-
9
-
10
-
11
-
12
-
 13
13 -
 14
14 -
 15
15 -
 16
16 -
 17
17 -
 18
18 -
 19
19 -
 20
20 -
 21
21 -
 22
22 -
 23
23 -
24
-
25
-
26
-
27
-
28
-
29
-
30
-
31
-
32
-
33
-
34
-
35
-
36
-
37
-
38
-
39
-
40
-
41
-
42
-
43
-
44
-
45
-
46
-
47
-
48
-
49
-
50
-
51
-
52
-
53
-
54
-
55
-
56
-
57
-
58
-
59
-
60
-
61
-
62
-
63
-
64
-
65
-
66
-
67
-
68
-
69
 |
 |

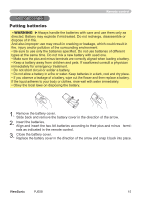
Connecting power supply
WARNING
►Please use extra caution when connecting the power cord, as
incorrect or faulty connections may result in fire and/or electrical shock.
• Only use the power cord that came with the projector. If it is damaged, contact
your dealer to newly get correct one.
• Only plug the power cord into an outlet rated for use with the power cord's
specified voltage range.
• Never modify the power cord. Never attempt to defeat the ground connection
of the three-pronged plug.
1.
Connect the connector of the power cord to the AC inlet of the projector.
2.
Firmly plug the power cord's plug into the outlet.
Setting up
AC inlet
Connector
of the power cord
14
ViewSonic
PJ658