ViewSonic VE170B User Manual - Page 7
Using the ViewPanel - ve170
 |
View all ViewSonic VE170B manuals
Add to My Manuals
Save this manual to your list of manuals |
Page 7 highlights
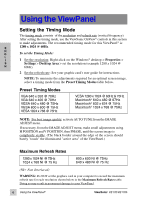
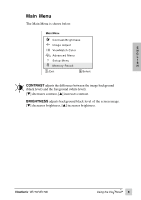
Using the ViewPanel Setting the Timing Mode The timing mode consists of the resolution and refresh rate (vertical frequency). After setting the timing mode, use the ViewSonic OnView® controls in this section to make adjustments. The recommended timing mode for this ViewPanel® is: E 1280 x 1024 @ 60Hz. N G To set the Timing Mode: L I 1 Set the resolution: Right-click on the Windows® desktop > Properties > S Settings > Desktop Area > set the resolution (example 1280 x 1024 @ H 60Hz). 2 Set the refresh rate: See your graphic card's user guide for instructions. NOTE: To minimize the adjustments required for an optimal screen image, select a timing mode from the Preset Timing Modes table below. Preset Timing Modes VGA 640 x 350 @ 70Hz VGA 640 x 400 @ 70Hz VESA 640 x 480 @ 75Hz VESA 800 x 600 @ 75Hz VESA 1024 x 768 @ 75Hz VESA 1280 x 1024 @ 60Hz & 75Hz Macintosh® 640 x 480 @ 67Hz Macintosh® 832 x 624 @ 75Hz Macintosh® 1024 x 768 @ 75Hz NOTE: For best image quality, activate AUTO TUNE from the IMAGE ADJUST menu. If necessary, from the IMAGE ADJUST menu, make small adjustments using H POSITION and V POSITION, then PHASE, until the screen image is completely visible. (The black border around the edge of the screen should barely "touch" the illuminated "active area" of the ViewPanel.) Maximum Refresh Rates 1280 x 1024 NI @ 75Hz 1024 x 768 NI @ 75 Hz 800 x 600 NI @ 75Hz 640 x 480 NI @ 75 Hz (NI= Non Interlaced) WARNING: Do NOT set the graphics card in your computer to exceed the maximum refresh rate for each resolution shown below in the Maximum Refresh Rates table. Doing so may result in permanent damage to your ViewPanel. 6 Using the ViewPanel® ViewSonic VE170/VE170b
-
 1
1 -
 2
2 -
 3
3 -
 4
4 -
 5
5 -
 6
6 -
 7
7 -
 8
8 -
 9
9 -
 10
10 -
 11
11 -
 12
12 -
13
-
14
-
15
-
16
-
17
-
18
-
19
-
20
-
21
-
22
 |
 |
