Viking VDD5360 Installation Instructions - Page 7
Cut Countertop Opening, Install Housing Into, Cabinet
 |
View all Viking VDD5360 manuals
Add to My Manuals
Save this manual to your list of manuals |
Page 7 highlights
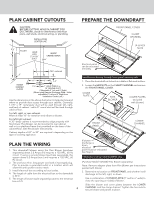
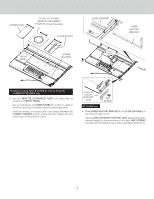
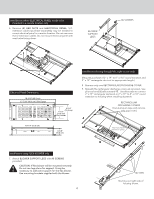
CUT COUNTERTOP OPENING 1. Lay out and cut the cooktop cut-out far enough FORWARD so downdraft will fit behind it. 2. Set cooktop in place and slide it as far forward as possible without exposing an gaps. Center and square it with edges of countertop. HEX SCREW SUPPORT LEG (2) SCREWS 3. Extend SUPPORT LEGS and attach to bottom of cabinet with (2) SCREWS through each leg. Tighten HEX SCREWS. COOKTOP Template against back edge of cooktop. 3. Place the plastic template against the back flange of the cooktop or back edge of slide-in range countertop opening. Center the template. Trace around template to mark the downdraft opening. 4. Remove cooktop from countertop. 5. Cut downdraft opening. Be careful not to chip edges of coun- tertop. INSTALL HOUSING INTO CABINET UPPER SUPPORT BRACKET (2) SCREWS 4. Extend UPPER SUPPORT BRACKETS and attached to sides of cabinet with (2) SCREWS through each bracket. FLEX BLOWER (4) SCREWS SCREWS 1. Remove cooktop. 2. Set housing into cabinet / countertop opening as far back as Installations using FLEX BLOWER only: possible and make sure it is level. 5. Loosen (4) SCREWS attaching BLOWER SUPPORT LEGS to FLEX BLOWER. Extend legs and secure them to bottom of 7 cabinet with a SCREW through each bracket.
-
 1
1 -
 2
2 -
 3
3 -
 4
4 -
 5
5 -
 6
6 -
 7
7 -
 8
8 -
 9
9 -
 10
10 -
 11
11 -
 12
12
 |
 |
