Viking VDD5360 Installation Instructions - Page 9
Install Finish Trim, Install Cooking Appliance, Make-up Air Damper, Range Trim Kit
 |
View all Viking VDD5360 manuals
Add to My Manuals
Save this manual to your list of manuals |
Page 9 highlights
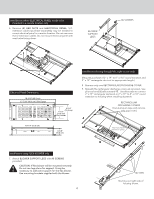
INSTALL FINISH TRIM SCREW CHIMNEY FINISH TRIM DOWNDRAFT HOUSING COUNTERTOP 1. Attach FINISH TRIM to top/left and top/right of DOWNDRAFT HOUSING with screw provided. INSTALL COOKING APPLIANCE 1. Align the cooking appliance with downdraft and fasten appliance in place following appliance instructions. Note: Accurate alignment of cooking appliance and downdraft is necessary to ensure that there is no interference when air vent is raised and lowered. There should be a gap of 1/32" - 1/16" between the back of the cooktop and the front of the downdraft cover. MAKE-UP AIR DAMPER (OPTIONAL) ELECTRICAL PANEL MAKE-UP AIR DAMPER CONTACTS Connects to 2 CONTACTS on ELECTRICAL PANEL. Compatible with G6MD and G8MD damper. RANGE TRIM KIT (OPTIONAL) Available for application with free-standing range - where gap is present between back of range and downdraft. 9
-
 1
1 -
2
-
3
-
 4
4 -
 5
5 -
 6
6 -
 7
7 -
 8
8 -
 9
9 -
 10
10 -
 11
11 -
 12
12
 |
 |
