Viking VWH4878TSS Installation Instructions - Page 22
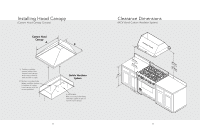
To install ventillation kit, refer to ventillation kit, installation instructions.
 |
View all Viking VWH4878TSS manuals
Add to My Manuals
Save this manual to your list of manuals |
Page 22 highlights
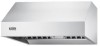
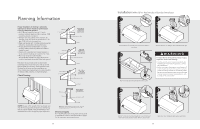
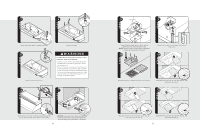
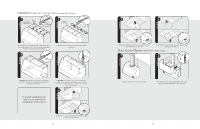
Installation (VWH 18"H. Wall & VCWH Chimney Wall Hoods) 1 1-1/2"x 3/4" (3.8 cm) x (1.9 cm) wood strip 1(4-.163c/1m6)" 5/16" nut driver 2 Slot for wood strip 5/16" nut driver Measure down 1-13/16 (4.6 cm) from desired height of hood and secure 1-1/2" x 3/4" wood strip (provided locally) to wall using screws provided. 3 5/16" nut driver Use additional mounting screws to secure hood to wood strip. 5/16" nut driver CAUTION: Secure vent hood to wall using screws provided. Use additional mounting screws and wall anchors, if necessary. To install ventillation kit refer to ventillation kit installation instructions. CAUTION: If not using a duct cover, using screws provided, make sure top mounting screws are secured into soffit or cabinet framing use additional mounting screws, if necessary. 4 1 2 3 Slide filter front over front lip. Push filter rear up, then slide back over rear lip. 42 5 1 6 1 3 2 3 2 Slide spacer front over front lip. Push spacer rear up, then slide back over rear lip. Slide filter front over front lip. Push filter rear up, then slide back over rear lip. Duct Cover Option (VWH 18"H. Wall Hoods) 1 2 2 Measure distance from ceiling to canopy. Slide the duct cover in place and fasten from inside canopy using the sheet metal screws provided. 43
-
 1
1 -
2
-
3
-
4
-
5
-
6
-
7
-
8
-
9
-
10
-
11
-
12
-
13
-
14
-
15
-
16
-
 17
17 -
 18
18 -
 19
19 -
 20
20 -
 21
21 -
 22
22 -
 23
23 -
 24
24
 |
 |