Vizio E390-B0 Download - Page 27
Adjusting the Advanced Picture Settings, positions of the picture to ensure the image is centered
 |
View all Vizio E390-B0 manuals
Add to My Manuals
Save this manual to your list of manuals |
Page 27 highlights
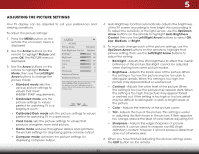
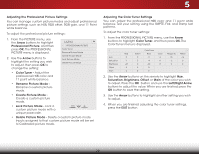
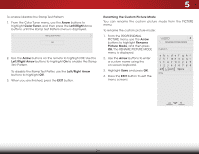
5 Adjusting the Advanced Picture Settings To adjust the advanced picture settings: 1. From the PICTURE menu, use the Arrow buttons to highlight More, and then press OK. 2. Use the Arrow buttons to highlight Advanced Picture, and then press OK. The ADVANCED PICTURE menu is displayed. VIZIO ADVANCED PICTURE Color Temperature Black Detail Backlight Control Reduce Signal Noise Reduce Block Noise Picture Position Cool Medium On Low Low 3. Use the Arrow buttons to Picture Size highlight the setting you wish Film Mode Auto to adjust, then press the Left/ Right Arrow buttons to change the setting: • Color Temperature Adjusts the 'warmness' and 'coolness' of the white areas of the picture. Select Cool, Normal, or Computer. • Black Detail - Adjusts the average brightness of the picture to compensate for large areas of brightness. Select Off, Low, Medium, or High. • Backlight Control - Dynamically improves the contrast ratio of the picture by adjusting the backlight. The adjustment is controlled by the content on the screen. Select On or Off. • Reduce Signal Noise - Diminishes artifacts in the image caused by the digitizing of image motion content. Select Off, Low, Medium, or High. • Reduce Block Noise - Reduces pixelation and distortion for mpeg files. Select Off, Low, Medium, or High. • Picture Position - Adjust the vertical and horizontal positions of the picture to ensure the image is centered and completely fills the screen. Use the Left/Right Arrow buttons to adjust the horizontal position of the displayed picture. Use the Up/Down Arrow buttons to adjust the Wide Zoom Normal Panoramic vertical position of the displayed picture. Press the BACK button when you are finished. • Picture Size - Increase or decrease the vertical and Exit hor2iDzontal3sDize of the displayed picture. Use the Left/ Right Arrow buttons to adjust the horizontal size of the displayed picture. Use the Up/Down Arrow buttons to adjust theAvBeC rtical size of the displayed picture. Press the BACK button when you are finished. Input Wide CC • Film Mode - Optimizes the picture for watching film. Select Auto or Off. 4. When you have finished adjusting the Advanced Picture STliSm eeeeprttingPicst,upreresAsutdhioe EXIT button on the remote. Network Settings Help 21
-
 1
1 -
2
-
3
-
4
-
5
-
6
-
7
-
8
-
9
-
10
-
11
-
12
-
13
-
14
-
15
-
16
-
17
-
18
-
19
-
20
-
21
-
 22
22 -
 23
23 -
 24
24 -
 25
25 -
 26
26 -
 27
27 -
 28
28 -
 29
29 -
 30
30 -
 31
31 -
 32
32 -
33
-
34
-
35
-
36
-
37
-
38
-
39
-
40
-
41
-
42
-
43
-
44
-
45
-
46
-
47
-
48
-
49
-
50
-
51
-
52
-
53
-
54
-
55
-
56
-
57
-
58
-
59
 |
 |