Vizio GV42LF User Manual - Page 7
To remove the speakers - settings
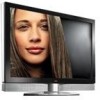 |
UPC - 857380000997
View all Vizio GV42LF manuals
Add to My Manuals
Save this manual to your list of manuals |
Page 7 highlights
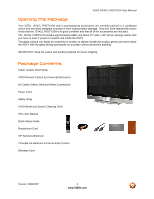
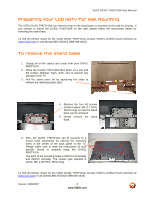
VIZIO GV42L FHDTV10A User Manual To remove the speakers If you wish to remove the attached speakers as well and use your Home Theatre System for the audio, please follow the procedure below. 1. Unplug the speaker wires from the GV42L FHDTV10A at the rear of the TV set by carefully pulling down on these two 5-DIN pin connectors. 2. Remove the four (4) screws that hold the right speaker in place and remove the speaker. The screws are identified by arrows molded into the plastic. After removing speaker, the screws could be left in place for future use if speaker needs to be reinstalled. 3. Remove the aluminum nameplate from the front of the TV, between the speakers. Please make sure no to use excessive force since there are clips holding the plate which could break. 4. Repeat step 2 for the left speaker. After removing speaker, the screws could be left in place for future use if speaker needs to be reinstalled. Note: Do not attempt to remove the nameplate without removing one of the speakers beforehand; plate will be easily removed after step 2 is done. Version 10/9/2007 7 www.VIZIO.com
-
 1
1 -
 2
2 -
 3
3 -
 4
4 -
 5
5 -
 6
6 -
 7
7 -
 8
8 -
 9
9 -
 10
10 -
 11
11 -
 12
12 -
13
-
14
-
15
-
16
-
17
-
18
-
19
-
20
-
21
-
22
-
23
-
24
-
25
-
26
-
27
-
28
-
29
-
30
-
31
-
32
-
33
-
34
-
35
-
36
-
37
-
38
-
39
-
40
-
41
-
42
-
43
-
44
-
45
-
46
-
47
-
48
-
49
-
50
-
51
-
52
-
53
-
54
-
55
-
56
-
57
-
58
-
59
-
60
-
61
-
62
-
63
-
64
-
65
-
66
-
67
-
68
-
69
-
70
-
71
-
72
-
73
-
74
-
75
-
76
-
77
-
78
-
79
 |
 |
