Weider Cross Bow By 1500x Canadian English Manual - Page 10
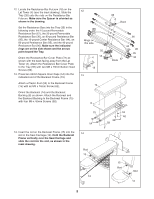
Locate the Long Cable 80.
 |
View all Weider Cross Bow By 1500x manuals
Add to My Manuals
Save this manual to your list of manuals |
Page 10 highlights
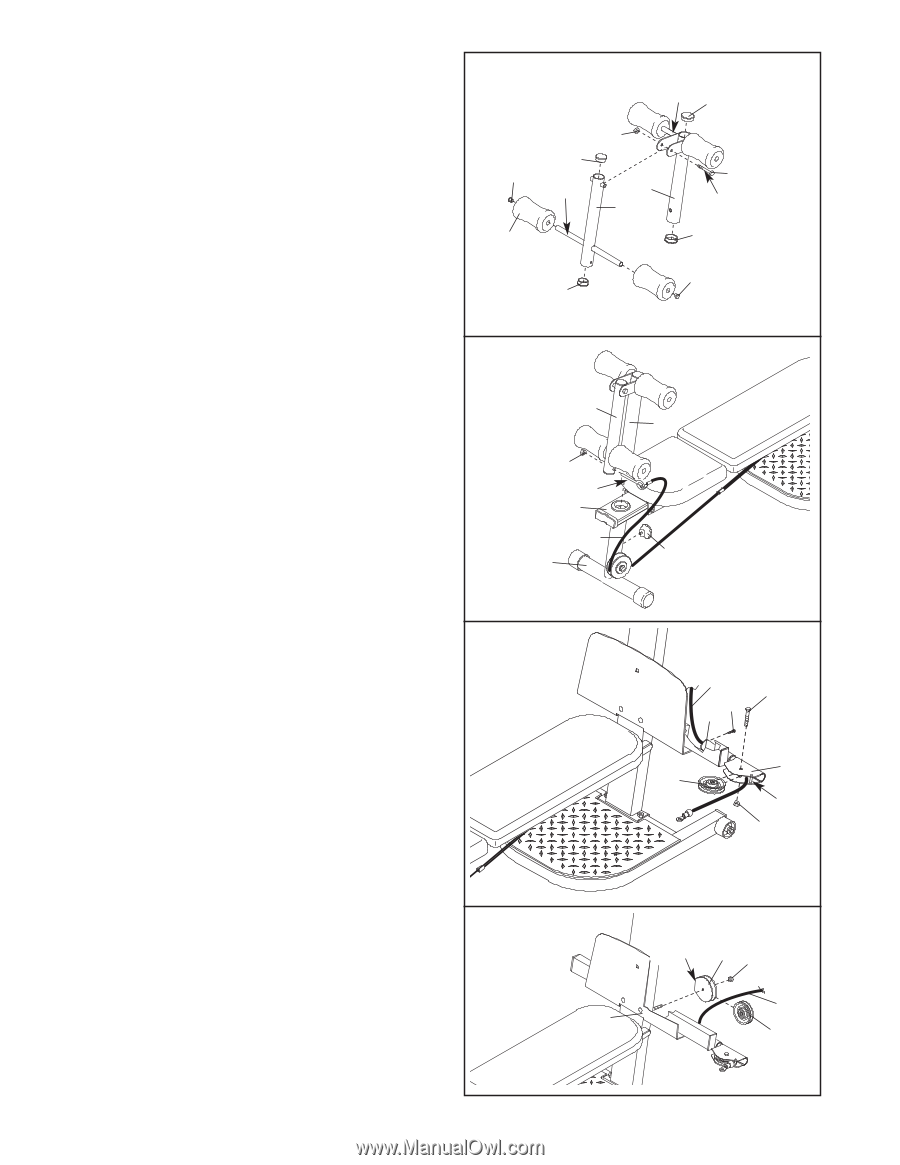
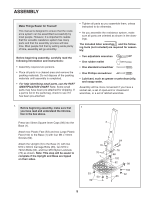
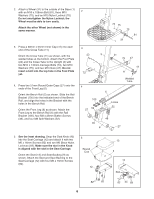
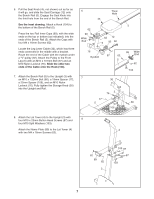
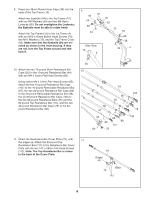
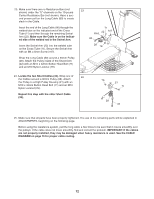
15. Press two 50mm Round Inner Caps (57) into the top and bottom of the Leg Developer (19). Press two 45mm Round Inner Caps (56) into the top and bottom of the Leg Lever (7). Lubricate an M10 x 69mm Bolt (60) with grease. Attach the Leg Lever (7) to the Leg Developer (19) with the Bolt and an M10 Nylon Locknut (76). Do not overtighten the Locknut; the Leg Lever must be able to pivot easily. Press two 19mm Round Inner Caps (78) into the tube on the Leg Lever (7). Slide two Foam Pads (26) onto the tubes. Repeat with the tube on the Leg Developer (19). 16. Slide the Leg Developer (19) into the Bench Rail (5). Align the hole in the Leg Developer with a hole in the Front Leg (6). Tighten the Bench Knob (42) into the hole in the Leg Developer. Connect the eyebolt on the Leg Lever Cable (32) to the indicated side of the Leg Lever (7) with an M8 Nylon Locknut (65). 15 Tube 57 76 56 78 Tube 19 7 26 60 Lubricate 57 78 56 16 7 19 65 Eyebolt 5 32 6 42 17. Locate the Long Cable (80). Insert one end of 17 the Cable through the welded tube on the indicat- ed end of the Cross Tube (11) and then through a Swivel Arm (22). If necessary, use the tip of a screwdriver to pull the end of the Cable out of the Swivel Arm. Make sure the Cable is on the indi- cated side of the welded rod in the Swivel Arm. Insert the Swivel Arm (22) into the welded tube on the Cross Tube (11). Secure the Swivel Arm with an M4 x 5mm Screw (107). Wrap the Long Cable (80) around a 90mm Pulley (28). Attach the Pulley inside of the Swivel Arm (22) with an M10 x 42mm Button Head Bolt (71) and an M10 Nylon Locknut (76). 18. Wrap the Long Cable (80) around a 90mm Pulley 18 (28). Attach the Pulley and a Pulley Guard (29) to the indicated M10 x 140mm Carriage Bolt (73) with an M10 Nylon Locknut (76). Make sure the flat edge of the Pulley Guard is on the side shown. 80 71 107 11 22 28 Rod 76 Flat Edge 29 76 80 73 28 10
-
 1
1 -
2
-
3
-
4
-
 5
5 -
 6
6 -
 7
7 -
 8
8 -
 9
9 -
 10
10 -
 11
11 -
 12
12 -
 13
13 -
 14
14 -
 15
15 -
16
-
17
-
18
-
19
-
20
-
21
-
22
-
23
 |
 |