Whirlpool EL88TRRW Installation Instructions - Page 5
Installation Instructions
 |
View all Whirlpool EL88TRRW manuals
Add to My Manuals
Save this manual to your list of manuals |
Page 5 highlights
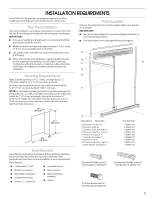
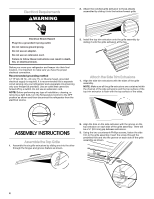
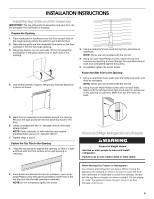
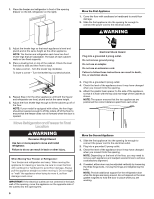
INSTALLATION INSTRUCTIONS Install the Top Grille and Trim Assembly IMPORTANT: The top grille and trim assembly, and your floor can be damaged if the assembly is dropped. Prepare the Opening 1. Place cardboard or hardboard over the floor at each side of the rough opening where the side trim will meet the floor. 2. Place the top grille and trim assembly face down on the floor centered in front of the rough opening. 3. Using two people, one on each side, lift the trim assembly and position it into place above and on each side of the opening. 4. Use several pieces of tape to temporarily hold the assembly in place as shown. 3. Using a carpenter's level, level the top trim, and shim as necessary. NOTE: Shims are not provided with the trim kit. 4. Using two pan head Phillips screws, fasten the top trim extrusion by inserting a screw through the predrilled holes at each end. Completely tighten the screws. 5. Completely tighten the center screw. Fasten the Side Trim to the Opening 1. Using a carpenters level, make sure the sides are plumb, and shim as necessary. NOTE: Shims are not provided with the trim kit. 2. Using four pan head Phillips screws (two on each side), fasten both the left-hand and right-hand side trim extrusions to the opening or cabinetry. Make sure the trim does not twist. 5. Mark the trim assembly hole locations around the opening. Remove the tape and lower the trim assembly back to the floor. 6. Using a cordless drill and ¹⁄₈" diameter drill bit, drill holes where marked. NOTE: Some cabinetry or wall materials may require predrilled holes using a ⁷⁄₈" diameter drill bit. 7. Repeat steps 3 and 4. Fasten the Top Trim to the Opening 1. Align the top extrusion against the opening, so that it is tight and flush with the front surface of the wall opening or cabinetry. 2. From below and behind the top trim extrusion, insert a pan head Phillips screw through the predrilled center hole of the top trim and into the wall opening or cabinetry. NOTE: Do not completely tighten the screw. Place and Align Refrigerator and Freezer WARNING Excessive Weight Hazard Use two or more people to move and install refrigerator. Failure to do so can result in back or other injury. When Moving Your Freezer or Refrigerator: Your freezer and refrigerator are heavy. When moving the appliance for cleaning or service, be sure to cover the floor with cardboard or hardboard to avoid floor damage. Always pull the appliance straight out when moving it. Do not wiggle or "walk" the appliance when trying to move it, as floor damage could occur. 5
-
 1
1 -
 2
2 -
 3
3 -
 4
4 -
 5
5 -
 6
6 -
 7
7 -
 8
8 -
 9
9 -
 10
10 -
 11
11 -
12
-
13
-
14
-
15
-
16
-
17
-
18
-
19
-
20
 |
 |
