Whirlpool WFG975H0H Installation Instructions - Page 10
Install Griddle
 |
View all Whirlpool WFG975H0H manuals
Add to My Manuals
Save this manual to your list of manuals |
Page 10 highlights
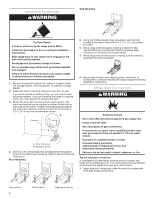
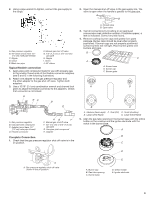
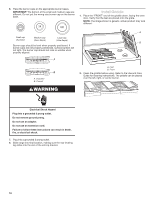
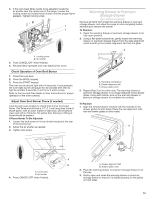
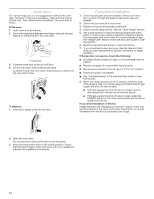
6. Place the burner caps on the appropriate burner bases. IMPORTANT: The bottom of the small and medium caps are different. Do not put the wrong size burner cap on the burner base. AUX SR UR Small cap (Auxiliary) Medium cap (Semi Rapid) Large cap (Ultra Rapid) Burner caps should be level when properly positioned. If burner caps are not properly positioned, surface burners will not light. The burner cap should not rock or wobble when properly aligned. Install Griddle 1. Place the "FRONT" end of the griddle down, facing the oven door. Verify that the feet are placed onto the grate. NOTE: The image shown is generic, actual product may look different. A B A B A. Incorrect B. Correct A. Feet B. Front 2. Clean the griddle before using. Refer to the Use and Care Guide for cleaning instructions. The griddle can be placed over the left, right, or center burner. WARNING Electrical Shock Hazard Plug into a grounded 3 prong outlet. Do not remove ground prong. Do not use an adapter. Do not use an extension cord. Failure to follow these instructions can result in death, fire, or electrical shock. 7. Plug into a grounded 3 prong outlet. 8. Slide range into final location, making sure the rear leveling leg slides into the slot of the anti-tip bracket. 10
-
 1
1 -
2
-
3
-
4
-
 5
5 -
 6
6 -
 7
7 -
 8
8 -
 9
9 -
 10
10 -
 11
11 -
 12
12 -
 13
13 -
 14
14 -
 15
15 -
16
-
17
-
18
-
19
-
20
-
21
-
22
-
23
-
24
-
25
-
26
-
27
-
28
-
29
-
30
-
31
-
32
-
33
-
34
-
35
-
36
-
37
-
38
-
39
-
40
-
41
-
42
-
43
-
44
-
45
-
46
-
47
-
48
-
49
-
50
-
51
-
52
-
53
-
54
-
55
-
56
-
57
-
58
-
59
-
60
-
61
-
62
-
63
-
64
 |
 |
