Xerox 7500/DN Phaser 7500 User Guide - Page 73
Using Custom Size Paper, Mac OS X version 10.4 and newer, Print, Xerox Features, Paper, Other Type - dimensions
 |
UPC - 095205705935
View all Xerox 7500/DN manuals
Add to My Manuals
Save this manual to your list of manuals |
Page 73 highlights
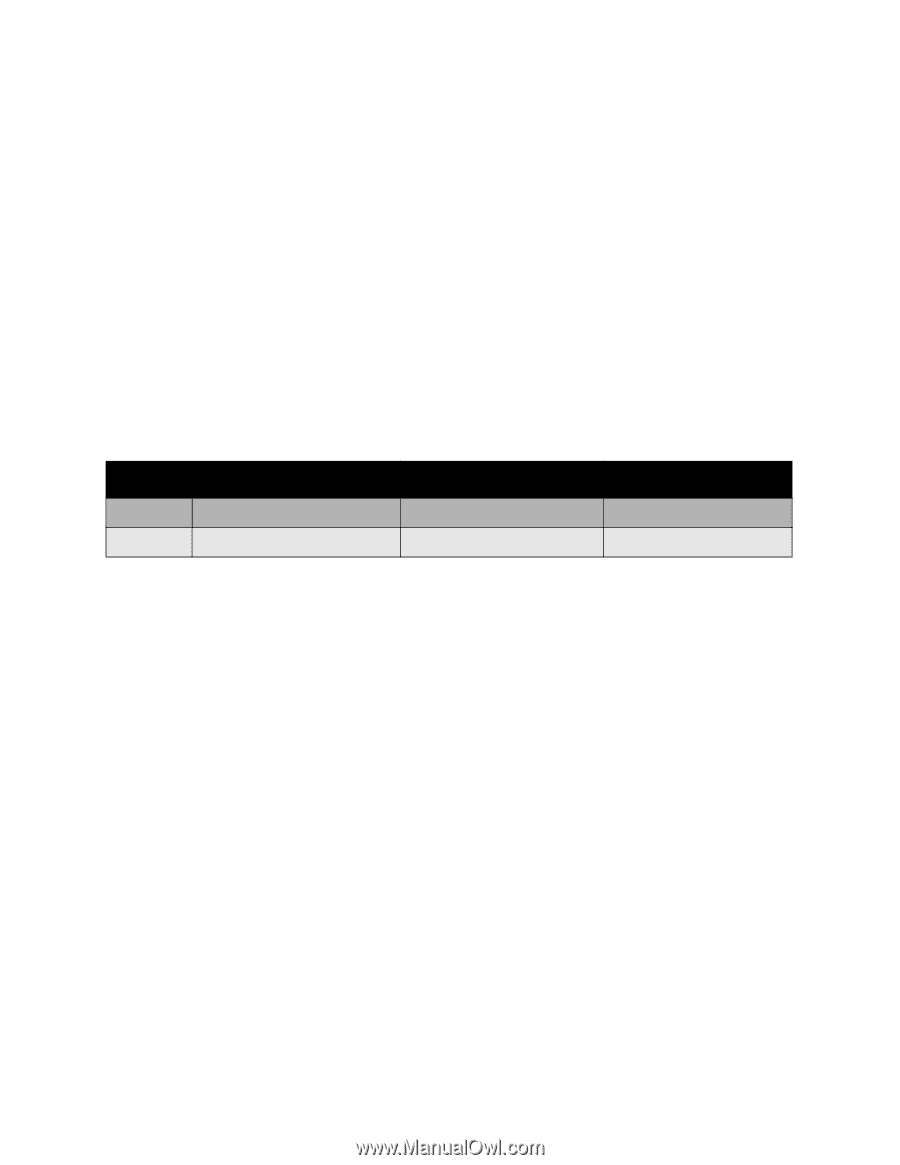
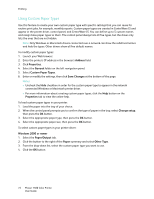
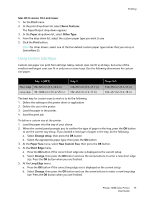
Printing Mac OS X version 10.4 and newer 1. Go the Print menu. 2. In the print drop-down list, select Xerox Features. The Paper/Output drop-down appears. 3. In the Paper drop-down list, select Other Type. 4. From the drop-down list, select the custom paper type you want to use. 5. Click the Print button. Note: For other drivers, select one of the five default custom paper type names that you set up in CentreWare IS. Using Custom Size Paper Custom size paper can print from all trays. Many custom sizes can fit in all trays, but some of the smallest and largest sizes can fit in only one or some trays. Use the following dimensions for custom size paper: Tray 1 (MPT) Short edge 89-320 mm (3.5-12.6 in.) Long edge 99-1200 mm (3.9-47.25 in.) Tray 2 140-297 mm (5.5-11.7 in.) 182-432 mm (7.2-17 in.) Trays 3-5 140-330 mm (5.5-13 in.) 182-457 mm (7.2-18 in.) The best way for custom sizes to work is to do the following: 1. Define the settings in the printer driver or application. 2. Define the size in the printer. 3. Load the paper in the printer. 4. Send the print job. To define a custom size at the printer: 1. Load the paper into the tray of your choice. 2. When the control panel prompts you to confirm the type of paper in the tray, press the OK button to use the current tray setup. If you loaded a new type of paper in the tray, do the following: a. Select Change setup, then press the OK button. b. Select the appropriate paper type, then press the OK button. 3. At the Paper Size menu, select New Custom Size, then press the OK button. 4. At the Short Edge menu: a. Press the OK button if the correct short edge size is displayed as the current setup. b. Select Change, then press the OK button and use the arrow buttons to enter a new short edge size. Press the OK button when you are finished. 5. At the Long Edge menu: a. Press the OK button if the correct long edge size is displayed as the current setup. b. Select Change, then press the OK button and use the arrow buttons to enter a new long edge size. Press the OK button when you are finished. Phaser 7500 Color Printer 73 User Guide
-
 1
1 -
2
-
3
-
4
-
5
-
6
-
7
-
8
-
9
-
10
-
11
-
12
-
13
-
14
-
15
-
16
-
17
-
18
-
19
-
20
-
21
-
22
-
23
-
24
-
25
-
26
-
27
-
28
-
29
-
30
-
31
-
32
-
33
-
34
-
35
-
36
-
37
-
38
-
39
-
40
-
41
-
42
-
43
-
44
-
45
-
46
-
47
-
48
-
49
-
50
-
51
-
52
-
53
-
54
-
55
-
56
-
57
-
58
-
59
-
60
-
61
-
62
-
63
-
64
-
65
-
66
-
67
-
 68
68 -
 69
69 -
 70
70 -
 71
71 -
 72
72 -
 73
73 -
 74
74 -
 75
75 -
 76
76 -
 77
77 -
 78
78 -
79
-
80
-
81
-
82
-
83
-
84
-
85
-
86
-
87
-
88
-
89
-
90
-
91
-
92
-
93
-
94
-
95
-
96
-
97
-
98
-
99
-
100
-
101
-
102
-
103
-
104
-
105
-
106
-
107
-
108
-
109
-
110
-
111
-
112
-
113
-
114
-
115
-
116
-
117
-
118
-
119
-
120
-
121
-
122
-
123
-
124
-
125
-
126
-
127
-
128
-
129
-
130
-
131
-
132
-
133
-
134
-
135
-
136
-
137
-
138
-
139
-
140
-
141
-
142
-
143
-
144
-
145
-
146
-
147
-
148
-
149
-
150
-
151
-
152
-
153
-
154
-
155
-
156
-
157
-
158
-
159
-
160
-
161
-
162
-
163
-
164
 |
 |