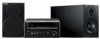
Yamaha MCR730B User Manual
Yamaha MCR730B - MCR 730 AV System Manual
 |
UPC - 027108105840
View all Yamaha MCR730B manuals
Add to My Manuals
Save this manual to your list of manuals |
Yamaha MCR730B manual content summary:
- Yamaha MCR730B | User Manual - Page 1
UA DRX-730 MICRO COMPONENT SYSTEM OWNER'S MANUAL - Yamaha MCR730B | User Manual - Page 2
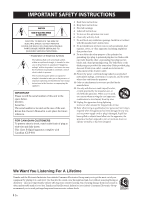
IMPORTANT SAFETY INSTRUCTIONS CAUTION RISK OF ELECTRIC SHOCK DO NOT OPEN CAUTION: TO REDUCE THE RISK OF ELECTRIC SHOCK, DO NOT REMOVE COVER (OR BACK). NO USER-SERVICEABLE PARTS INSIDE. REFER SERVICING TO QUALIFIED SERVICE PERSONNEL. • Explanation of Graphical Symbols The lightning flash with - Yamaha MCR730B | User Manual - Page 3
instructions. Failure to follow instructions could void your FCC authorization to use this product in the USA. 3 NOTE: This product has been tested instructions found in the users manual ON", please try to eliminate the problem by using one of the following distributed by Yamaha Corporation of - Yamaha MCR730B | User Manual - Page 4
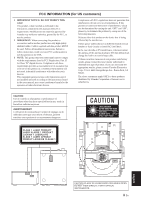
shock to the user and/or injury. Yamaha will Troubleshooting" section in the owner's manual service person should remove the cover or attempt to service this device. LASER Type Wave length Output Power Beam divergence Semiconductor laser AlGaInP 655 nm (DVD) 790 nm (VCD/CD) 5 mW (DVD) 7 mW (VCD/CD - Yamaha MCR730B | User Manual - Page 5
of Bluetooth SIG and is used by Yamaha in accordance with a license agreement. ■ Memory backup If the power cable is disconnected from the AC wall outlet, the DRX-730 will save the radio presets and other settings for at least 1 week. ■ About this manual Unless otherwise stated, instructions in - Yamaha MCR730B | User Manual - Page 6
DivX, DivX Ultra Certified, and associated logos are trademarks of DivX, Inc. and are used under license. Manufactured under license from Dolby Laboratories. Dolby and the double-D symbol are trademarks of Dolby Laboratories. Manufactured under license under U.S. Patent #'s: 5,451,942; 5,956,674; 5, - Yamaha MCR730B | User Manual - Page 7
Settings 52 Initial Settings menu 52 Appendix 57 Supported discs and formats 57 Looking after discs 60 Looking after the DRX-730 61 Resetting the DRX-730 61 Language, country, and region lists . . . . . .62 Troubleshooting 63 Specifications 70 1 2 3 4 5 6 7 8 9 10 Appendix English 1 En - Yamaha MCR730B | User Manual - Page 8
the Yamaha DRX-730 DVD Receiver. To get the most enjoyment from your new Yamaha product, please read this manual carefully, and keep it in a safe place for future reference. Features • Play the following discs: DVD-Video, DVD-VR (DVD-R/RW/R DL discs recorded in VR mode), VCD, SVCD, Audio CD, DTS CD - Yamaha MCR730B | User Manual - Page 9
page 23). C TIMER LED Lights up when the DRX-730 is on standby and the timer is on (see on page 4 for more details. H Remote control sensor Receives signals from the remote control. I Stop ( ) Stops L PORTABLE jack Used to connect a portable music player (see page 43). M PHONES jack Used to - Yamaha MCR730B | User Manual - Page 10
and an optional Yamaha YBA-10 Bluetooth Wireless Audio Receiver (see page 47). • Flashes while the optional Yamaha YBA-10 Bluetooth Wireless Audio Receiver is pairing or searching for a Bluetooth device (see page 47). F SHUFFLE Lights up when shuffle playback is selected on the iPod (see page 44 - Yamaha MCR730B | User Manual - Page 11
subwoofer (sold separately) can be connected here (see page 10). G AUX IN and OUT A recording component, such as a CDR, MDR, or cassette deck, can be connected here (see page 14). H DOCK An optional Yamaha iPod universal dock (YDS-10 or YDS-11) or a Yamaha YBA-10 Bluetooth Wireless Audio Receiver - Yamaha MCR730B | User Manual - Page 12
/ MANUAL MEMORY f O BAND TUNER P Q R S DVD/USB AUX/PORTABLE DOCK SOUND PURE DIRECT MUTE TIMER SLEEP DIMMER DISPLAY g h i j k T l Tip: • In addition to controlling the DRX-730, the remote control can also be used to control playback on an iPod (see page 43) or a Bluetooth music player - Yamaha MCR730B | User Manual - Page 13
and closes the disc tray (see page 23). k DISPLAY • Displays the time. • When the input source is DVD and a disc is being played, also displays the audio format. l DIMMER Dims the DRX-730's display (see page 20). V ON SCREEN Displays information about the currently playing disc on the connected TV - Yamaha MCR730B | User Manual - Page 14
and -). Operating range The remote control has an operating range of up to 6 meters (20 feet). When using the remote control, point it toward the DRX-730's remote control sensor, which is next to the display, see below. Notes: • Be careful not to spill liquid on the remote control. • Be careful not - Yamaha MCR730B | User Manual - Page 15
Connecting speakers Connect the NX-E700 speakers to the DRX-730 as shown below. Right speaker Chapter 2: Getting Started Left speaker 2 Speaker cables DRX-730 MAINS HDMI CLASS 2 WIRING CABLAGE CLASSE 2 R 6 MIN SPEAKER SPEAKERS R SUBWOOFER OUT OUT IN AUX AM ANT GND FM ANT 75 UNBAL. PR - Yamaha MCR730B | User Manual - Page 16
, and twist the exposed strands together to prevent possible short circuits. 10 mm (3/8 in.) Connecting a powered subwoofer You can connect a powered subwoofer (sold separately) to the DRX-730's SUBWOOFER OUT jack for a really deep bass sound. Using an audio pin cable (sold separately), connect the - Yamaha MCR730B | User Manual - Page 17
, and connect the black wire to the GND terminal. AM ANT terminal W hite GND terminal Black Notes: • Do not connect the power cable to the DRX-730 until all other connections have been completed. • Before deciding where to install the antennas permanently, tune in to an AM or FM radio station and - Yamaha MCR730B | User Manual - Page 18
you choose will depend on the connections supported by your TV. Refer to your TV owner's manual for details. HDMI provides the best picture quality. Component video offers the next best picture quality and the DRX-730's component video output supports progressive scanning for even better picture - Yamaha MCR730B | User Manual - Page 19
the 2 DRX-730, press STANDBY/ON, keeping IN Stop ( ) pressed until "DVD - NO REQ." HDMI appears on the display. HDMI cable (sold separately) 3 Press Play/Pause ( / ) repeatedly to select "HDMI AUDIO ON." MAINS HDMI CLASS 2 WIRING CABLAGE CLASSE 2 R 6 MIN SPEAKER SPEAKERS R SUBWOOFER OUT - Yamaha MCR730B | User Manual - Page 20
DRX-730 all the way when listening through the speakers connected to your AV receiver/decoder. • The OPTICAL DIGITAL OUT outputs audio only when the input source is DVD or USB. MAINS CLASS 2 WIRING CABLAGE CLASSE 2 R HDMI PR PB AM ANT GND FM ANT 75 UNBAL. 6 MIN SPEAKER SPEAKERS R SUBWOOFER - Yamaha MCR730B | User Manual - Page 21
Connecting the power cable Once you've completed all of the other connections, connect the power cable to an AC wall outlet. Connect to an AC wall outlet MAINS CLASS 2 WIRING CABLAGE CLASSE 2 R HDMI 6 MIN SPEAKER SPEAKERS SUBWOOFER OUT OUT IN AUX Chapter 2: Getting Started 2 English 15 En - Yamaha MCR730B | User Manual - Page 22
Press repeatedly to select AUX or PORTABLE. 5. Optional Yamaha iPod universal dock (YDS-10 or YDS-11) required. 6. Optional Yamaha YBA-10 Bluetooth Wireless Audio Receiver required. ■ Front panel INPUT control You can also use the INPUT control on the DRX-730 to select input sources. Turn it to the - Yamaha MCR730B | User Manual - Page 23
. AE SETUP PRESET ENTER MENU AE RETURN AUTO/ MANUAL MEMORY VOLUME BAND TUNER DVD/USB AUX/PORTABLE DOCK SOUND PURE DIRECT MUTE TIMER SLEEP VOLUME control You can also adjust the volume by using the VOLUME control on the DRX-730. To mute the sound, press MUTE. MUTE ON "MUTE ON" appears on - Yamaha MCR730B | User Manual - Page 24
the balance You can adjust the left and right sound balance. SOUND TOP MENU INFO. AE SETUP PRESET ENTER MENU AE RETURN AUTO/ MANUAL MEMORY VOLUME BAND TUNER DVD/USB AUX/PORTABLE DOCK SOUND PURE DIRECT MUTE TIMER SLEEP DIMMER DISPLAY SOUND TOP MENU INFO. AE SETUP PRESET ENTER MENU AE - Yamaha MCR730B | User Manual - Page 25
enjoy high quality audio playback. PURE DIRECT AUTO/ MANUAL MEMORY VOLUME BAND TUNER DVD/USB AUX/PORTABLE DOCK SOUND PURE DIRECT MUTE PHONES jack on the DRX-730's front panel. While headphones are plugged into the PHONES jack, the speakers and, if connected, subwoofer output no sound. English - Yamaha MCR730B | User Manual - Page 26
the brightness of the display to suit your room lighting. For example, you're using the DRX-730 in a darkened room and the display is too bright. AUTO/ MANUAL MEMORY VOLUME BAND TUNER DVD/USB AUX/PORTABLE DOCK SOUND PURE DIRECT MUTE TIMER SLEEP DIMMER DISPLAY DIMMER Using the sleep timer - Yamaha MCR730B | User Manual - Page 27
program the timer, you must first set the clock. ENTER TIMER TOP MENU INFO. AE SETUP PRESET ENTER MENU AE RETURN AUTO/ MANUAL MEMORY VOLUME BAND TUNER DVD/USB AUX/PORTABLE DOCK SOUND PURE DIRECT MUTE TIMER SLEEP DIMMER DISPLAY Chapter 3: General Functions 6 Press ENTER. The time is set - Yamaha MCR730B | User Manual - Page 28
MANUAL MEMORY VOLUME BAND TUNER DVD/USB AUX/PORTABLE DOCK SOUND PURE DIRECT MUTE TIMER SLEEP DIMMER DISPLAY DISPLAY Auto standby To save energy and prevent screen burn, you can set the DRX-730 be displayed while iPod Menu mode is selected (see page 43). 1 With the DVD or USB input source - Yamaha MCR730B | User Manual - Page 29
9 0 ON BLUETOOTH OFF AUDIO SUBTITLE ANGLE PLAY MODE CLEAR TOP MENU INFO. AE SETUP PRESET ENTER MENU AE RETURN AUTO/ MANUAL MEMORY VOLUME BAND TUNER DVD/USB AUX/PORTABLE DOCK SOUND PURE DIRECT MUTE TIMER SLEEP DIMMER DISPLAY MENU RETURN 3 Press Play/Pause ( / ) on the DRX-730 to - Yamaha MCR730B | User Manual - Page 30
Stop ( ). Notes: • The Last Memory function may not work with some discs. • The DRX-730 can remember the Last Memory points for up to five DVD-Video discs and one VCD or SVCD disc. ® • For DivX , WMV, and Audio CD discs, the Resume function is cancelled when the disc is ejected, the input source - Yamaha MCR730B | User Manual - Page 31
can be used with menus. Previous/Rewind ( / ) on the DRX-730 to select tracks. Button RETURN Description Displays the PBC menu when pressed , playback goes to the specified title (DVD-VR [VR mode DVD-R/RW/R DL]), chapter (DVD-Video), or track (VCD, SVCD, or Audio CD). Notes: • With some PBC VCD - Yamaha MCR730B | User Manual - Page 32
VCD, SVCD, DivX , and WMV discs in slow motion at four different speeds. You can also play DVD-Video discs in reverse slow motion. STANDBY/ON OPEN/CLOSE 1 2 3 4 5 6 7 8 ZOOM ON SCREEN 9 0 ON BLUETOOTH OFF AUDIO SUBTITLE ANGLE PLAY MODE CLEAR Frame-by-frame playback ® You can play - Yamaha MCR730B | User Manual - Page 33
have multiple audio soundtracks. ® Some DVD and DivX discs have subtitles in one or more languages that you can select during playback. STANDBY/ON OPEN/CLOSE 1 2 3 4 AUDIO STANDBY/ON OPEN/CLOSE 1 2 3 4 5 6 7 8 ZOOM ON SCREEN 9 0 ON BLUETOOTH OFF AUDIO SUBTITLE ANGLE PLAY - Yamaha MCR730B | User Manual - Page 34
® DVD-Video, VCD, SVCD, DivX , WMV, or JPEG disc. STANDBY/ON OPEN/CLOSE 1 2 3 4 5 6 7 8 ZOOM ON SCREEN 9 0 ON BLUETOOTH OFF AUDIO SUBTITLE ANGLE PLAY MODE CLEAR ZOOM TOP MENU INFO. AE SETUP PRESET ENTER MENU AE RETURN AUTO/ MANUAL MEMORY VOLUME - Yamaha MCR730B | User Manual - Page 35
ANGLE PLAY MODE CLEAR A-B repeat playback You can specify two points (A and B) on a DVD, VCD, SVCD, or Audio CD, and then play the section between those two points repeatedly. PLAY MODE ON BLUETOOTH OFF AUDIO SUBTITLE ANGLE PLAY MODE CLEAR TOP MENU PRESET MENU ENTER SETUP TOP MENU - Yamaha MCR730B | User Manual - Page 36
-Video) or tracks (VCD, SVCD, or Audio CD) in random order. PLAY MODE ON BLUETOOTH OFF AUDIO SUBTITLE ANGLE PLAY MODE CLEAR ENTER SETUP TOP MENU INFO. AE SETUP PRESET ENTER MENU AE RETURN AUTO/ MANUAL MEMORY VOLUME BAND TUNER DVD/USB AUX/PORTABLE DOCK 1 During playback, press SETUP - Yamaha MCR730B | User Manual - Page 37
is ejected, an input source other than DVD is selected, or the DRX-730 is turned off. ENTER SETUP TOP MENU INFO. AE SETUP PRESET ENTER MENU AE RETURN AUTO/ MANUAL MEMORY VOLUME BAND TUNER 4 • Program playback cannot be used with DVD-VR ® (VR mode DVD-R/RW/R DL), DivX , WMV, JPEG, MP3, WMA - Yamaha MCR730B | User Manual - Page 38
BLUETOOTH OFF AUDIO SUBTITLE ANGLE PLAY MODE CLEAR ZOOM TOP MENU INFO. AE SETUP PRESET ENTER MENU AE RETURN AUTO/ MANUAL MEMORY VOLUME BAND TUNER MENU Load the JPEG CD not appear immediately. • On a single disc, the DRX-730 supports up to 299 folders, and each folder may contain a combination - Yamaha MCR730B | User Manual - Page 39
SCREEN 9 0 ON BLUETOOTH OFF AUDIO SUBTITLE ANGLE PLAY MODE CLEAR Original: Title DVD-VR Original: Time (VR mode DVD-R/RW/R DL)2 Playlist: then press ENTER. SETUP INFO. AE SETUP ENTER AE RETURN AUTO/ MANUAL MEMORY VOLUME Six thumbnail images appear on-screen showing content of the - Yamaha MCR730B | User Manual - Page 40
WMV, and JPEG files on data discs. ZOOM ON SCREEN 9 0 ON BLUETOOTH OFF AUDIO SUBTITLE ANGLE PLAY MODE CLEAR SETUP ENTER TOP MENU INFO. AE SETUP PRESET ENTER MENU AE RETURN AUTO/ MANUAL MEMORY VOLUME BAND TUNER DVD/USB AUX/PORTABLE DOCK SOUND PURE DIRECT MUTE 1 Press SETUP. The - Yamaha MCR730B | User Manual - Page 41
0 ON BLUETOOTH OFF AUDIO MANUAL MEMORY VOLUME BAND TUNER DVD DRX-730's display. Display Description PCM PCM (DVD-Video disc) Dolby D Dolby Digital (DVD-Video disc) MPEG2 MPEG2 (DVD-Video disc) DTS DTS (DVD-Video disc) CDDA Audio CD VCD Video CD SVCD Super video CD DTS CD DTS CD - Yamaha MCR730B | User Manual - Page 42
in to radio stations automatically or manually. Auto tuning In Auto Tuning mode, the DRX-730 searches for radio stations automatically. AUTO/MANUAL BAND TUNER TOP MENU INFO. AE SETUP PRESET ENTER MENU AE RETURN AUTO/ MANUAL MEMORY VOLUME BAND TUNER DVD/USB AUX/PORTABLE DOCK SOUND PURE - Yamaha MCR730B | User Manual - Page 43
to standby. 2 While holding down Stop ( ) on the DRX-730, press STANDBY/ON, keeping Stop ( ) pressed until "DVD - NO REQ." appears on the display. 5 3 Press AUTO/MANUAL repeatedly to select Manual Tuning mode (AUTO indicator off ). In Manual Tuning mode, the AUTO indicator on the display is off - Yamaha MCR730B | User Manual - Page 44
. Auto presetting In Auto Presetting mode, the DRX-730 presets all of the radio stations available in your area automatically. MEMORY TUNER TOP MENU INFO. AE SETUP PRESET ENTER MENU AE RETURN AUTO/ MANUAL MEMORY VOLUME BAND TUNER DVD/USB AUX/PORTABLE DOCK SOUND PURE DIRECT MUTE TIMER - Yamaha MCR730B | User Manual - Page 45
STANDBY/ON OPEN/CLOSE 1 2 3 4 5 6 7 8 ZOOM ON SCREEN 9 0 ON BLUETOOTH OFF AUDIO SUBTITLE ANGLE PLAY MODE CLEAR BAND TUNER TOP MENU INFO. AE SETUP PRESET ENTER MENU AE RETURN AUTO/ MANUAL MEMORY VOLUME BAND TUNER DVD/USB AUX/PORTABLE DOCK SOUND PURE DIRECT MUTE TIMER - Yamaha MCR730B | User Manual - Page 46
the timer turns on the DRX-730. PLAY MODE CLEAR 3 Press ENTER. The input source is set and the ON Time setting appears on the display (see page 41). Note: • The DOCK input source can be used for timer playback with an iPod, but not a Bluetooth device. BAND TUNER DVD/USB TIMER TOP MENU INFO - Yamaha MCR730B | User Manual - Page 47
the off time You can set the time at which you want the DRX-730 to stop playback and go on standby. ENTER TIMER TOP MENU INFO. AE SETUP PRESET ENTER MENU AE RETURN AUTO/ MANUAL MEMORY VOLUME BAND TUNER DVD/USB AUX/PORTABLE DOCK SOUND PURE DIRECT MUTE TIMER SLEEP DIMMER DISPLAY ENTER - Yamaha MCR730B | User Manual - Page 48
If you selected the DVD input source, don't forget to load a disc in the DRX-730. Likewise, if you selected the USB input source, make sure a USB storage device is plugged into the DRX-730. • If you selected the AUX, PORTABLE, or DOCK input source, see the owner's manual for the connected component - Yamaha MCR730B | User Manual - Page 49
(sold separately), connect the audio output on the music player Yamaha dock's owner's manual to learn which iPod models it supports and for setup details. to the PORTABLE jack on the DRX-730's front panel. Notes: • Set the DRX-730 to standby and disconnect its power cable before connecting or - Yamaha MCR730B | User Manual - Page 50
output from the DRX-730. • Depending on your iPod model and its firmware version, some iPod functions may not work as expected, and some may not work at all. • In Menu mode, any unsupported characters will be replaced with an underscore (_) character. • Refer to your iPod owner's manual for details - Yamaha MCR730B | User Manual - Page 51
played. • The DRX-730 supports USB mass storage class devices formatted with FAT16 or FAT32, including USB flash memory devices, digital audio players, and USB hard 1 Press DVD/USB repeatedly to select the USB input source. Turn on your TV and select the AV input to which the DRX-730 is connected. - Yamaha MCR730B | User Manual - Page 52
longer to load and may not appear immediately. • On a single USB storage device, the DRX-730 supports up to 299 folders, and each folder may contain a combination of up to 648 files and a JPEG slideshow" above. Note: • With some digital music players, file names may not display correctly. 46 En - Yamaha MCR730B | User Manual - Page 53
Device Playback Bluetooth playback With an optional Yamaha YBA-10 Bluetooth Wireless Audio Receiver connected to the DRX-730's DOCK jack, you can enjoy the music stored on your Bluetooth device, for example, a Bluetoothcompatible music player or mobile phone, through the DRX-730's speakers in - Yamaha MCR730B | User Manual - Page 54
device will not be disconnected when a different input source is selected on the DRX-730. • The Yamaha YBA-10 only supports Bluetooth music players and mobile phones that are compatible with A2DP or AVRCP. • Bluetooth has a line of sight operating range of up to 10 meters (33 ft.). Make sure - Yamaha MCR730B | User Manual - Page 55
the DRX-730 and recording component. 3 On the DRX-730, select the input source that you want to record. If you selected the DVD DRX-730's OPTICAL DIGITAL OUT jack and record digitally. Notes: • Refer to your recording component's owner's manual for details on using it. • Adjustments to the DRX-730 - Yamaha MCR730B | User Manual - Page 56
AE SETUP PRESET ENTER MENU AE RETURN AUTO/ MANUAL MEMORY VOLUME BAND TUNER DVD/USB AUX/PORTABLE DOCK SOUND PURE DIRECT MUTE TIMER The effects of the Audio settings depends on your speakers, TV, and AV receiver's volume level and other settings. For each setting, switch between the - Yamaha MCR730B | User Manual - Page 57
picture. SETUP ENTER TOP MENU INFO. AE SETUP PRESET ENTER MENU AE RETURN AUTO/ MANUAL MEMORY VOLUME BAND TUNER DVD/USB AUX/PORTABLE DOCK SOUND PURE DIRECT MUTE TIMER SLEEP DIMMER DISPLAY 1 Select the DVD input source, and then press SETUP. The Setup menu appears on-screen. Note: • The - Yamaha MCR730B | User Manual - Page 58
Note: • The Initial Settings menu is available only when the DVD input source is selected. 2 Select "Initial Settings," and then press and output as 2-channel PCM. Notes: • If you select DTS and your AV receiver/decoder doesn't support DTS, noise may be heard. • When DTS > PCM is selected, you can - Yamaha MCR730B | User Manual - Page 59
If your TV or projector supports progressive scanning, select Progressive. Refer to your TV owner's manual for details. • Interlace ( select Progressive inadvertently and your TV doesn't support it, you may lose the picture altogether. In this case, connect the DRX-730 to a TV with a composite video - Yamaha MCR730B | User Manual - Page 60
be used if available. (Available languages depends on where you purchased the DRX-730.) • Other Languages: Use the language abbreviations and codes listed on page 62 to specify languages not listed above. Notes: • With some DVD-Video discs, the soundtrack language will be set by the disc regardless - Yamaha MCR730B | User Manual - Page 61
page 52) is set to DTS > PCM. Select Lt/Rt if your AV receiver/decoder supports Dolby Pro Logic but not DTS and it's connected to the OPTICAL DIGITAL addition, some DVD-Video discs use country or region codes to block unsuitable content based on the country or region that you set on the DRX-730. To - Yamaha MCR730B | User Manual - Page 62
. Note: • The new country or region code setting will take effect the next time you load a disc. If a disc is already loaded, you must eject and reload it for the new setting to take effect. DivX® VOD ® To play DivX VOD (Video on Demand) files on the ® DRX-730, you may need to provide - Yamaha MCR730B | User Manual - Page 63
supported. • Unfinalized discs cannot be played. See your disc recorder owner's manual for details on finalizing. • Some discs may not play, may produce noise, or may sound distorted. This is due to the disc and is not a malfunction. ■ DVD-R/RW/R DL • The DRX-730 is compatible with DVD-R/RW and DVD - Yamaha MCR730B | User Manual - Page 64
owner's manual for details. • Discs recorded with packet writing are not supported. MP3, WMA, and MPEG-4 AAC files • The DRX-730 AAC. • The DRX-730 can play MP3, WMA, and MPEG-4 AAC files stored on CD-R/RW discs discs and USB storage devices. • The following sampling rates are supported: 32 kHz, - Yamaha MCR730B | User Manual - Page 65
properly. DVD-Video regions DVD players and DVD-Video discs are assigned a region number based on the country or region in which they are sold. DVD player's can only play discs with the same region number. Discs with a different region number cannot be played. The region number for the DRX-730 can - Yamaha MCR730B | User Manual - Page 66
dust collects on the DRX-730's pickup lens, the sound may jump or the picture may be disturbed. In such cases, contact your Yamaha dealer. Do not use records. • Do not load badly damaged, cracked, or warped discs into the DRX-730, as they may damage it. • Do not affix stickers or labels to discs - Yamaha MCR730B | User Manual - Page 67
other AV components that you intend to use with it. • Do not place anything on top of the DRX-730. • Do not place the DRX-730 on top of your TV. And keep it away from components that are sensitive to magnetism, such as video recorders. • Do not place the DRX-730 on top of a power amplifier or - Yamaha MCR730B | User Manual - Page 68
Twi (tw), 2023 Ukrainian (uk), 2111 Urdu (ur), 2118 Uzbek (uz), 2126 Vietnamese (vi), 2209 Volapük (vo), 2215 Volof (wo), 2315 Xhosa (xh), 2408 Yoruba (yo), 2515 Zulu (zu), 2621 Country and region list ■ Language, code number, abbreviation Argentina, 0118, ar Australia, 0121, au Austria, 0120 - Yamaha MCR730B | User Manual - Page 69
Troubleshooting If you experience any issues while using the DRX-730, look them up in the following tables and try the suggested solution. If an issue is not listed, or you cannot resolve it yourself, contact your Yamaha dealer. General Issue The DRX-730 not supported. Use only supported disc - Yamaha MCR730B | User Manual - Page 70
then disconnect the power cable. Wait 30 seconds, reconnect the power cable, and turn it back on again. Move the device away from the DRX-730. Connect the DRX-730 to an AC wall outlet, and then set the clock (see page 21). Remote control Issue The remote control doesn't work. Possible cause The - Yamaha MCR730B | User Manual - Page 71
camera angles. Can't play some files. Can't record a DVD. The TV picture is disturbed. The picture is stretched or black bars are displayed. Ghosting appears in some areas of the picture. Possible cause Not all discs support all of the DRX-730's disc playback functions. The disc is not properly set - Yamaha MCR730B | User Manual - Page 72
Initial Settings, or Video Adjust menu. Possible cause The loaded disc is not supported. The disc is not properly set on the disc tray. These menus can be displayed only when the DVD input source is selected. Solution Use only supported disc formats (see page 57). Place the disc, label-side up, in - Yamaha MCR730B | User Manual - Page 73
switching to Manual Tuning mode (see page 37), or connect an outdoor FM antenna (sold separately). Consult an qualified antenna installer in your area for more details. ■ AM Issue Possible cause Solution Reception is very noisy. Atmospheric interference or lightning, or the DRX-730 is picking - Yamaha MCR730B | User Manual - Page 74
to the Yamaha iPod universal dock or DRX-730 properly. Depending on your iPod model and its firmware version, some iPod functions may not work as expected, and some may not work at all. The iPod is set to display video on a TV. The iPod is not supported. There's no iPod in the Yamaha iPod universal - Yamaha MCR730B | User Manual - Page 75
player or mobile phone. Some functions don't work as expected. The message "Not found" is displayed. The message "Not Available" is displayed. Possible cause The dock cable is not connected to the Yamaha YBA-10 or DRX-730 properly. The Bluetooth device doesn't support A2DP or AVRCP. The Bluetooth - Yamaha MCR730B | User Manual - Page 76
kHz downmix support DVD section • CD) Output power 5 mW (DVD), 7 mW (VCD/CD) • Dimensions (W x H x D 215 x 113 x 300 mm (8.46 x 4.45 x 11.81 in.) • Weight 2.9 kg (6.4 lbs.) • Operating Temperature Range 5 to 35ºC (41 to 95ºF) • Operating Humidity Range 5 to 90% (no condensation) Specifications - Yamaha MCR730B | User Manual - Page 77
EX NX-E700 Speaker System Systeme D'enceintes Lautsprecheranlage Sistema de altavoces OWNER'S MANUAL MODE D'EMPLOI BEDIENUNGSANLEITUNG MANUAL DE INSTRUCCIONES 1 - Yamaha MCR730B | User Manual - Page 78
away from the TV set. CONNECTION TO YOUR DVD RECEIVER BEFORE MAKING CONNECTIONS, MAKE SURE THAT THE DVD RECEIVER IS SWITCHED OFF. When this unit is connected to the DVD receiver, refer also to the owner's manual supplied with the receiver. s CONNECTIONS • Connect the screw-type input terminals at - Yamaha MCR730B | User Manual - Page 79
push gently. DVD receiver How to connect Test the firmness of the connection by pulling lightly on the cable at the terminal. Note Do not let the bare speaker wires touch each other as this could damage the speaker or the receiver cable (4 m) x 2 * Specifications are subject to change without - Yamaha MCR730B | User Manual - Page 80
-BEAUBOURG 77312 MARNE-LA-VALLEE CEDEX02, FRANCE YAMAHA ELECTRONICS (UK) LTD. YAMAHA HOUSE, 200 RICKMANSWORTH ROAD WATFORD, HERTS WD18 7GQ, ENGLAND YAMAHA SCANDINAVIA A.B. J A WETTERGRENS GATA 1, BOX 30053, 400 43 VÄSTRA FRÖLUNDA, SWEDEN YAMAHA MUSIC AUSTRALIA PTY, LTD. 17-33 MARKET ST., SOUTH
-
 1
1 -
 2
2 -
 3
3 -
 4
4 -
 5
5 -
 6
6 -
 7
7 -
8
-
9
-
10
-
11
-
12
-
13
-
14
-
15
-
16
-
17
-
18
-
19
-
20
-
21
-
22
-
23
-
24
-
25
-
26
-
27
-
28
-
29
-
30
-
31
-
32
-
33
-
34
-
35
-
36
-
37
-
38
-
39
-
40
-
41
-
42
-
43
-
44
-
45
-
46
-
47
-
48
-
49
-
50
-
51
-
52
-
53
-
54
-
55
-
56
-
57
-
58
-
59
-
60
-
61
-
62
-
63
-
64
-
65
-
66
-
67
-
68
-
69
-
70
-
71
-
72
-
73
-
74
-
75
-
76
-
77
-
78
-
79
-
80
 |
 |
OWNER'S MANUAL
MICRO COMPONENT SYSTEM
DRX-730
UA