Yamaha PR7 Owner's Manual - Page 17
Selecting a recording preset, Overdubbing Layered recordings, Press the [REC LEVEL] button
 |
View all Yamaha PR7 manuals
Add to My Manuals
Save this manual to your list of manuals |
Page 17 highlights
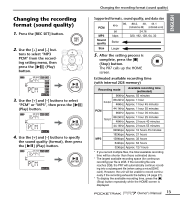
Selecting a recording preset The PR7 offers presets that feature predetermined parameter settings to optimize the recording source. 1. Press and hold down the [REC SET] button for at least two seconds while the PR7 is stopped. 2. Use the [+] and [-] but- tons to select a preset that is suitable for the recording source, then press the [ ] (Play) button. Selecting a recording preset Overdubbing (Layered recordings) You can layer a recording over an existing audio file and create a new file. This process is called "overdubbing." Make sure to connect a set of headphones when doing this; overdubbing cannot be executed by using the built-in speaker. 1. Select a file that you want to use for overdubbing, then press the [OVERDUB] button. 2. Press the [REC LEVEL] button. 3. Press the [+] or [-] button to adjust the recording level. Press the [] button to adjust the playback level. Available presets • OFF (musical instrument) • bAnd (band) • SPEECH (conference/speech) • FIELd (field recording) • nEAr (recording closer to the musical instrument/close miking) 4. Press the [REC LEVEL] button again to display the previous screen. 5. Press the [●] (REC) button. Overdubbing starts. 6. After recording is complete and the PR7 plays the original file to the end, press the [■] (Stop) button. The PR7 calls up the HOME screen. Other operations available during overdubbing [ ] (Play) button ➔ Pause [●] (REC) button ➔ Dubbing Punch in/out ➔ Refer to the Reference Manual Owner's Manual 17
-
 1
1 -
2
-
3
-
4
-
5
-
6
-
7
-
8
-
9
-
10
-
11
-
 12
12 -
 13
13 -
 14
14 -
 15
15 -
 16
16 -
 17
17 -
 18
18 -
 19
19 -
 20
20 -
 21
21 -
 22
22 -
23
-
24
-
25
-
26
-
27
-
28
-
29
-
30
-
31
-
32
 |
 |
