Yamaha PSR-1000 Owner's Manual - Page 85
Saving Your Registration Memory Setups, REGISTRATION EDIT display
 |
View all Yamaha PSR-1000 manuals
Add to My Manuals
Save this manual to your list of manuals |
Page 85 highlights
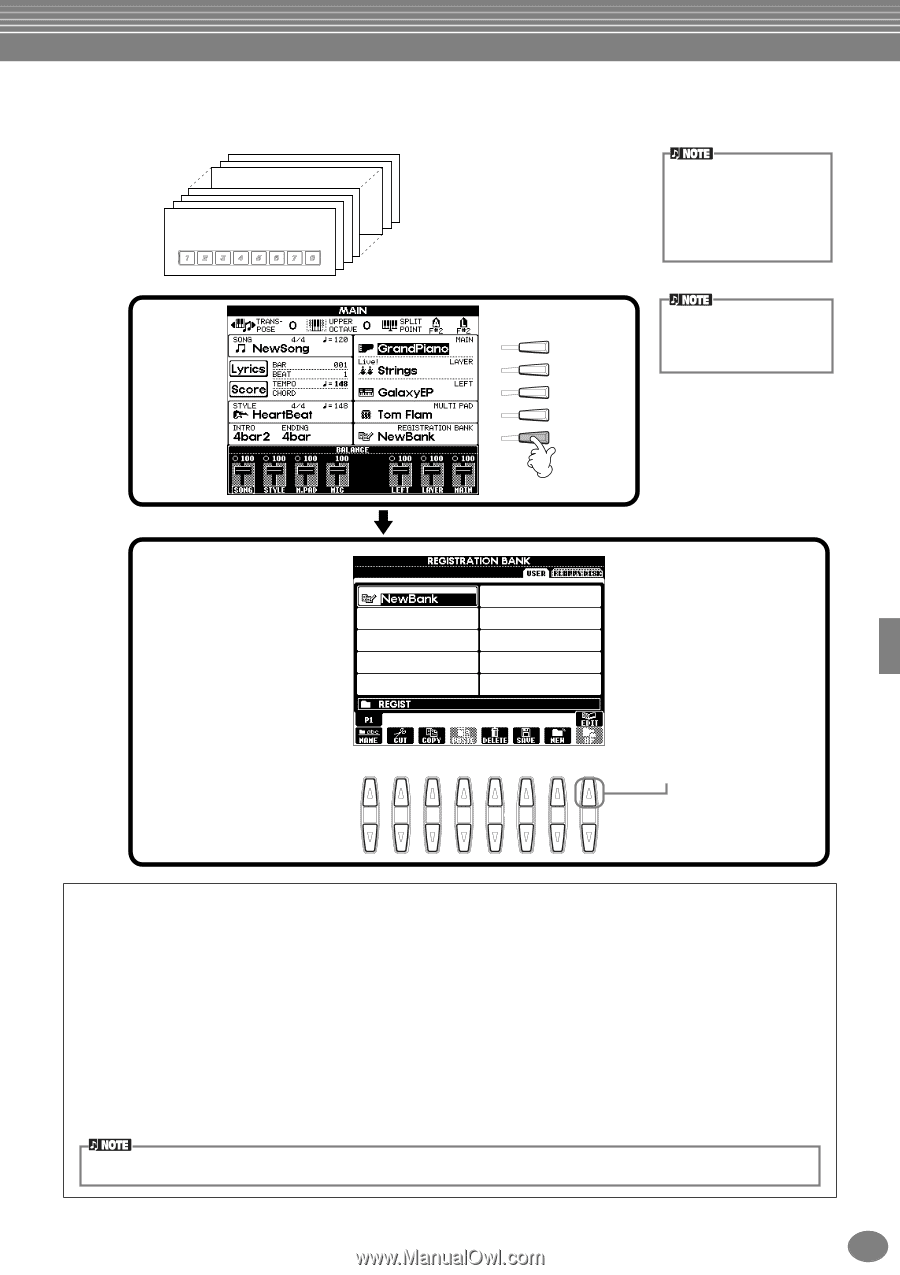
Saving and Recalling Custom Panel Setups - Registration Memory Saving Your Registration Memory Setups The settings registered to the REGISTRATION MEMORY [1]-[8] buttons are saved as a single file. BANK 01 All settings registered to buttons [1][8] are referred to as a "bank." The banks can be saved to "USER" or "FLOPPY DISK" as Registration bank files. Keep in mind that the size of the Registration bank files and the memory space they occupy depends on the amount of functions set in each. 1 Press the [DIRECT ACCESS] button and [EXIT] F button to call up the MAIN display. G H I J 2 Save the settings you've made to the Registration Memory buttons as a single Registration bank file (page 44). The REGISTRATION EDIT display appears. For details on this display, see below. 1 2 3 4 5 6 7 8 REGISTRATION EDIT display The contents of the current Registration Memory bank (REGIST.) are listed in the REGISTRATION EDIT screen. The names of the stored Registration Memory presets are shown in the display and the indicators of the relevant REGISTRATION MEMORY buttons are lit in green. From this screen, you can select, name, or delete the Registration Memory presets. Select ..........Press the [A] - [J] buttons. The REGIST. display is linked to the REGISTRATION MEMORY [1] - [8] buttons. When you select the Registration Memory preset in the display, the related button turns on (indicator is red). Name ..........This operation is the same as that in "Naming Files and Folders" (page 41) in "Basic Operations - Organizing Your Data." Delete .........This operation is the same as that in "Deleting Files/Folders" (page 43) in "Basic Operations - Organizing Your Data." The result of the Name/Delete operation will be lost when the power is turned off unless you return to the REGISTRATION BANK display by pressing the [8M] (UP) button and save the data (page 44). PSR-2000/1000 85
-
 1
1 -
2
-
3
-
4
-
5
-
6
-
7
-
8
-
9
-
10
-
11
-
12
-
13
-
14
-
15
-
16
-
17
-
18
-
19
-
20
-
21
-
22
-
23
-
24
-
25
-
26
-
27
-
28
-
29
-
30
-
31
-
32
-
33
-
34
-
35
-
36
-
37
-
38
-
39
-
40
-
41
-
42
-
43
-
44
-
45
-
46
-
47
-
48
-
49
-
50
-
51
-
52
-
53
-
54
-
55
-
56
-
57
-
58
-
59
-
60
-
61
-
62
-
63
-
64
-
65
-
66
-
67
-
68
-
69
-
70
-
71
-
72
-
73
-
74
-
75
-
76
-
77
-
78
-
79
-
 80
80 -
 81
81 -
 82
82 -
 83
83 -
 84
84 -
 85
85 -
 86
86 -
 87
87 -
 88
88 -
 89
89 -
 90
90 -
91
-
92
-
93
-
94
-
95
-
96
-
97
-
98
-
99
-
100
-
101
-
102
-
103
-
104
-
105
-
106
-
107
-
108
-
109
-
110
-
111
-
112
-
113
-
114
-
115
-
116
-
117
-
118
-
119
-
120
-
121
-
122
-
123
-
124
-
125
-
126
-
127
-
128
-
129
-
130
-
131
-
132
-
133
-
134
-
135
-
136
-
137
-
138
-
139
-
140
-
141
-
142
-
143
-
144
-
145
-
146
-
147
-
148
-
149
-
150
-
151
-
152
-
153
-
154
-
155
-
156
-
157
-
158
-
159
-
160
-
161
-
162
-
163
-
164
-
165
-
166
-
167
-
168
-
169
-
170
-
171
-
172
 |
 |