Yamaha RX V2700 MCXSP10 Manual - Page 120
Signal Info. (Input signal information), To load settings
 |
UPC - 027108927077
View all Yamaha RX V2700 manuals
Add to My Manuals
Save this manual to your list of manuals |
Page 120 highlights
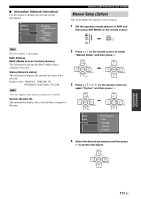
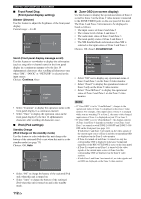
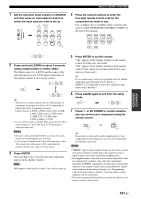
GRAPHIC USER INTERFACE (GUI) SCREEN ■ To load settings 1 Set the operation mode selector to AMP and then press SET MENU on the remote control. AMP SOURCE TV SET MENU MENU SRCH MODE 2 Press k / n / l / h on the remote control repeatedly to select "System Memory" and then press h. 3 Select "Load" and then press ENTER. Signal Info. (Input signal information) You can display the format, sampling frequency, channel, bit rate and flag data of the current input signal. You can display the format, sampling frequency, channel, bit rate and flag data of the current input signal. 1 Set the operation mode selector to AMP and then press SET MENU on the remote control. The top display appears. AMP SOURCE TV SET MENU MENU SRCH MODE Current Memory 1 Memory 2 Memory 3 Sci-Fi SpeakerCH LFE Level D-Range PEQ 3/4/0.1 0dB MAX Reset Stereo/Surround Input Select Manual Setup Auto Setup System Memory Sound Video Basic NET/USB Option 4 Press k / n on the remote control repeatedly to select the desired memory number to load and then press h. "Load: ENTER" appears in the bottom right corner of the window. 5 Press ENTER to load settings. y "Memory 1" and "Memory 2" settings can be recalled simply by pressing MEMORY 1 or MEMORY 2 on the remote control. When you press MEMORY 1, "Load Memory 1? Yes:Press Again" appears in the GUI and "Press MEMORY1!" appears in the front panel display. Press MEMORY 1 once more to recall the settings. 1 MEMORY 2 9 0 When you press MEMORY 2, "Load Memory 2? Yes:Press Again" appears in the GUI and "Press MEMORY2!" appears in the front panel display. Press MEMORY 2 once more to recall the settings. 1 MEMORY 2 9 0 2 Press k / n repeatedly to select "Signal Info.". The audio information about the input source appears in the GUI screen. PRESET/CH ENTER A/B/C/D/E 3 Press l / h repeatedly to select "Audio Info." or "Video Info.". PRESET/CH ENTER A/B/C/D/E Auto Setup System Memory Signal Info. Language Audio Info. Video Format - - - Sampling 48kHz Channel ??? Bitrate - - - Dialogue - - - Flag1 - - - Flag2 - - - Auto Setup System Memory Signal Info. Language Video Info. Audio HDMI Signal - - - - - - HDMI Resolution - - - - - - Analog Resolution 480i 480i HDMI Error - - - 116 En
-
 1
1 -
2
-
3
-
4
-
5
-
6
-
7
-
8
-
9
-
10
-
11
-
12
-
13
-
14
-
15
-
16
-
17
-
18
-
19
-
20
-
21
-
22
-
23
-
24
-
25
-
26
-
27
-
28
-
29
-
30
-
31
-
32
-
33
-
34
-
35
-
36
-
37
-
38
-
39
-
40
-
41
-
42
-
43
-
44
-
45
-
46
-
47
-
48
-
49
-
50
-
51
-
52
-
53
-
54
-
55
-
56
-
57
-
58
-
59
-
60
-
61
-
62
-
63
-
64
-
65
-
66
-
67
-
68
-
69
-
70
-
71
-
72
-
73
-
74
-
75
-
76
-
77
-
78
-
79
-
80
-
81
-
82
-
83
-
84
-
85
-
86
-
87
-
88
-
89
-
90
-
91
-
92
-
93
-
94
-
95
-
96
-
97
-
98
-
99
-
100
-
101
-
102
-
103
-
104
-
105
-
106
-
107
-
108
-
109
-
110
-
111
-
112
-
113
-
114
-
 115
115 -
 116
116 -
 117
117 -
 118
118 -
 119
119 -
 120
120 -
 121
121 -
 122
122 -
 123
123 -
 124
124 -
 125
125 -
126
-
127
-
128
-
129
-
130
-
131
-
132
-
133
-
134
-
135
-
136
-
137
-
138
-
139
-
140
-
141
-
142
-
143
-
144
-
145
-
146
-
147
-
148
-
149
-
150
-
151
-
152
-
153
-
154
-
155
-
156
-
157
-
158
-
159
-
160
-
161
-
162
-
163
-
164
-
165
-
166
-
167
-
168
-
169
-
170
-
171
-
172
-
173
-
174
 |
 |