Yamaha RX V2700 MCXSP10 Manual - Page 99
Volume Trim Volume trimming, Rename Rename, type CAPITAL/SMALL/ MARK.
 |
UPC - 027108927077
View all Yamaha RX V2700 manuals
Add to My Manuals
Save this manual to your list of manuals |
Page 99 highlights
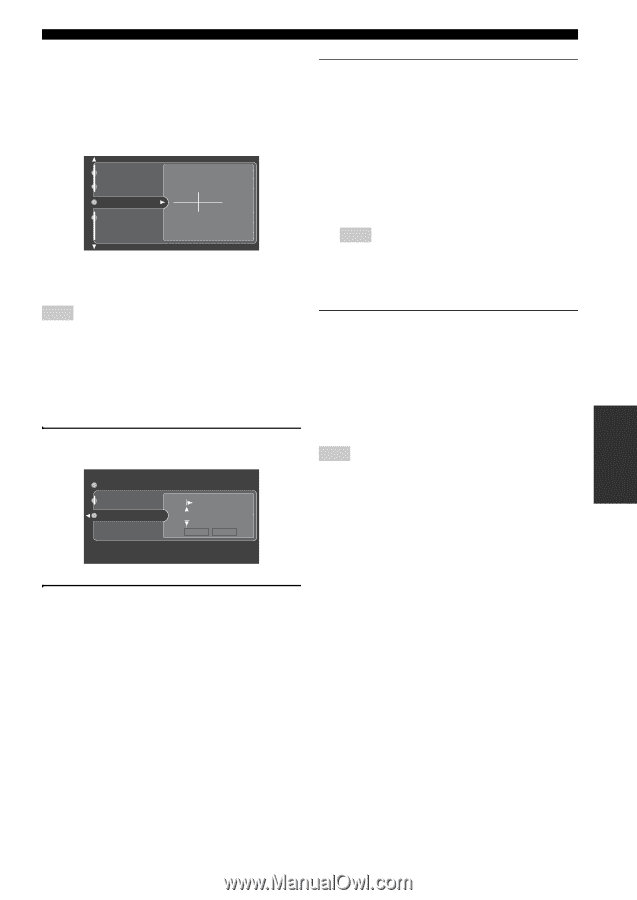
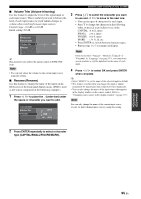
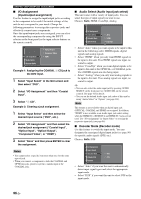
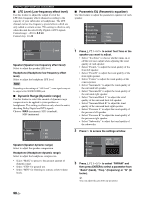
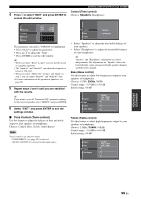
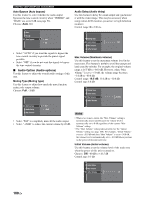
■ Volume Trim (Volume trimming) Use this feature to adjust the level of the signal input at each input source. This is useful if you want to balance the level of each input source to avoid sudden changes in volume when switching between input sources. Control range: -6.0 dB to +6.0 dB Initial setting: 0.0 dB Audio Select Decoder Mode Volume Trim Rename 0.0dB y This parameter also affects the signals output at ZONE OUT jacks. Note • You can only adjust the volume for the current input source using this setting. ■ Rename (Rename) Use this feature to change the name of the inputs in the GUI screen or the front panel display menu. (DVD is used as the source component in the following example.) 1 Press l / h to place the _ (under-bar) under the space or character you want to edit. Decoder Mode Volume Trim Rename CAPITAL DVD OK RESET GRAPHIC USER INTERFACE (GUI) SCREEN 3 Press k / n to select the character you want to use and l / h to move to the next one. • You can use up to 8 characters for each input. • Press n to change the character in the following order, or press k to go in the reverse order: CAPITAL A to Z, space SMALL a to z, space FIGURE 0 to 9, space MARK etc. • Press ENTER to switch between character types. • Repeat steps 1 to 3 to rename each input. Note Even if you select "Français", "Deutsch", Espaсol" or in "Language" (see page 117), you cannot use accent symbols or cyrillic alphabets for the name of each input. 4 Press l / h to select OK and press ENTER when complete. y • Select "RESET" to set the name of the selected input to default. • This feature is useful when you change the input or output assignment for digital jacks and component video input jacks. • You can also change the name of the input source that appears in the display window on the remote control. Refer to "Changing source names in the display window" on page 123". Note You can only change the name of the current input source (except for multi channel input sources) using this setting. 2 Press ENTER repeatedly to select a character type (CAPITAL/SMALL/FIGURE/MARK). ADVANCED OPERATION 95 En
-
 1
1 -
2
-
3
-
4
-
5
-
6
-
7
-
8
-
9
-
10
-
11
-
12
-
13
-
14
-
15
-
16
-
17
-
18
-
19
-
20
-
21
-
22
-
23
-
24
-
25
-
26
-
27
-
28
-
29
-
30
-
31
-
32
-
33
-
34
-
35
-
36
-
37
-
38
-
39
-
40
-
41
-
42
-
43
-
44
-
45
-
46
-
47
-
48
-
49
-
50
-
51
-
52
-
53
-
54
-
55
-
56
-
57
-
58
-
59
-
60
-
61
-
62
-
63
-
64
-
65
-
66
-
67
-
68
-
69
-
70
-
71
-
72
-
73
-
74
-
75
-
76
-
77
-
78
-
79
-
80
-
81
-
82
-
83
-
84
-
85
-
86
-
87
-
88
-
89
-
90
-
91
-
92
-
93
-
 94
94 -
 95
95 -
 96
96 -
 97
97 -
 98
98 -
 99
99 -
 100
100 -
 101
101 -
 102
102 -
 103
103 -
 104
104 -
105
-
106
-
107
-
108
-
109
-
110
-
111
-
112
-
113
-
114
-
115
-
116
-
117
-
118
-
119
-
120
-
121
-
122
-
123
-
124
-
125
-
126
-
127
-
128
-
129
-
130
-
131
-
132
-
133
-
134
-
135
-
136
-
137
-
138
-
139
-
140
-
141
-
142
-
143
-
144
-
145
-
146
-
147
-
148
-
149
-
150
-
151
-
152
-
153
-
154
-
155
-
156
-
157
-
158
-
159
-
160
-
161
-
162
-
163
-
164
-
165
-
166
-
167
-
168
-
169
-
170
-
171
-
172
-
173
-
174
 |
 |