Yamaha TSS-10 Owner's Manual - Page 13
ADJUSTING SPEAKER OUTPUT LEVELS, Using the test tone
 |
View all Yamaha TSS-10 manuals
Add to My Manuals
Save this manual to your list of manuals |
Page 13 highlights
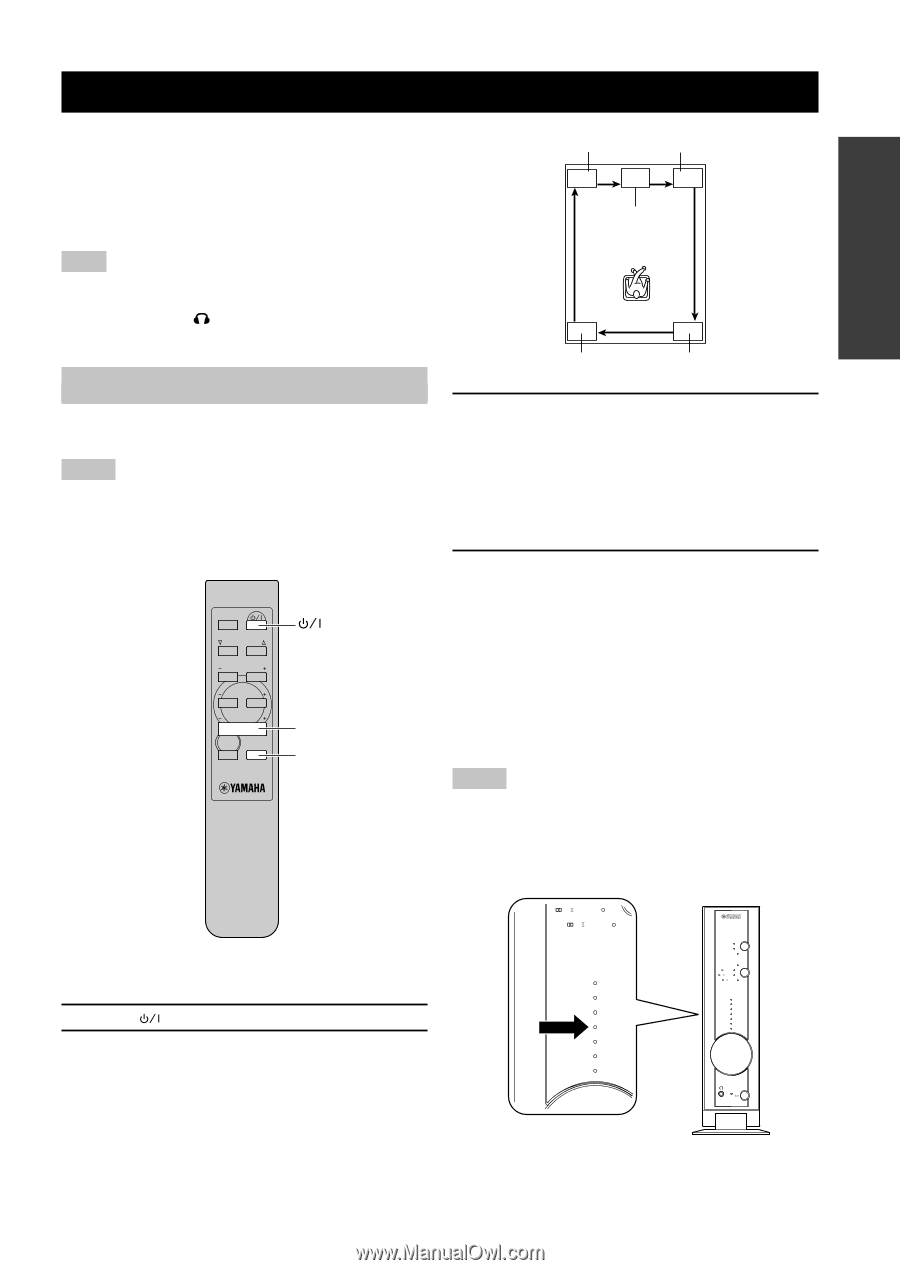
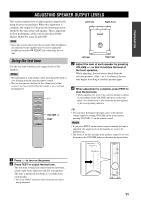
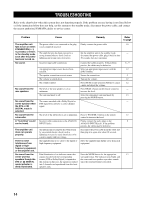
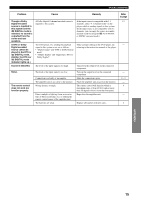
PREPARATION ADJUSTING SPEAKER OUTPUT LEVELS This section explains how to adjust speaker output levels using the test tone generator. When this adjustment is complete, the output level heard at the listening position should be the same from each speaker. This is important for best performance of the various decoders (Dolby Digital, Dolby Pro Logic II and DTS). Note • Since this system cannot enter the test mode while headphones are connected to the amplifier unit, be sure to unplug the headphones from the SILENT jack when using the test tone. Using the test tone Use the test tone to balance the output levels of the speakers. Notes • The adjustment of each speaker output level should be made at your listening position using the remote control. • The test tone may not be heard if the volume level of this system is too low. Confirm that the volume is set to a proper listening level. INPUT MODE REAR S.WOOFER VOLUME MUTE TEST VOLUME +/- TEST Left front Right front Center Left rear Right rear 3 Adjust the level of each speaker by pressing VOLUME +/- so that it matches the level of the front speakers. While adjusting, the test tone is heard from the selected speakers. After - or + is released, the test tone begins travelling to another speaker again. 4 When adjustment is complete, press TEST to stop the test tone. • While adjusting, the level of the selected speaker is shown by the lighting of the VOLUME indicators on the front panel. The default level is also shown by the dim lighting of the corresponding indicator. y • You can enjoy listening to the input source at the desired volume simply by turning VOLUME on the front panel or pressing VOLUME +/- on the remote control. Notes • If you press INPUT on the remote control when the test tone is outputted, the output levels of all channels are reset to the default levels. • The levels of the left and right front speakers cannot be set over the point on the VOLUME indicator shown in the figure below. 1 Press to turn on the power. 2 Press TEST to output the test tone. The test tone is heard (in order) from the left front, center, right front, right rear and left rear speaker. The tone is produced for about 2.5 seconds from each speaker. • All of the INPUT indicators flash while the test tone is being outputted. PL MOVIE PL MUSIC VOLUME TRIM 7 +6 6 +4 5 +2 4 0 3 -2 2 -4 1 -6 INPUT DIGITAL 1 DIGITAL 2 ANALOG MODE DTS DIGITAL PL MOVIE PL MUSIC VOLUME TRIM 7 +6 6 +4 5 +2 4 0 3 -2 2 -4 1 -6 SILENT STANDBY/ON English 11
-
 1
1 -
2
-
3
-
4
-
5
-
6
-
7
-
 8
8 -
 9
9 -
 10
10 -
 11
11 -
 12
12 -
 13
13 -
 14
14 -
 15
15 -
 16
16 -
 17
17 -
 18
18 -
19
-
20
 |
 |