Yamaha TYROS Owners Manual - Page 163
tting it into the, TYROS as shown in the illustration.
 |
View all Yamaha TYROS manuals
Add to My Manuals
Save this manual to your list of manuals |
Page 163 highlights
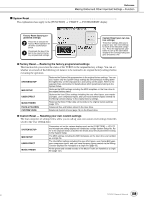
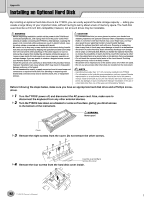
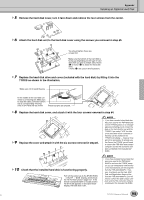
Appendix Installing an Optional Hard Disk 5 Remove the hard disk cover, turn it face down and remove the four screws from the center. 6 Attach the hard disk unit to the hard disk cover using the screws you removed in step #5. You should tighten these two screws first. Make sure the bottom of the hard disk is facing up. Depending on the type of hard disk drive you plan to install, select holes (A) or holes (B) to attach the hard disk drive. * Holes (A) are used in this illustration. 7 Replace the hard disk drive and cover (included with the hard disk) by fitting it into the TYROS as shown in the illustration. Make sure not to bend the pins. In the middle of the hard disk connector is a "missing" pin. Make sure to align the cable connector (which has a corresponding "missing" hole) to the hard disk as shown. These four pins are unused. 8 Replace the hard disk cover, and attach it with the four screws removed in step #4. 9 Replace the cover and attach it with the six screws removed in step #3. • If you have installed a hard disk that was once used for the PSR-8000 and turn the TYROS' power on, a message appears prompting you to convert the data on the hard disk for use with the TYROS. If you select "YES," the files on the hard disk will be converted so that they can be viewed on the TYROS' LCD display - however, they will not be accessible. To actually use the files on the TYROS, you will need to convert the PSR-8000 data using a computer and the File Converter software (contained in the included CDROM). 10 Check that the installed hard disk is functioning properly. Turn on the power, go to the [FUNCTION] → UTILITY → DISK display, and execute the HD Format function (page 157). If the format is completed with no trouble and the HD drive tab appears on the Open/Save display, the hard disk is OK. • If you have installed the hard disk that was once used for the PSR-9000/ 9000Pro and turn the TYROS' power on, you can immediately view the files on the hard disk and use the song files from the PSR-9000/9000Pro. However, to properly use the style, Multi Pad, and Registration Memory files from the PSR-9000/9000Pro, you will need to convert the data using a computer and the File Converter software (contained in the included CD-ROM). 163 TYROS Owner's Manual 161
-
 1
1 -
2
-
3
-
4
-
5
-
6
-
7
-
8
-
9
-
10
-
11
-
12
-
13
-
14
-
15
-
16
-
17
-
18
-
19
-
20
-
21
-
22
-
23
-
24
-
25
-
26
-
27
-
28
-
29
-
30
-
31
-
32
-
33
-
34
-
35
-
36
-
37
-
38
-
39
-
40
-
41
-
42
-
43
-
44
-
45
-
46
-
47
-
48
-
49
-
50
-
51
-
52
-
53
-
54
-
55
-
56
-
57
-
58
-
59
-
60
-
61
-
62
-
63
-
64
-
65
-
66
-
67
-
68
-
69
-
70
-
71
-
72
-
73
-
74
-
75
-
76
-
77
-
78
-
79
-
80
-
81
-
82
-
83
-
84
-
85
-
86
-
87
-
88
-
89
-
90
-
91
-
92
-
93
-
94
-
95
-
96
-
97
-
98
-
99
-
100
-
101
-
102
-
103
-
104
-
105
-
106
-
107
-
108
-
109
-
110
-
111
-
112
-
113
-
114
-
115
-
116
-
117
-
118
-
119
-
120
-
121
-
122
-
123
-
124
-
125
-
126
-
127
-
128
-
129
-
130
-
131
-
132
-
133
-
134
-
135
-
136
-
137
-
138
-
139
-
140
-
141
-
142
-
143
-
144
-
145
-
146
-
147
-
148
-
149
-
150
-
151
-
152
-
153
-
154
-
155
-
156
-
157
-
 158
158 -
 159
159 -
 160
160 -
 161
161 -
 162
162 -
 163
163 -
 164
164 -
 165
165 -
 166
166 -
 167
167 -
 168
168 -
169
-
170
-
171
-
172
-
173
-
174
-
175
-
176
 |
 |