Yamaha YAS-105 Owners Manual - Page 7
Installation - wall mount
 |
View all Yamaha YAS-105 manuals
Add to My Manuals
Save this manual to your list of manuals |
Page 7 highlights
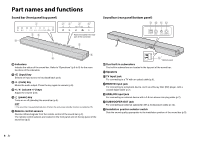
Installation The orientation of the sound bar and the appropriate remote control sensor depend on the installation location. Installing the sound bar on a TV cabinet, etc. 1 Slide the installation position selector switch on the bottom panel of the sound bar to the T (for Tabletop) side (T, by default). The sound quality appropriate to the installation will be set. 2 Place the sound bar on a TV cabinet, etc., so that the keys are facing the wall. Installation position selector switch (bottom panel) Remote control sensor (front panel) Cautions • Do not stack the sound bar and a BD player or other device directly on each other. Doing so may cause a malfunction due to vibrations. • Do not hold the speaker portion (fabric parts) on the front and the top of the sound bar. • The sound bar contains non-magnetic shielding speakers. Do not place magnetically sensitive items (hard disk drive, etc.) near the sound bar. • Depending on your installation environment, it may be better to connect the sound bar and external devices (such as a TV) before installing the sound bar. • Do not place the sound bar within 50 mm (2") of the TV. Attaching the sound bar to a wall 1 Slide the installation position selector switch on the bottom panel of the sound bar to the W (for Wall mount) side. The sound quality appropriate to the installation will be set. 2 Following "How to install on the wall" below, install the sound bar so that the keys face upwards. Remote control sensor (top panel) Keys Installation position selector switch (bottom panel) 2 Remove the mounting template from the wall, then install commercially available screws (as illustrated below) at the points marked on the wall. 7 to 9 mm (1/4" to 3/8") 10 to 12 mm (3/8" to 1/2") 4 mm (#8) 20 mm (3/4") or more 3 Peel off the backing paper from the spacers and attach the adhesive face to the sound bar as illustrated below. Spacer 4 Hang the sound bar on the screws. Cautions • When installing the sound bar on a wall, all installation work must be performed by a qualified contractor or dealer. The customer must never attempt to perform this installation work. Improper or inadequate installation could cause the sound bar to fall, resulting in personal injury. • To avoid falling the sound bar, attach the sound bar to a dry wall. • Make sure you use commercially available screws that can support the weight of the installation (specified in Step 2 on the right). Using clamps other than specified screws, such as short screws, nails, and two-sided tape, may cause the sound bar to fall. How to install on the wall 1 Attach the mounting template on a wall and mark for the screw holes. Tapes or thumbtacks Mounting template (supplied) Screw holes Mounting holes on bottom of sound bar Cautions • Fix the cables in place where they will not become loose. If your foot or hand accidentally gets caught on a loose cable, the sound bar may fall. • Check that the sound bar is fixed securely after the installation. Yamaha will bear no responsibility for any accidents caused by improper installations. En 5
-
 1
1 -
 2
2 -
 3
3 -
 4
4 -
 5
5 -
 6
6 -
 7
7 -
 8
8 -
 9
9 -
 10
10 -
 11
11 -
 12
12 -
13
-
14
-
15
-
16
-
17
-
18
-
19
-
20
-
21
-
22
-
23
 |
 |
