Yamaha YSP 1100 Owner's Manual - Page 10
CONTROLS AND FUNCTIONS, Front panel - remote
 |
UPC - 027108926490
View all Yamaha YSP 1100 manuals
Add to My Manuals
Save this manual to your list of manuals |
Page 10 highlights
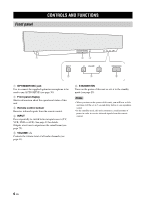
CONTROLS AND FUNCTIONS CONTROLS AND FUNCTIONS Front panel 1 23 INPUT VOLUME + STANDBY/ON 4 5 6 1 OPTIMIZER MIC jack Use to connect the supplied optimizer microphone to be used to run AUTO SETUP (see page 30). 2 Front panel display Shows information about the operational status of this unit. 3 Remote control sensor Receives infrared signals from the remote control. 4 INPUT Press repeatedly to switch between input sources (TV, VCR, DVD or AUX). See page 39 for details. Outputs a test tone to experience the sound beam (see page 72). 5 VOLUME -/+ Controls the volume level of all audio channels (see page 41). 6 STANDBY/ON Turns on the power of this unit or sets it to the standby mode (see page 25). Notes • When you turn on the power of this unit, you will hear a click and there will be a 4 to 5-second delay before it can reproduce sound. • In the standby mode, this unit consumes a small amount of power in order to receive infrared-signals from the remote control. 6 En
-
 1
1 -
2
-
3
-
4
-
 5
5 -
 6
6 -
 7
7 -
 8
8 -
 9
9 -
 10
10 -
 11
11 -
 12
12 -
 13
13 -
 14
14 -
 15
15 -
16
-
17
-
18
-
19
-
20
-
21
-
22
-
23
-
24
-
25
-
26
-
27
-
28
-
29
-
30
-
31
-
32
-
33
-
34
-
35
-
36
-
37
-
38
-
39
-
40
-
41
-
42
-
43
-
44
-
45
-
46
-
47
-
48
-
49
-
50
-
51
-
52
-
53
-
54
-
55
-
56
-
57
-
58
-
59
-
60
-
61
-
62
-
63
-
64
-
65
-
66
-
67
-
68
-
69
-
70
-
71
-
72
-
73
-
74
-
75
-
76
-
77
-
78
-
79
-
80
-
81
-
82
-
83
-
84
-
85
-
86
-
87
-
88
-
89
-
90
-
91
-
92
-
93
-
94
-
95
-
96
-
97
-
98
-
99
-
100
 |
 |
