ZyXEL GS1500-24P User Guide - Page 53
Time Setting, IP Setting Screen
 |
View all ZyXEL GS1500-24P manuals
Add to My Manuals
Save this manual to your list of manuals |
Page 53 highlights
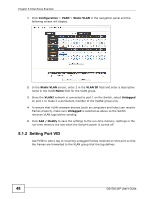
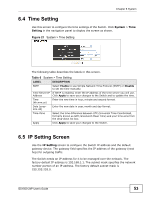
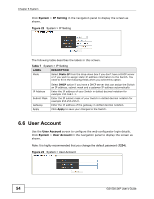
Chapter 6 System 6.4 Time Setting Use this screen to configure the time settings of the Switch. Click System > Time Setting in the navigation panel to display the screen as shown. Figure 21 System > Time Setting The following table describes the labels in this screen. Table 6 System > Time Setting LABEL DESCRIPTION SNTP Select Enable to use Simple Network Time Protocol (SNTP) or Disable to set the time manually. Time Server IP If SNTP is enabled, enter the IP address of the time server you will use. Address Click Apply to save your changes to the Switch and to update the time. Time (hh:mm:ss) Enter the new time in hour, minute and second format. Date (yyyymm-dd) Enter the new date in year, month and day format. Time Zone Select the time difference between UTC (Universal Time Coordinated, formerly known as GMT, Greenwich Mean Time) and your time zone from the drop-down list box. Apply Click Apply to save your changes to the Switch. 6.5 IP Setting Screen Use the IP Setting screen to configure the Switch IP address and the default gateway device. The gateway field specifies the IP address of the gateway (next hop) for outgoing traffic. The Switch needs an IP address for it to be managed over the network. The factory default IP address is 192.168.1.1. The subnet mask specifies the network number portion of an IP address. The factory default subnet mask is 255.255.255.0. GS1500-24P User's Guide 53
-
 1
1 -
2
-
3
-
4
-
5
-
6
-
7
-
8
-
9
-
10
-
11
-
12
-
13
-
14
-
15
-
16
-
17
-
18
-
19
-
20
-
21
-
22
-
23
-
24
-
25
-
26
-
27
-
28
-
29
-
30
-
31
-
32
-
33
-
34
-
35
-
36
-
37
-
38
-
39
-
40
-
41
-
42
-
43
-
44
-
45
-
46
-
47
-
 48
48 -
 49
49 -
 50
50 -
 51
51 -
 52
52 -
 53
53 -
 54
54 -
 55
55 -
 56
56 -
 57
57 -
 58
58 -
59
-
60
-
61
-
62
-
63
-
64
-
65
-
66
-
67
-
68
-
69
-
70
-
71
-
72
-
73
-
74
-
75
-
76
-
77
-
78
-
79
-
80
-
81
-
82
-
83
-
84
-
85
-
86
-
87
-
88
-
89
-
90
-
91
-
92
-
93
-
94
-
95
-
96
-
97
-
98
-
99
-
100
-
101
-
102
-
103
-
104
-
105
-
106
-
107
-
108
-
109
-
110
-
111
-
112
-
113
-
114
-
115
-
116
-
117
-
118
-
119
-
120
-
121
-
122
-
123
-
124
-
125
-
126
-
127
-
128
-
129
-
130
-
131
-
132
-
133
-
134
-
135
-
136
-
137
-
138
-
139
-
140
-
141
-
142
-
143
-
144
-
145
-
146
-
147
-
148
-
149
-
150
-
151
-
152
-
153
-
154
-
155
-
156
-
157
-
158
-
159
-
160
-
161
-
162
-
163
-
164
-
165
-
166
-
167
-
168
-
169
-
170
-
171
-
172
-
173
-
174
-
175
-
176
-
177
-
178
-
179
-
180
-
181
-
182
-
183
-
184
-
185
-
186
-
187
-
188
-
189
-
190
-
191
-
192
-
193
-
194
-
195
-
196
-
197
-
198
-
199
-
200
-
201
-
202
-
203
-
204
-
205
-
206
-
207
-
208
-
209
-
210
-
211
-
212
-
213
-
214
-
215
-
216
-
217
-
218
 |
 |
