2011 Ford Taurus Owner Guide 3rd Printing - Page 302
2011 Ford Taurus Manual
Page 302 highlights
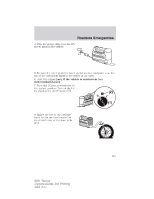
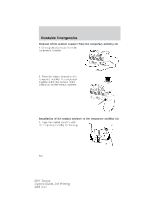
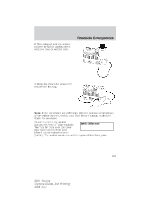
Roadside Emergencies Note: When the sealing compound is first added into the tire, the air pressure gauge reading on the compressor unit may indicate a higher value; this is normal and should be no reason for concern. The pressure will drop after about 30 seconds of operation. The tire pressure has to be checked with the compressor in the OFF position to get the correct tire pressure reading. WARNING: Do not stand directly over the temporary mobility kit while inflating the tire. If you notice any unusual bulges or deformations in the tire's sidewall during inflation, stop and call roadside assistance. WARNING: If the tire doesn't inflate to the recommended tire pressure within 15 minutes, stop and call roadside assistance. 9. When the recommended tire pressure is reached, turn off the kit by pressing the on/off button; disconnect the kit from the tire valve and the power point. Re-install the valve cap on the tire valve, place the tube cap on the metal connector, and return the kit to the stowage area. 10. Immediately and cautiously, drive the vehicle 4 miles (6 km) to distribute the sealant evenly inside the tire. Do not exceed 50 mph (80 km/h). Note: If you experience any unusual vibration, ride disturbance or noise while driving, reduce your speed until you can safely pull off to the side of the road to call for roadside assistance. Do not proceed to the second stage of this operation. 11. After 4 miles (6 km), stop and check the tire pressure. See Second stage: Checking tire pressure. Second stage: Checking tire pressure Check the air pressure of your tires as follows: 1. Remove the valve cap from the tire valve. 2. Unhook the black hose from the side of the compressor and fasten firmly on the valve stem by turning clockwise. WARNING: If you are proceeding from the First stage: Reinflating the tire with sealing compound and air section and have injected sealant in the tire and the pressure is below 20 psi (1.4 bar), stop and call roadside assistance. If tire pressure is above 20 psi (1.4 bar), continue to the next step. 302 2011 Taurus Owners Guide, 3rd Printing USA (fus)
-
 1
1 -
2
-
3
-
4
-
5
-
6
-
7
-
8
-
9
-
10
-
11
-
12
-
13
-
14
-
15
-
16
-
17
-
18
-
19
-
20
-
21
-
22
-
23
-
24
-
25
-
26
-
27
-
28
-
29
-
30
-
31
-
32
-
33
-
34
-
35
-
36
-
37
-
38
-
39
-
40
-
41
-
42
-
43
-
44
-
45
-
46
-
47
-
48
-
49
-
50
-
51
-
52
-
53
-
54
-
55
-
56
-
57
-
58
-
59
-
60
-
61
-
62
-
63
-
64
-
65
-
66
-
67
-
68
-
69
-
70
-
71
-
72
-
73
-
74
-
75
-
76
-
77
-
78
-
79
-
80
-
81
-
82
-
83
-
84
-
85
-
86
-
87
-
88
-
89
-
90
-
91
-
92
-
93
-
94
-
95
-
96
-
97
-
98
-
99
-
100
-
101
-
102
-
103
-
104
-
105
-
106
-
107
-
108
-
109
-
110
-
111
-
112
-
113
-
114
-
115
-
116
-
117
-
118
-
119
-
120
-
121
-
122
-
123
-
124
-
125
-
126
-
127
-
128
-
129
-
130
-
131
-
132
-
133
-
134
-
135
-
136
-
137
-
138
-
139
-
140
-
141
-
142
-
143
-
144
-
145
-
146
-
147
-
148
-
149
-
150
-
151
-
152
-
153
-
154
-
155
-
156
-
157
-
158
-
159
-
160
-
161
-
162
-
163
-
164
-
165
-
166
-
167
-
168
-
169
-
170
-
171
-
172
-
173
-
174
-
175
-
176
-
177
-
178
-
179
-
180
-
181
-
182
-
183
-
184
-
185
-
186
-
187
-
188
-
189
-
190
-
191
-
192
-
193
-
194
-
195
-
196
-
197
-
198
-
199
-
200
-
201
-
202
-
203
-
204
-
205
-
206
-
207
-
208
-
209
-
210
-
211
-
212
-
213
-
214
-
215
-
216
-
217
-
218
-
219
-
220
-
221
-
222
-
223
-
224
-
225
-
226
-
227
-
228
-
229
-
230
-
231
-
232
-
233
-
234
-
235
-
236
-
237
-
238
-
239
-
240
-
241
-
242
-
243
-
244
-
245
-
246
-
247
-
248
-
249
-
250
-
251
-
252
-
253
-
254
-
255
-
256
-
257
-
258
-
259
-
260
-
261
-
262
-
263
-
264
-
265
-
266
-
267
-
268
-
269
-
270
-
271
-
272
-
273
-
274
-
275
-
276
-
277
-
278
-
279
-
280
-
281
-
282
-
283
-
284
-
285
-
286
-
287
-
288
-
289
-
290
-
291
-
292
-
293
-
294
-
295
-
296
-
 297
297 -
 298
298 -
 299
299 -
 300
300 -
 301
301 -
 302
302 -
 303
303 -
 304
304 -
 305
305 -
 306
306 -
 307
307 -
308
-
309
-
310
-
311
-
312
-
313
-
314
-
315
-
316
-
317
-
318
-
319
-
320
-
321
-
322
-
323
-
324
-
325
-
326
-
327
-
328
-
329
-
330
-
331
-
332
-
333
-
334
-
335
-
336
-
337
-
338
-
339
-
340
-
341
-
342
-
343
-
344
-
345
-
346
-
347
-
348
-
349
-
350
-
351
-
352
-
353
-
354
-
355
-
356
-
357
-
358
-
359
-
360
-
361
-
362
-
363
-
364
-
365
-
366
-
367
-
368
-
369
-
370
-
371
-
372
-
373
-
374
-
375
-
376
-
377
-
378
-
379
-
380
-
381
-
382
-
383
-
384
-
385
-
386
-
387
-
388
-
389
-
390
-
391
-
392
-
393
-
394
-
395
-
396
-
397
-
398
-
399
-
400
-
401
-
402
-
403
-
404
-
405
-
406
-
407
-
408
 |
 |