2004 Honda S2000 Owner's Manual - Page 48
2004 Honda S2000 Manual
Page 48 highlights
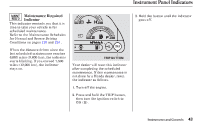
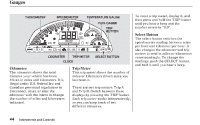
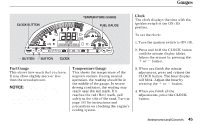
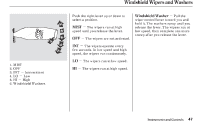
Gauges TEMPERATURE GAUGE CLOCK BUTTON FUEL GAUGE Clock The clock displays the time with the ignition switch in the ON (II) position. To set the clock: 1. Turn the ignition switch to ON (II). 2. Press and hold the CLOCK button until the minute display blinks. Adjust the minute by pressing the or button. BUTTON BUTTON CLOCK Fuel Gauge This shows how much fuel you have. It may show slightly more or less than the actual amount. NOTICE: Avoid driving with an extremely low f uel level. Running out of f uel could cause the engine to misf ire, damaging the catalytic converter. Temperature Gauge This shows the temperature of the engine's coolant. During normal operation, the reading should be in the middle of the gauge. In severe driving conditions, the reading may reach near the red mark. If it reaches the red (Hot) mark, pull safely to the side of the road. Turn to page 163 for instructions and precautions on checking the engine's cooling system. 3. When you finish the minute adjustment, press and release the CLOCK button. The hour display will blink. Adjust the hour by pressing the or button. 4. When you finish all the adjustments, press the CLOCK button. Instruments and Controls 45
-
 1
1 -
2
-
3
-
4
-
5
-
6
-
7
-
8
-
9
-
10
-
11
-
12
-
13
-
14
-
15
-
16
-
17
-
18
-
19
-
20
-
21
-
22
-
23
-
24
-
25
-
26
-
27
-
28
-
29
-
30
-
31
-
32
-
33
-
34
-
35
-
36
-
37
-
38
-
39
-
40
-
41
-
42
-
 43
43 -
 44
44 -
 45
45 -
 46
46 -
 47
47 -
 48
48 -
 49
49 -
 50
50 -
 51
51 -
 52
52 -
 53
53 -
54
-
55
-
56
-
57
-
58
-
59
-
60
-
61
-
62
-
63
-
64
-
65
-
66
-
67
-
68
-
69
-
70
-
71
-
72
-
73
-
74
-
75
-
76
-
77
-
78
-
79
-
80
-
81
-
82
-
83
-
84
-
85
-
86
-
87
-
88
-
89
-
90
-
91
-
92
-
93
-
94
-
95
-
96
-
97
-
98
-
99
-
100
-
101
-
102
-
103
-
104
-
105
-
106
-
107
-
108
-
109
-
110
-
111
-
112
-
113
-
114
-
115
-
116
-
117
-
118
-
119
-
120
-
121
-
122
-
123
-
124
-
125
-
126
-
127
-
128
-
129
-
130
-
131
-
132
-
133
-
134
-
135
-
136
-
137
-
138
-
139
-
140
-
141
-
142
-
143
-
144
-
145
-
146
-
147
-
148
-
149
-
150
-
151
-
152
-
153
-
154
-
155
-
156
-
157
-
158
-
159
-
160
-
161
-
162
-
163
-
164
-
165
-
166
-
167
-
168
-
169
-
170
-
171
-
172
-
173
-
174
-
175
-
176
-
177
-
178
-
179
-
180
-
181
-
182
-
183
-
184
-
185
-
186
-
187
-
188
-
189
-
190
-
191
-
192
-
193
-
194
-
195
-
196
-
197
-
198
-
199
-
200
-
201
-
202
-
203
-
204
-
205
-
206
-
207
-
208
-
209
 |
 |
