2008 Infiniti G37 Owner's Manual - Page 397

2008 Infiniti G37 Manual

Page 397 highlights

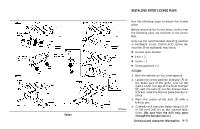
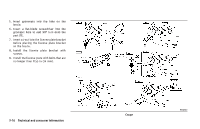
VEHICLE LOADING INFORMATION COUPE 1. Park the vehicle on flat, level ground. 2. Locate the center position indicator A on the lower part of the grille. Measure straight down from the edge where the bumper and grille meet to the aligning holes B , keeping the tape measure lined up with the center position indicator. 3. Mark the holes B with a felt-tip pen. 4. Carefully drill the two aligning holes B using a 0.39 in (10 mm) drill bit at the marked locations. (Be sure that the drill only goes through the bumper fascia.) 5. Line up the bosses C or license plate bracket with the holes and hold the license plate bracket in place. 6. Mark the center of the holes D with a felt-tip pen. 7. Carefully drill the two pilot holes using a 0.39 in (10 mm) drill bit at the marked locations. (Be sure that the drill only goes through the bumper fascia.) 8. Insert grommets into the hole on the fascia. 9. Insert a flat-blade screwdriver into the grommet hole to add 90° turn onto the part E . 10. Insert a J-nut into the license plate bracket before placing the license plate bracket on the fascia. 11. Install the license plate bracket with screws. 12. Install the license plate with bolts that are no longer than 0.55 in (14 mm). WARNING ● It is extremely dangerous to ride in a cargo area inside the vehicle. In a collision, people riding in these areas are more likely to be seriously injured or killed. ● Do not allow people to ride in any area of vehicle that is not equipped with seats and seat belts. ● Be sure everyone in your vehicle is in a seat and using a seat belt properly. TERMS It is important to familiarize yourself with the following terms before loading your vehicle: ● Curb Weight (actual weight of your vehicle) - vehicle weight including: standard and optional equipment, fluids, emergency tools, and spare tire assembly. This weight does not include passengers and cargo. Technical and consumer information 9-17

  • 1
  • 2
  • 3
  • 4
  • 5
  • 6
  • 7
  • 8
  • 9
  • 10
  • 11
  • 12
  • 13
  • 14
  • 15
  • 16
  • 17
  • 18
  • 19
  • 20
  • 21
  • 22
  • 23
  • 24
  • 25
  • 26
  • 27
  • 28
  • 29
  • 30
  • 31
  • 32
  • 33
  • 34
  • 35
  • 36
  • 37
  • 38
  • 39
  • 40
  • 41
  • 42
  • 43
  • 44
  • 45
  • 46
  • 47
  • 48
  • 49
  • 50
  • 51
  • 52
  • 53
  • 54
  • 55
  • 56
  • 57
  • 58
  • 59
  • 60
  • 61
  • 62
  • 63
  • 64
  • 65
  • 66
  • 67
  • 68
  • 69
  • 70
  • 71
  • 72
  • 73
  • 74
  • 75
  • 76
  • 77
  • 78
  • 79
  • 80
  • 81
  • 82
  • 83
  • 84
  • 85
  • 86
  • 87
  • 88
  • 89
  • 90
  • 91
  • 92
  • 93
  • 94
  • 95
  • 96
  • 97
  • 98
  • 99
  • 100
  • 101
  • 102
  • 103
  • 104
  • 105
  • 106
  • 107
  • 108
  • 109
  • 110
  • 111
  • 112
  • 113
  • 114
  • 115
  • 116
  • 117
  • 118
  • 119
  • 120
  • 121
  • 122
  • 123
  • 124
  • 125
  • 126
  • 127
  • 128
  • 129
  • 130
  • 131
  • 132
  • 133
  • 134
  • 135
  • 136
  • 137
  • 138
  • 139
  • 140
  • 141
  • 142
  • 143
  • 144
  • 145
  • 146
  • 147
  • 148
  • 149
  • 150
  • 151
  • 152
  • 153
  • 154
  • 155
  • 156
  • 157
  • 158
  • 159
  • 160
  • 161
  • 162
  • 163
  • 164
  • 165
  • 166
  • 167
  • 168
  • 169
  • 170
  • 171
  • 172
  • 173
  • 174
  • 175
  • 176
  • 177
  • 178
  • 179
  • 180
  • 181
  • 182
  • 183
  • 184
  • 185
  • 186
  • 187
  • 188
  • 189
  • 190
  • 191
  • 192
  • 193
  • 194
  • 195
  • 196
  • 197
  • 198
  • 199
  • 200
  • 201
  • 202
  • 203
  • 204
  • 205
  • 206
  • 207
  • 208
  • 209
  • 210
  • 211
  • 212
  • 213
  • 214
  • 215
  • 216
  • 217
  • 218
  • 219
  • 220
  • 221
  • 222
  • 223
  • 224
  • 225
  • 226
  • 227
  • 228
  • 229
  • 230
  • 231
  • 232
  • 233
  • 234
  • 235
  • 236
  • 237
  • 238
  • 239
  • 240
  • 241
  • 242
  • 243
  • 244
  • 245
  • 246
  • 247
  • 248
  • 249
  • 250
  • 251
  • 252
  • 253
  • 254
  • 255
  • 256
  • 257
  • 258
  • 259
  • 260
  • 261
  • 262
  • 263
  • 264
  • 265
  • 266
  • 267
  • 268
  • 269
  • 270
  • 271
  • 272
  • 273
  • 274
  • 275
  • 276
  • 277
  • 278
  • 279
  • 280
  • 281
  • 282
  • 283
  • 284
  • 285
  • 286
  • 287
  • 288
  • 289
  • 290
  • 291
  • 292
  • 293
  • 294
  • 295
  • 296
  • 297
  • 298
  • 299
  • 300
  • 301
  • 302
  • 303
  • 304
  • 305
  • 306
  • 307
  • 308
  • 309
  • 310
  • 311
  • 312
  • 313
  • 314
  • 315
  • 316
  • 317
  • 318
  • 319
  • 320
  • 321
  • 322
  • 323
  • 324
  • 325
  • 326
  • 327
  • 328
  • 329
  • 330
  • 331
  • 332
  • 333
  • 334
  • 335
  • 336
  • 337
  • 338
  • 339
  • 340
  • 341
  • 342
  • 343
  • 344
  • 345
  • 346
  • 347
  • 348
  • 349
  • 350
  • 351
  • 352
  • 353
  • 354
  • 355
  • 356
  • 357
  • 358
  • 359
  • 360
  • 361
  • 362
  • 363
  • 364
  • 365
  • 366
  • 367
  • 368
  • 369
  • 370
  • 371
  • 372
  • 373
  • 374
  • 375
  • 376
  • 377
  • 378
  • 379
  • 380
  • 381
  • 382
  • 383
  • 384
  • 385
  • 386
  • 387
  • 388
  • 389
  • 390
  • 391
  • 392
  • 393
  • 394
  • 395
  • 396
  • 397
  • 398
  • 399
  • 400
  • 401
  • 402
  • 403
  • 404
  • 405
  • 406
  • 407
  • 408
  • 409
  • 410
  • 411
  • 412
  • 413
  • 414
  • 415
  • 416

COUPE
1. Park the vehicle on flat, level ground.
2. Locate the center position indicator
°
A
on
the
lower
part
of
the
grille.
Measure
straight down from the edge where the
bumper and grille meet to the aligning
holes
°
B
, keeping the tape measure lined
up with the center position indicator.
3. Mark the holes
°
B
with a felt-tip pen.
4. Carefully drill the two aligning holes
°
B
using a 0.39 in (10 mm) drill bit at the
marked locations.
(Be sure that the drill
only goes through the bumper fascia.)
5. Line up the bosses
°
C
or license plate
bracket with the holes and hold the li-
cense plate bracket in place.
6. Mark the center of the holes
°
D
with a
felt-tip pen.
7. Carefully drill the two pilot holes using a
0.39 in (10 mm) drill bit at the marked
locations.
(Be sure that the drill only goes
through the bumper fascia.)
8. Insert
grommets
into
the
hole
on
the
fascia.
9. Insert a flat-blade screwdriver into the
grommet hole to add 90° turn onto the
part
°
E
.
10. Insert
a
J-nut
into
the
license
plate
bracket before placing the license plate
bracket on the fascia.
11. Install
the
license
plate
bracket
with
screws.
12. Install the license plate with bolts that
are no longer than 0.55 in (14 mm).
WARNING
It is extremely dangerous to ride in a
cargo area inside the vehicle. In a col-
lision, people riding in these areas
are more likely to be seriously injured
or killed.
Do not allow people to ride in any area
of vehicle that is not equipped with
seats and seat belts.
Be sure everyone in your vehicle is in
a seat and using a seat belt properly.
TERMS
It
is
important
to
familiarize
yourself
with the following terms before loading
your vehicle:
Curb Weight (actual weight of your
vehicle)
-
vehicle
weight
including:
standard and optional equipment, flu-
ids, emergency tools, and spare tire
assembly. This weight
does not
in-
clude passengers and cargo.
VEHICLE LOADING INFORMATION
Technical and consumer information
9-17